Arduino BLE Example Explained Step by Step
Arduino BLE Example Code Explained
In this tutorial series, I will give you a basic idea you need to know about Bluetooth Low Energy and I will show you how you can make Arduino BLE Chipset to send and receive data wirelessly from mobile phones and other Arduino boards. Let’s Get Started.
Why not make a PCB for your Project?
Making a PCB for your DIY project is not hard nowadays. PCB helps to get rid of all messy wires and stuff and gives your project an awesome look. And it’s cool to make your own PCB for your project right?
I use Altium Designer to draw the circuit and design the PCB. It is a powerful tool that can be used to design and create your own PCBs for your project as well as complex and multiplayer PCBs for industrial use. Here is the link to the Altium trial version. So make sure you check it out.
I use Altium Designer to draw the circuit and design the PCB. It is a powerful tool that can be used to design and create your own PCBs for your project as well as complex and multiplayer PCBs for industrial use. Here is the link to the Altium trial version. So make sure you check it out.
Arduino Nano 33 BLE Sense
Today, I am here with a new version of Arduino Nano – Arduino Nano 33 BLE Sense, Nano with BLE connectivity focussing on IOT, which is packed with a wide variety of sensors such as 9 axis Inertial Measurement Unit, pressure, light, and even gestures sensors and a microphone.
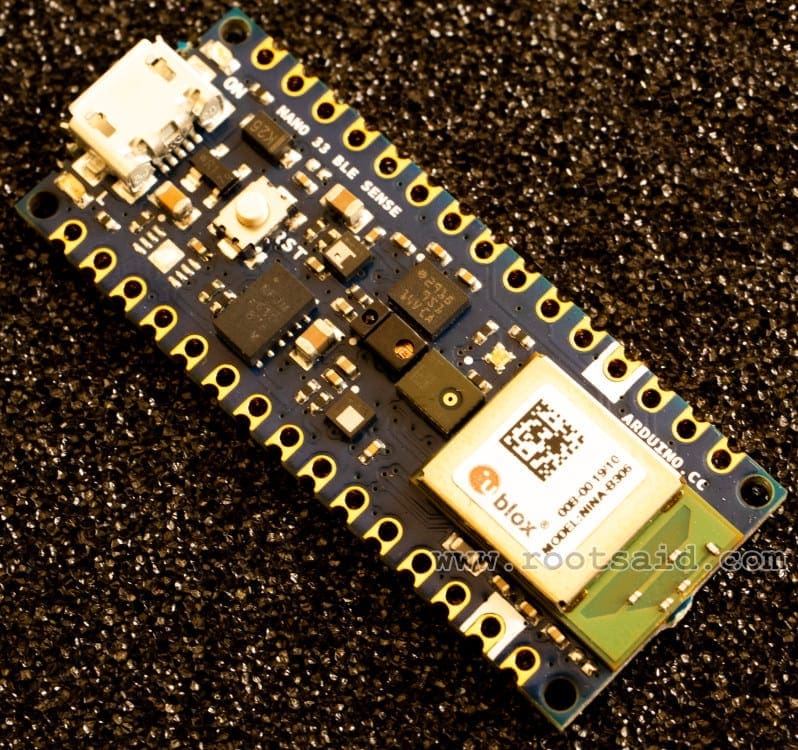
It is powered by Nina B306 module that supports BLE as well as Bluetooth 5 connection. The inbuilt Bluetooth module consumes very low power and can be easily accessed using Arduino libraries. This makes it easier to program and enable wireless connectivity to any of your projects in no time. You won’t have to use external Bluetooth modules to add Bluetooth capability to your project. Save space and power.
Arduino BLE – Bluetooth Low Energy Introduction
BLE is a version of Bluetooth which is optimized for very low power consuming situations with very low data rate. We can even operate these devices using a coin cell for weeks or even months.
Arduino have a wonderful introduction to BLE but here in this post, I will give you a brief introduction for you to get started with BLE communication.
Basically, there are two types of devices when we consider a BLE communication block.
- The Peripheral Device
- The Central Device
Peripheral Device is like a Notice board, from where we can read data from various notices or pin new notices to the board. It posts data for all devices that needs this information.
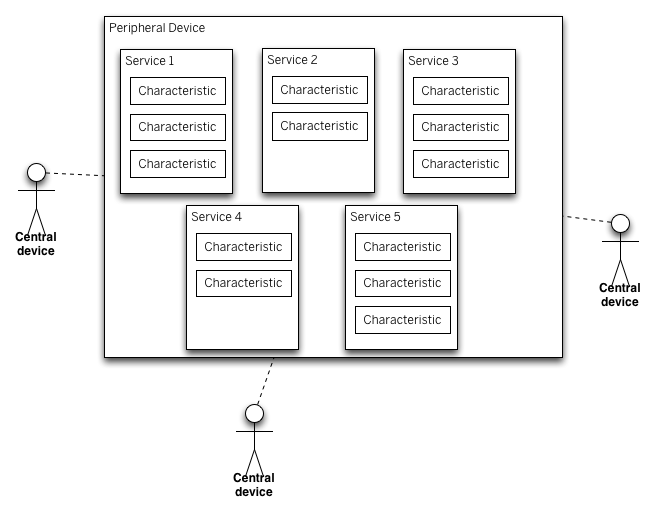
Central Devices are like people who are reading notices from the notice board. Multiple users can read and get data from the notice board at the same time. Similarly multiple central devices can read data from the peripheral device at the same time.
The information that is given by the Peripheral devices are structured as Services. And These services are further divided into characteristics. Think of Services as different notices in the notice board and services as different paragraphs in each notice board.
If Accelerometer is a service, then their values X, Y and Z can be three characteristics.
Now let’s take a look at a simple Arduino BLE example.
Arduino BLE Example 1 – Battery Level Indicator
In this example, I will explain how you can read the level of a battery connected to pin A0 of an Arduino using a smartphone via BLE. This is the code here. This is pretty much the same as that of the example code for Battery Monitor with minor changes. I will explain it for you.
First you have to install the library ArduinoBLE from the library manager.
Just go to Sketch -> Include Library -> Manage Library and Search for ArduinoBLE and simply install it.
Arduino BLE Tutorial Battery Level Indicator Code
#include <ArduinoBLE.h>
BLEService batteryService("1101");
BLEUnsignedCharCharacteristic batteryLevelChar("2101", BLERead | BLENotify);

void setup() {
Serial.begin(9600);
while (!Serial);

pinMode(LED_BUILTIN, OUTPUT);
if (!BLE.begin())
{
Serial.println("starting BLE failed!");
while (1);
}

BLE.setLocalName("BatteryMonitor");
BLE.setAdvertisedService(batteryService);
batteryService.addCharacteristic(batteryLevelChar);
BLE.addService(batteryService);

BLE.advertise();
Serial.println("Bluetooth device active, waiting for connections...");
}

void loop()
{
BLEDevice central = BLE.central();

if (central)
{
Serial.print("Connected to central: ");
Serial.println(central.address());
digitalWrite(LED_BUILTIN, HIGH);

while (central.connected()) {

      int battery = analogRead(A0);
      int batteryLevel = map(battery, 0, 1023, 0, 100);
      Serial.print("Battery Level % is now: ");
      Serial.println(batteryLevel);
      batteryLevelChar.writeValue(batteryLevel);
      delay(200);

}
}
digitalWrite(LED_BUILTIN, LOW);
Serial.print("Disconnected from central: ");
Serial.println(central.address());
}
Arduino Bluetooth Battery Level Indicator Code Explained
#include <ArduinoBLE.h>
BLEService batteryService("1101");
BLEUnsignedCharCharacteristic batteryLevelChar("2101", BLERead | BLENotify);
The first line of the code is to include the ArduinoBLE.h file. Then we will declare the Battery Service as well the battery level characteristics here. Here we will be giving two permissions – BLERead and BLENotify.
BLERead will allow central devices (Mobile Phone) to read data from the Peripheral device (Arduino). And BLENotify allows remote clients to get notifications if this characteristic changes.
Now we will jump on to the Setup function.
Serial.begin(9600);
while (!Serial);
pinMode(LED_BUILTIN, OUTPUT);
if (!BLE.begin()) {
Serial.println("starting BLE failed!");
while (1);
}
Here it will initialize the Serial Communication and BLE and wait for serial monitor to open.
Set a local name for the BLE device. This name will appear in advertising packets and can be used by remote devices to identify this BLE device.
BLE.setLocalName("BatteryMonitor");
BLE.setAdvertisedService(batteryService);
batteryService.addCharacteristic(batteryLevelChar);
BLE.addService(batteryService);
Here we will add and set the value for the Service UUID and the Characteristic.
BLE.advertise();
Serial.println("Bluetooth device active, waiting for connections...");
And here, we will Start advertising BLE. It will start continuously transmitting BLE advertising packets and will be visible to remote BLE central devices until it receives a new connection.
BLEDevice central = BLE.central();
if (central) {
Serial.print("Connected to central: ");
Serial.println(central.address());
digitalWrite(LED_BUILTIN, HIGH);
And here, the loop function. Once everything is setup and have started advertising, the device will wait for any central device. Once it is connected, it will display the MAC address of the device and it will turn on the builtin LED.
while (central.connected()) {
int battery = analogRead(A0);
int batteryLevel = map(battery, 0, 1023, 0, 100);
Serial.print("Battery Level % is now: ");
Serial.println(batteryLevel);
batteryLevelChar.writeValue(batteryLevel);
delay(200);
}
Now, it will start to read analog voltage from A0, which will be a value in between 0 and 1023 and will map it with in the 0 to 100 range. It will print out the battery level in the serial monitor and the value will be written for the batteryLevelchar charecteristics and waits for 200 ms. After that the whole loop will be executed again as long as the central device is connected to this peripheral device.
digitalWrite(LED_BUILTIN, LOW);
Serial.print("Disconnected from central: ");
Serial.println(central.address());
Once it is disconnected, a message will be shown on the central device and LED will be turned off.
Installing the App for Android
In your Android smartphone, install the app “nRF Connect”. Open it and start the scanner. You will see the device “Battery Monitor” in the device list. Now tap on connect and a new tab will be opened.

Go to that and you will see the services and characteristics of the device.Tap on Battery service and you will the battery levels being read from the Arduino

In the next post, I will show you how you can send inbuilt sensor values such as accelerometer, gyroscope, color sensor and gesture sensor from the Arduino to your phone as well as another Arduino via BLE.

Thanks a lot for your explanation. It’s really helpful. I am looking forward for your next post on sending the built-in sensor values to phone and sending parameters back from phone.
The compilation of this program on for Nano BLE 33 sense takes a really long time 5-10mins. Is this normal ? if not how can I get over this problem.
Your code does not compile.
I get lots of errors like “ATT.cpp: warning: variable length array is used”. Please help!
your code works great. it took some time to upload but it did work.
I copy and pasted the code into Arduino 1.8.10 on windows 10 and I got
“‘oldBatteryLevel’ was not declared in this scope” as an error. I love the idea of this tutorial, but sadly I couldn’t figure out the problem.
Can you check you have all the right libraries?
got the same error. Even when the library ArduinoBLE is included
Could you please comment out the line that have the oldBatteryLevel in it?
or copy the updated code that is in this page now?
Just add
int oldBatteryLevel;
before setup() and it will work.
Hi Mr.Jithin
Plese yours addvice since the code did not compile
Arduino: 1.8.10 (Windows 7), Board: “Arduino Nano 33 BLE”
C:\Program Files (x86)\Arduino\arduino-builder -dump-prefs -logger=machine -hardware C:\Program Files (x86)\Arduino\hardware -hardware C:\Users\user\AppData\Local\Arduino15\packages -tools C:\Program Files (x86)\Arduino\tools-builder -tools C:\Program Files (x86)\Arduino\hardware\tools\avr -tools C:\Users\user\AppData\Local\Arduino15\packages -built-in-libraries C:\Program Files (x86)\Arduino\libraries -libraries C:\Users\user\Documents\Arduino\libraries -fqbn=arduino:mbed:nano33ble -vid-pid=0X2341_0X805A -ide-version=10810 -build-path C:\Users\user\AppData\Local\Temp\arduino_build_759269 -warnings=none -build-cache C:\Users\user\AppData\Local\Temp\arduino_cache_896543 -prefs=build.warn_data_percentage=75 -prefs=runtime.tools.arm-none-eabi-gcc.path=C:\Users\user\AppData\Local\Arduino15\packages\arduino\tools\arm-none-eabi-gcc\7-2017q4 -prefs=runtime.tools.arm-none-eabi-gcc-7-2017q4.path=C:\Users\user\AppData\Local\Arduino15\packages\arduino\tools\arm-none-eabi-gcc\7-2017q4 -prefs=runtime.tools.openocd.path=C:\Users\user\AppData\Local\Arduino15\packages\arduino\tools\openocd\0.10.0-arduino9 -prefs=runtime.tools.openocd-0.10.0-arduino9.path=C:\Users\user\AppData\Local\Arduino15\packages\arduino\tools\openocd\0.10.0-arduino9 -prefs=runtime.tools.bossac.path=C:\Users\user\AppData\Local\Arduino15\packages\arduino\tools\bossac\1.9.1-arduino1 -prefs=runtime.tools.bossac-1.9.1-arduino1.path=C:\Users\user\AppData\Local\Arduino15\packages\arduino\tools\bossac\1.9.1-arduino1 -verbose C:\Users\user\Documents\Arduino\sketch_dec25b\sketch_dec25b.ino
loading libs from C:\Users\user\Documents\Arduino\libraries: loading library from C:\Users\user\Documents\Arduino\libraries\Adafruit_nRF8001: loading library.properties: Error reading file (C:\Users\user\Documents\Arduino\libraries\Adafruit_nRF8001\library.properties:0): Invalid line format, should be ‘key=value’
Error compiling for board Arduino Nano 33 BLE.
The problem is with the library. you have to install ArduinoBLE library
Thank you a lot for the nice tutorial. Everything is working fine now. When I tried for the first time, Unfortunately I’m facing the same problem like reported by Jazzik. In my modified code, but also when just copy pasting your example. Might be due to I’m completely new to Arduino, but I have no clue, where “oldBatteryLevel” is initialized or comes from.
The latest code you uploaded in the website corrects this issue. now it is working fine.
I have use your code, battery level indicator into Arduino 1.8.10 on windows 10 and I got
“‘oldBatteryLevel’ was not declared in this scope” as an error, I have used updated library file ArduinoBLE. I request, please let me know what may goes wrong ?
The ode has been updated. Could you please check out the latest code now?
Thanks a lot man.. Its working perfectly.. Well explained.. Cool!
Thanks alot dude!
Thanks for the tutorial, I just received the ble sense and I’m new to this. Your instructions are appreciated. It seems most every tutorial I find about arduino is geared towards those that aren’t absolute beginner’s or are on blinky, hello world ect. I really hope you continue your next tutorial on the sensors. Thanks.
This looks very helpful as I’m about to receive and try out an Arduino nano 33 BLE sense.
I didn’t understand in the first line why you declare it as: –
BLEDevice central = BLE.central(); rather than
BLEDevice peripheral = BLE.peripheral();
Does this matter?
Thanks Peter
I spent way too much time troubleshooting this to get it to work for me. In the end, the problem was with the line in the setup function: while (!Serial);
You did explain that this is waiting for the serial monitor window to be opened. I didn’t realize the program will hang on that line until the serial port is opened, preventing the device from being discovered.
I just commented out that line and now I can connect to the board as soon as it powers up without having to connect to the serial port first. Hopefully this helps out someone having this problem!
Thank you!
i have a tesla and everytime i walk up to the car w/ my smartphone in the pocket and pull the door handle, the car auto unlocks. so the tesla knows, based on bluetooth, that i am near. can you explain how this is done in terms of central and peripheral devices? Notice the phone doesn’t have to have the tesla app running for tesla to detect my phone.
The power level of the transmitted signal can be found out at the receiving end. When we are near it, the transmitted power of the Bluetooth signal will be high. I think that is how it finds out proximity. This can be done using Arduino also.
When I try to run this code on the Arduino when I am not connected to the computer, I am not able to connect to the Arduino with nRF Connect. Can you explain why this is and how to use the Bluetooth on the Arduino when not connected to a computer?
Thank you for the videos!
How do we read peripheral BLE device data using the Arduino as the Central Device?