Moisture Sensor Using Arduino
In this post, I will show you how you can use a moisture sensor with arduino to measure the moisture/water content of a place. This can be used to sense rainfall in smart weather sensors, water content of the soil for smart irrigation projects etc. Arduino can be easily programmed to work with this moisture sensor, can be easily programmed and put it in action in no time.
Components Needed[AdSense-C]
- Arduino Uno
- Moisture Sensor
- Breadboard for connections
- Connecting wires

Sponsor Link
This Project is Sponsored by UTSource. UTSource is a professional electronic components supplier.
About Moisture Sensor
The moisture sensor we are using here is a simple one which is compatible with arduino.

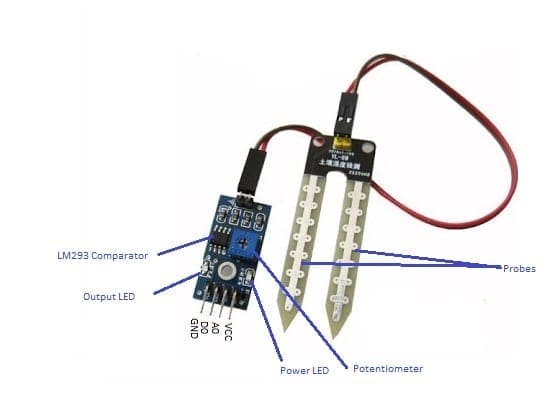
A typical Soil Moisture Sensor consist of two components. A two-legged Lead, that goes into the
soil or anywhere else where water content has to be measured. This has two header pins which
connect to an Amplifier/ A-D circuit which is in turn connected to the Arduino.
The Amplifier has a Vin, Gnd, Analog and Digital Data Out Pins. This means that you can get the
values in both Analog and Digital forms.
How Does the Moisture Sensor Work
Most soil moisture sensors are designed to estimate soil volumetric water content based on the dielectric constant (soil bulk permittivity) of the soil. The dielectric constant can be thought of as the soil’s ability to transmit electricity. The dielectric constant of soil increases as the water content of the soil increases. This response is due to the fact that the dielectric constant of water is much larger than the other soil components, including air. Thus, measurement of the dielectric constant gives a predictable estimation of water content.
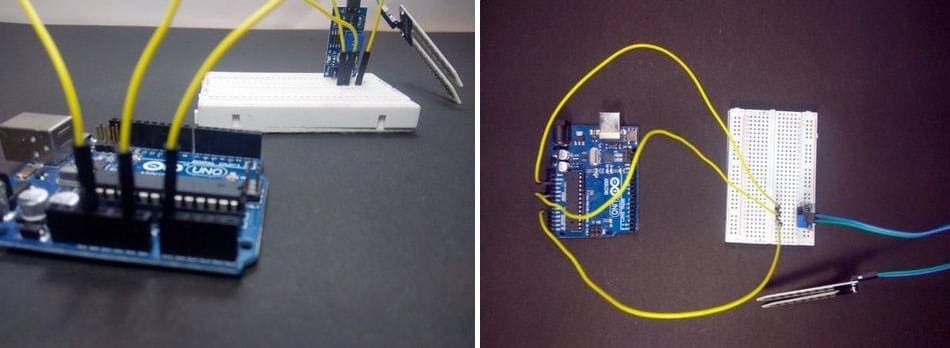
Connections
• Connect the two pins from the Sensor Probes to the two pins on the Amplifier circuit via hook up
wires.
• Connect the Vcc from the Amplifier to the 3.3V pin on the Arduino and the Gnd pin to the Gnd pin on the Arduino.
• Now connect the Analog Data Pin to the A0 pin on the Arduino (Since I’m interested in Analog Data).
Refer the Pictures and build the circuit.
The Code
For simply reading the values I’ll be using the AnalogRead sketch. You can modify the code as per your requirements.
void setup() {
Serial.begin(9600); // initialize serial communication at 9600 bits per second:
}
// the loop routine runs over and over again forever:

void loop() {

int sensorValue = analogRead(A0);// read the input on analog pin 0:

Serial.println(sensorValue);// print out the value you read:
delay(1); // delay in between reads for stability
}
[AdSense-A]After verifying the code, upload it to the board and open the serial monitor. You will see the sensor data on the monitor being changed when you dip the sensor leads in water and when dry.
Project By:
WhatsApp: +2348034736624
[AdSense-B]
Rate the Project
Did you find this useful? Help us to improve by rating this page.


Nice project. The only problem is that after a few weeks the probes will corrode because of the current which flows from one probe to the other via the ground. Therefore you can better use a capacitive soil moisture sensor like this one: https://www.aliexpress.com/item/NEW-Capacitive-soil-moisture-sensor-not-easy-to-corrode-wide-voltage-wire-for-arduino/32832538686.html