Ultrasonic Sensor Arduino Distance Measurement & Result on LCD Screen
In this project, we will use an Arduino Uno and an ultrasonic sensor to measure the distance and display that measured value on an LCD screen using Arduino. Here you will get complete tutorial, codes and instructions to make one yourself.

Sponsor Link
This Project is Sponsored by UTSource. UTSource is a professional electronic components supplier.
Components Required
- Ultrasonic Sensor HC-SR04
- Arduino Board
- Breadboard and Jump Wires


What is UltraSonic Sensor?
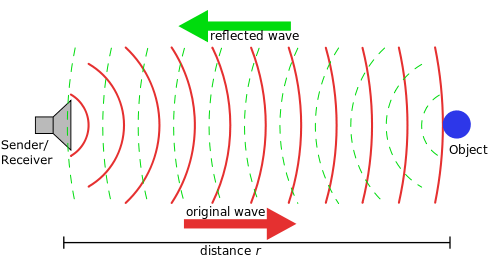
Ultra Sonic sensor is a device which is capable of transmitting and receiving ultra sonic sound waves out into the air and calculates the distance from the sensor to the obstacle by making use of the time required for the sound wave to reach back the sensor.
How UltraSonic Sensor works?
It emits an ultrasound at 40 000 Hz which travels through the air and if there is an object or obstacle on its path It will bounce back to the module. Considering the travel time and the speed of the sound you can calculate the distance.
Pins
The HC-SR04 Ultrasonic Module has 4 pins, Ground, VCC, Trig and Echo. The Ground and the VCC pins of the module needs to be connected to the Ground and the 5 volts pins on the Arduino Board respectively and the trig and echo pins to any Digital I/O pin on the Arduino Board.
Working
In order to generate the ultrasound you need to set the Trig on a High State for 10 μs. That will send out an 8 cycle sonic burst which will travel at the speed sound and it will be received in the Echo pin.
The Echo pin will output the time in microseconds the sound wave traveled.
For example, if the object is 10 cm away from the sensor, and the speed of the sound is 340 m/s or 0.034 cm/μs the sound wave will need to travel about 294 u seconds.[AdSense-C]
But what you will get from the Echo pin will be double that number because the sound wave needs to travel forward and bounce backward. So in order to get the distance in cm we need to multiply the received travel time value from the echo pin by 0.034 and divide it by 2.
Instructions
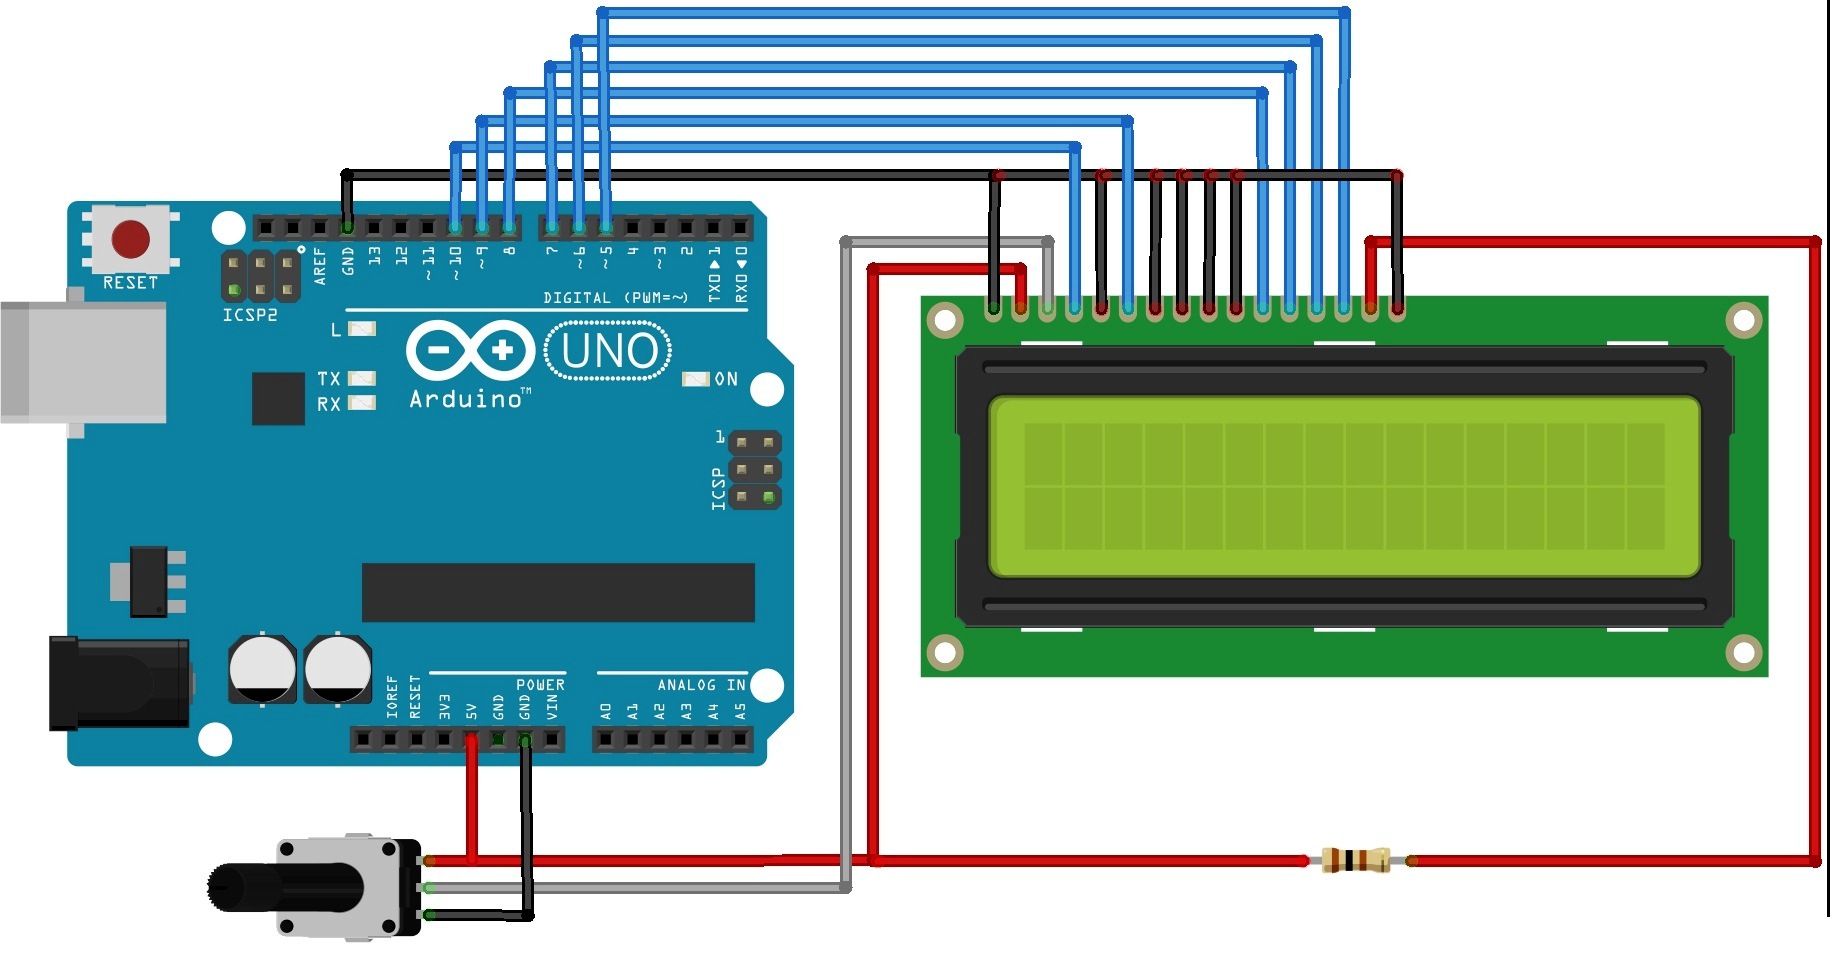
Step 1 – Connections
Connections are pretty simple and you can use a jumper wire to connect the Arduino to Ultra Sonic Sensor
Ultra Sonic Sensor —- Arduino
- VCC —– 5V Out of Arduino
- Gnd —–Gnd of Arduino
- Trigger —– Pin 9
- Echo —– Pin 10
LCD —– Arduino
Step 2 – Coding
The Code for Displaying Distance in Serial Monitor
// defines pins numbers
const int trigPin = 9;
const int echoPin = 10;

// defines variables
long duration;
int distance;
void setup() {
pinMode(trigPin, OUTPUT); // Sets the trigPin as an Output
pinMode(echoPin, INPUT); // Sets the echoPin as an Input
Serial.begin(9600); // Starts the serial communication
}
void loop() {
// Clears the trigPin
digitalWrite(trigPin, LOW);
delayMicroseconds(2);

// Sets the trigPin on HIGH state for 10 micro seconds
digitalWrite(trigPin, HIGH);
delayMicroseconds(10);
digitalWrite(trigPin, LOW);

// Reads the echoPin, returns the sound wave travel time in
microseconds
duration = pulseIn(echoPin, HIGH);
// Calculating the distance
distance= duration*0.034/2;

// Prints the distance on the Serial Monitor
Serial.print("Distance: ");
Serial.println(distance);
}
[AdSense-A]Code Explained
First you have to define the Trig and Echo pins. In this case they are the pins number 9 and 10 on the Arduino Board and they are named trigPin and echoPin. Then you need a Long variable, named “duration” for the travel time that you will get from the sensor and an integer variable for the distance.
In the setup you have to define the trigPin as an output and the echoPin as an Input and also start the serial communication for showing the results on the serial monitor.
In the loop first you have to make sure that the trigPin is clear so you have to set that pin on a LOW State for just 2 μs. Now for generating the Ultra sound wave we have to set the trigPin on HIGH State for 10 μs. Using the pulseIn() function you have to read the travel time and put that value into the variable “duration”.
This function has 2 parameters, the first one is the name of the echo pin and for the second one you can write either HIGH or LOW. In this case, HIGH means that the pulsIn() function will wait for the pin to go HIGH caused by the bounced sound wave and it will start timing, then it will wait for the pin to go LOW when the sound wave will end which will stop the timing. At the end the function will return the length of the pulse in microseconds. For getting the distance we will multiply the duration by 0.034 and divide it by 2 as we explained this equation previously.
At the end we will print the value of the distance on the Serial Monitor.
Code To Display te Distance on LCD Screen
#include <LiquidCrystal.h> // includes the LiquidCrystal Library
LiquidCrystal lcd(1, 2, 4, 5, 6, 7); // Creates an LCD object. Parameters: (rs, enable, d4, d5, d6, d7)
const int trigPin = 9;
const int echoPin = 10;
long duration;
int distanceCm, distanceInch;
void setup() {
lcd.begin(16,2); // Initializes the interface to the LCD screen, and specifies the dimensions (width and height) of the display
pinMode(trigPin, OUTPUT);
pinMode(echoPin, INPUT);
}
void loop() {
digitalWrite(trigPin, LOW);
delayMicroseconds(2);
digitalWrite(trigPin, HIGH);
delayMicroseconds(10);
digitalWrite(trigPin, LOW);

duration = pulseIn(echoPin, HIGH);
distanceCm= duration*0.034/2;
distanceInch = duration*0.0133/2;
lcd.setCursor(0,0); // Sets the location at which subsequent text written to the LCD will be displayed
lcd.print("Distance: "); // Prints string "Distance" on the LCD
lcd.print(distanceCm); // Prints the distance value from the sensor
lcd.print(" cm");
delay(10);
lcd.setCursor(0,1);
lcd.print("Distance: ");
lcd.print(distanceInch);
lcd.print(" inch");
delay(10);
}
This will display the result in inch as well as cm.
Step 3 – Code Upload
Now connect your arduino Board to the PC, select the correct board and port number from the Tools tab of Arduino IDE and click on upload.

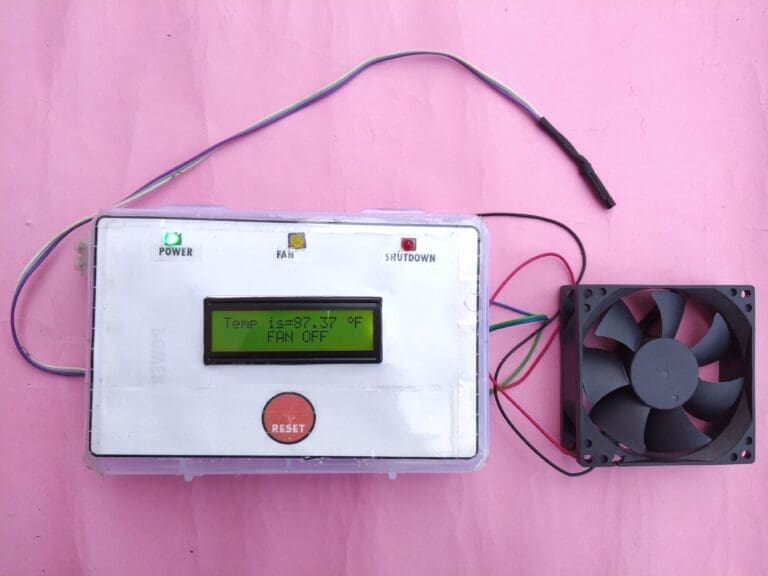
Once the code is uploaded, bring an obstacle in front of the sensor and try moving it back and forth. You will see the reading on the LCD screen varying.
Project By:
WhatsApp: +2348034736624
[AdSense-B]
Rate the Project
Did you find this useful? Help us to improve by rating this page.


It’s very easy to find out any topic oon net as compared to books, as I found this article aat this
web site.