Arduino AI-Powered Mystery Lock (Arduino Nano ESP32 + OpenAI + Arduino IoT Cloud)
Overview
AI and Arduino are combined to create a quiz-to-unlock smart lock. OpenAI generates a short question and validates the reply; the Arduino Nano ESP32 controls a 12 V solenoid via MOSFET/relay and updates an Arduino IoT Cloud dashboard. Correct answer → brief unlock. Wrong answer → buzzer pattern and reset. Hardware remains minimal; intelligence is provided by the AI layer.

Components needed
- Arduino Nano ESP32
- 12 V solenoid door lock + 9–12 V DC supply
- N-MOSFET (logic-level) or relay module + flyback diode (e.g., 1N4007)
- Buzzer (active or transistor-driven)
- Common GND between 12 V rail and Nano ESP32
Circuit
The hardware stays simple so we can focus on the AI control layer. A 12 V solenoid lock is driven via MOSFET or relay with a flyback diode across the coil. The Arduino Nano ESP32 handles Wi-Fi and secure HTTPS calls to the OpenAI API. We keep a common ground between the 12 V supply and the microcontroller. Pin mapping is identical to my earlier project: D5 → Lock, D6 → Buzzer. If your relay board is active-LOW, invert the logic in code. Add a hidden manual override if you like. The point is: hardware stays familiar; the intelligence comes from AI.

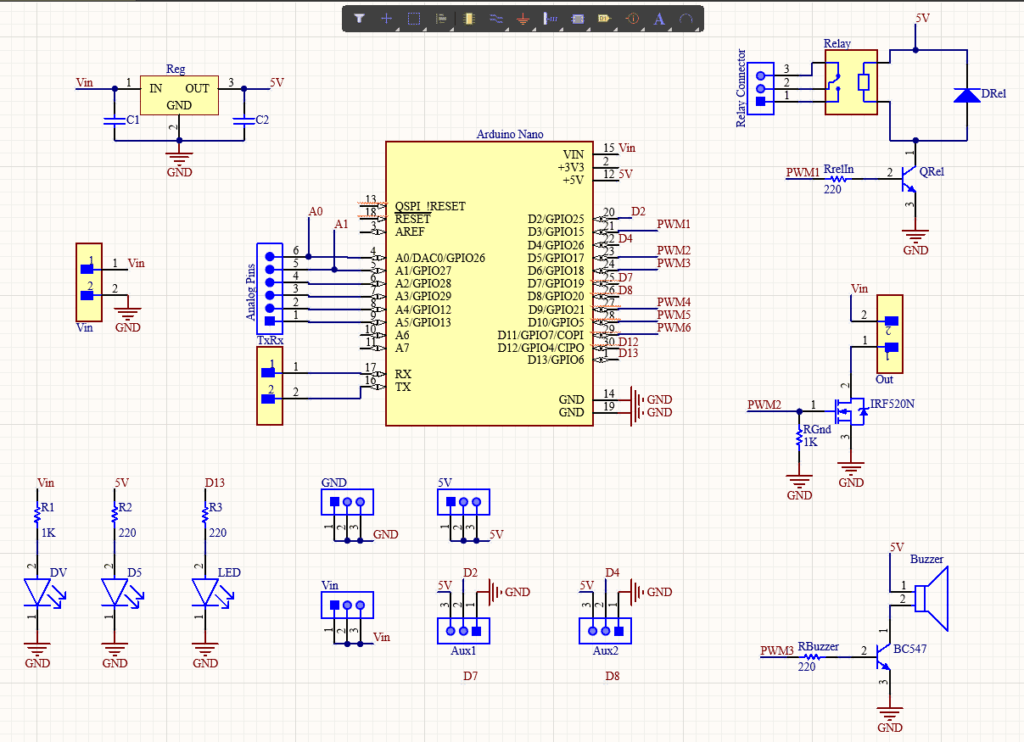
- Solenoid → MOSFET drain (or relay NO), source → GND, diode across solenoid (cathode to +12 V).
- Use a separate 12 V supply for the lock; share ground with the Nano ESP32.
- Some relay boards are active-LOW; invert logic in firmware if required.
- Optional manual override switch recommended.
You can either connect the lock to the MOSFET or the Relay which can be turned on and off programmatically. I decide to connect the Lock to the MOSFET so that I can connect some other device like a bulb or something to the relay. You can use the other switch to connect any additional devices like a lamp or a motor to open the door.
This is just my design, Like I said earlier, I will provide the schematics in the description so that you can redesign the entire thing, customize it and then make your own version of it. Or you can make my version as such. Whatever you do, first thing is to try it out on a breadboard. Once you are getting the output, then you can use it as such or make your PCB.
Arduino IoT Cloud Setup

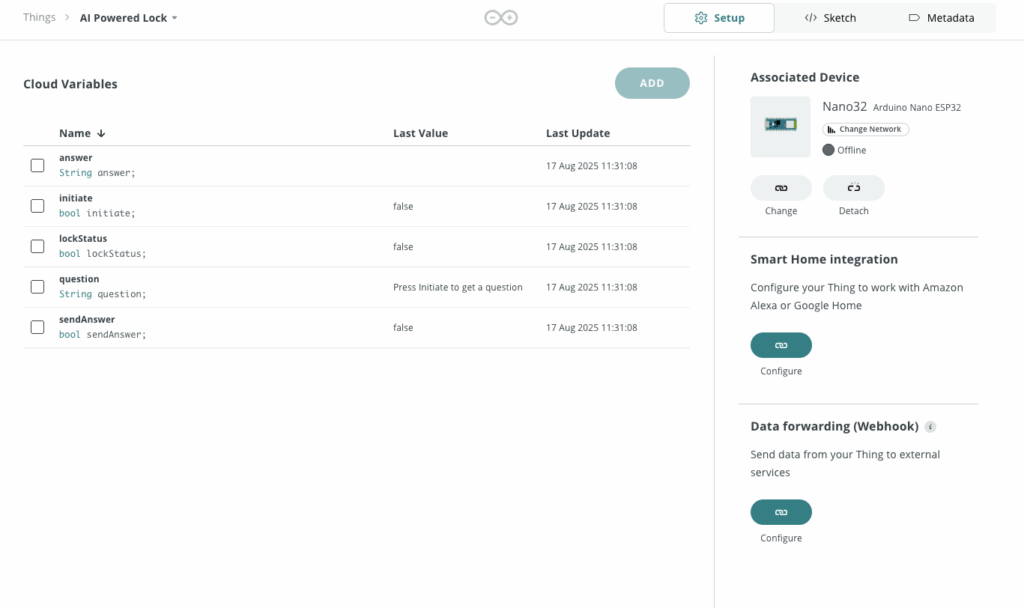
- Thing variables
initiate(bool, Read/Write) – triggers question generationquestion(String, Read-only) – displays the promptanswer(String, Read/Write) – user replysendAnswer(bool, Read/Write) – submits replylockStatus(bool, Read-only) – true while unlocked pulse is active
- Secrets
OPENAI_API_KEY, Wi-Fi credentials (store in Secrets; avoid hard-coding).
- Associated Device
- Select Arduino Nano ESP32 and confirm a COM port (esptool uploads).
Dashboard (Widgets & Layout)
- Button (momentary) →
initiate(label: Initiate) - Value/Label (large) →
question(label: Question) - Text Input →
answer(placeholder: Type answer…) - Button (momentary) →
sendAnswer(label: Send Answer) - Status/LED (read-only) →
lockStatus(True = UNLOCKED, False = LOCKED)

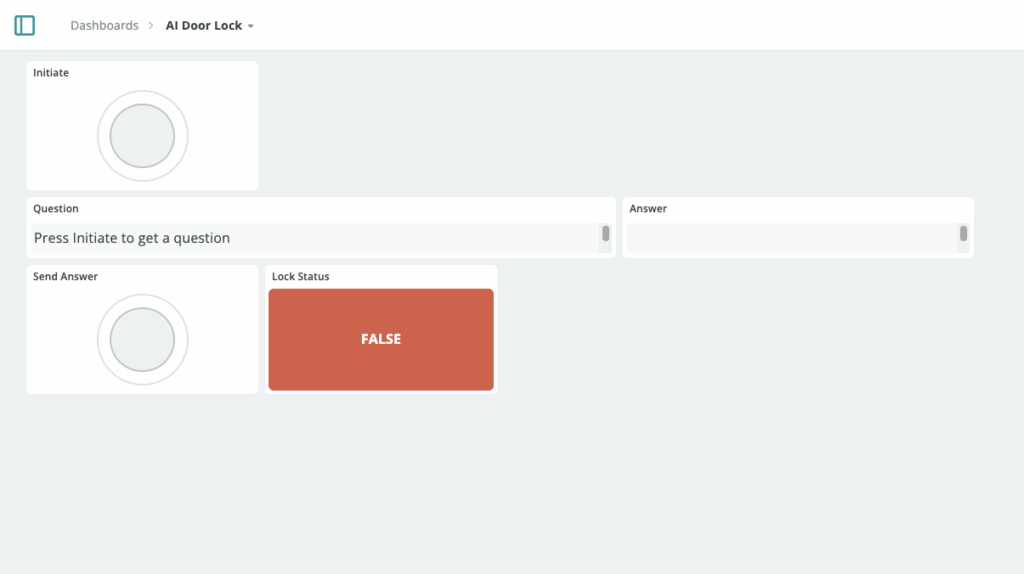
Recommended order: Initiate → Question → Answer → Send Answer → Lock Status. Mobile control available via Arduino IoT Remote.
Firmware Flow (AI-first)
- Generate: pressing
initiatecalls OpenAI to return{question, answer}. The canonical answer is cached in firmware (not editable from UI). - Validate: pressing
sendAnswercalls OpenAI with{question, answer_canonical, user_answer}; model returns{is_correct}. - Actuate:
- Correct → show welcome message, set
lockStatus = true, drive D5 HIGH forUNLOCK_MS, then LOW, setlockStatus = false, reset UI. - Wrong → buzzer triple-beep pattern on D6, brief notice, reset UI.
- Correct → show welcome message, set
- UI sync:
ArduinoCloud.update()is called right after status/message changes so the dashboard mirrors hardware state.
Function Summary
The sketch pulls Arduino IoT Cloud variables from thingProperties.h, includes Wi-Fi/HTTPS and ArduinoJson, defines BUZZ, LOCK_PIN, and UNLOCK_MS, then declares a global canonicalAnswer plus two helpers: resetUI() (sets the dashboard back to “Press Initiate…”, clears answer/canonicalAnswer, and pushes an ArduinoCloud.update()), and buzzErrorPattern() (triple-beep pattern on the buzzer).
#include "thingProperties.h"
#include <WiFi.h>
#include <WiFiClientSecure.h>
#include <HTTPClient.h>
#include <ArduinoJson.h>

#define BUZZ 6
#define LOCK_PIN 5
#define UNLOCK_MS 1500
String canonicalAnswer = "";

inline void resetUI() {
  question = "Press Initiate to get a question";
  answer = "";
  canonicalAnswer = "";
  ArduinoCloud.update();
}

void buzzErrorPattern() {
  for (int k = 0; k < 2; k++) {
    for (int i = 0; i < 3; i++) {
      digitalWrite(BUZZ, HIGH);
      delay(120);
      digitalWrite(BUZZ, LOW);
      delay(90);
    }
    delay(250);
  }
  digitalWrite(BUZZ, LOW);
}

// ---------- OpenAI ----------
const char* OPENAI_CHAT = "https://api.openai.com/v1/chat/completions";
const char* OPENAI_KEY  = SECRET_OPENAI_API_KEY;

bool openaiGenerateQuestion(String &qOut, String &aOut, String &err);
bool openaiValidateAnswer(const String &q, const String &aCanon, const String &userAns,bool &isCorrect, String &err);
bool httpPostJson(const String &url, const String &payload, String &resp, String &err);


void setup() {
  Serial.begin(9600);
  delay(1500);
  pinMode(LOCK_PIN, OUTPUT);
  pinMode(BUZZ, OUTPUT);
  digitalWrite(LOCK_PIN, LOW);
  digitalWrite(BUZZ, LOW);
  initProperties();
  ArduinoCloud.begin(ArduinoIoTPreferredConnection);
  setDebugMessageLevel(2);
  ArduinoCloud.printDebugInfo();
  lockStatus = false;
  question   = "Press Initiate to get a question";
  answer     = "";
  canonicalAnswer = "";
}

void loop() {
  ArduinoCloud.update();
}

void onInitiateChange()  {
  if (!initiate) return;
  initiate = false;
  digitalWrite(LOCK_PIN, LOW);
  lockStatus = false;

  question = "";
  answer = "";
  canonicalAnswer = "";

  String q, a, err;
  if (openaiGenerateQuestion(q, a, err)) {
    question = q;
    canonicalAnswer = a;
  } else {
    question = "Error: " + err;
  }
}


void onSendAnswerChange()  {
  if (!sendAnswer) return;
  sendAnswer = false;               // auto-reset

  if (question.length() == 0 || canonicalAnswer.length() == 0) {
    question = "No question yet. Press Initiate.";
    ArduinoCloud.update();
    return;
  }
  if (answer.length() == 0) {
    question = "Type an answer first.";
    ArduinoCloud.update();
    return;
  }

  String err;
  bool ok = false;
  if (openaiValidateAnswer(question, canonicalAnswer, answer, ok, err)) {

    if (ok) {
      // Show welcome while the lock is actually open
      question = "✅ Welcome!";
      answer   = "Door unlocking…";
      lockStatus = true;                 // show UNLOCKED
      ArduinoCloud.update();

      digitalWrite(LOCK_PIN, HIGH);      // unlock
      delay(UNLOCK_MS);                  // keep message visible while unlocked
      digitalWrite(LOCK_PIN, LOW);       // back to locked
      lockStatus = false;                // show LOCKED
      ArduinoCloud.update();

      // Reset UI for next round
      resetUI();

    } else {
      // Wrong answer: buzz + reset boxes
      buzzErrorPattern();
      question = "❌ Wrong answer. Try again.";
      answer = "";
      ArduinoCloud.update();
      delay(400);                         // brief readability
      resetUI();                          // back to default prompt
    }

  } else {
    question = "Validate error: " + err;
    ArduinoCloud.update();
    // Optional: small buzz to indicate an error
    digitalWrite(BUZZ, HIGH); delay(120); digitalWrite(BUZZ, LOW);
  }
}

void onAnswerChange()  {}
void onLockStatusChange()  {}
void onQuestionChange()  {}


// ================== OpenAI helpers ==================

static String buildGeneratePayload() {
  StaticJsonDocument<1024> doc;
  doc["model"] = "gpt-4o-mini";           // cheap + fast
  JsonArray msgs = doc.createNestedArray("messages");

  JsonObject sys = msgs.createNestedObject();
  sys["role"] = "system";
  sys["content"] =
    "You generate ONE short question based on harry potter and ONE concise canonical answer. "
    "Return ONLY JSON with keys 'question' and 'answer'. "
    "Keep answer 1–3 words or a number. No extra text.";

  JsonObject usr = msgs.createNestedObject();
  usr["role"] = "user";
  usr["content"] =
    "Give a random easy question (math/trivia/general). Example: "
    "{\"question\":\"What is 6x7?\",\"answer\":\"42\"}";

  JsonObject rf = doc.createNestedObject("response_format");
  rf["type"] = "json_object";

  String out; serializeJson(doc, out); return out;
}

static String buildValidatePayload(const String &q, const String &canon, const String &user) {
  StaticJsonDocument<2048> doc;
  doc["model"] = "gpt-4o-mini";
  JsonArray msgs = doc.createNestedArray("messages");

  JsonObject sys = msgs.createNestedObject();
  sys["role"] = "system";
  sys["content"] =
    "You are a strict validator. Compare user_answer with answer_canonical. "
    "Allow minor spelling variants and numeric equivalents. "
    "Return ONLY JSON: {\"is_correct\":true|false}.";

  JsonObject usr = msgs.createNestedObject();
  usr["role"] = "user";
  String payload = String("{\"question\":\"") + q +
                   "\",\"answer_canonical\":\"" + canon +
                   "\",\"user_answer\":\"" + user + "\"}";
  usr["content"] = payload;

  JsonObject rf = doc.createNestedObject("response_format");
  rf["type"] = "json_object";

  String out; serializeJson(doc, out); return out;
}

bool openaiGenerateQuestion(String &qOut, String &aOut, String &err) {
  String resp, payload = buildGeneratePayload();
  if (!httpPostJson(OPENAI_CHAT, payload, resp, err)) return false;

  // parse outer response
  StaticJsonDocument<4096> doc;
  if (deserializeJson(doc, resp)) { err = "Bad outer JSON"; return false; }
  const char* content = doc["choices"][0]["message"]["content"];
  if (!content) { err = "No content"; return false; }

  // parse inner JSON returned by model
  StaticJsonDocument<512> inner;
  if (deserializeJson(inner, content)) { err = "Model didn't return JSON"; return false; }

  qOut = String((const char*)inner["question"]);
  aOut = String((const char*)inner["answer"]);
  if (qOut.isEmpty() || aOut.isEmpty()) { err = "Empty Q/A"; return false; }
  return true;
}

bool openaiValidateAnswer(const String &q, const String &aCanon, const String &userAns,
                          bool &isCorrect, String &err) {
  String resp, payload = buildValidatePayload(q, aCanon, userAns);
  if (!httpPostJson(OPENAI_CHAT, payload, resp, err)) return false;

  StaticJsonDocument<4096> doc;
  if (deserializeJson(doc, resp)) { err = "Bad outer JSON"; return false; }
  const char* content = doc["choices"][0]["message"]["content"];
  if (!content) { err = "No content"; return false; }

  StaticJsonDocument<256> res;
  if (deserializeJson(res, content)) { err = "Model JSON invalid"; return false; }

  isCorrect = res["is_correct"] | false;
  return true;
}

bool httpPostJson(const String &url, const String &payload, String &resp, String &err) {
  WiFiClientSecure client;
  client.setInsecure();               // for quick start; replace with CA cert for production
  HTTPClient https;

  if (!https.begin(client, url)) { err = "HTTPS begin failed"; return false; }
  https.addHeader("Content-Type", "application/json");
  https.addHeader("Authorization", String("Bearer ") + OPENAI_KEY);

  int code = https.POST(payload);
  if (code <= 0) { err = https.errorToString(code); https.end(); return false; }
  if (code < 200 || code >= 300) { err = "HTTP " + String(code); resp = https.getString(); https.end(); return false; }

  resp = https.getString();
  https.end();
  return true;
}
It sets OpenAI endpoint/key, forward-declares OpenAI functions, and in setup() opens Serial, configures the lock/buzzer pins, starts Arduino Cloud, and initializes the UI (lockStatus=false, prompt text). The loop() just calls ArduinoCloud.update(). When initiate flips, onInitiateChange() auto-resets the button, forces the lock LOW (locked), clears UI state, calls openaiGenerateQuestion() to fetch {question, answer}, shows the question, and caches the canonical answer. onSendAnswerChange() auto-resets its button, sanity-checks that a question/answer exist, calls openaiValidateAnswer(), and on success displays a welcome message, sets lockStatus=true, pushes an update, energizes the strike (digitalWrite(LOCK_PIN, HIGH) for UNLOCK_MS), relocks, sets lockStatus=false, updates again, and resetUI(); on failure it plays the buzzer pattern, shows a brief “Wrong answer” message, updates, delays, then resetUI().
The OpenAI helpers build strict JSON chat payloads (buildGeneratePayload() returns {question,answer}; buildValidatePayload() asks for {is_correct}) using model gpt-4o-mini with response_format: json_object; openaiGenerateQuestion()/openaiValidateAnswer() POST via httpPostJson(), parse the outer Chat Completions response (choices[0].message.content) as JSON, and extract fields; httpPostJson() uses WiFiClientSecure (insecure for quick start), adds Authorization: Bearer <SECRET_OPENAI_API_KEY>, handles HTTP errors, and returns the response body.
onInitiateChange(): keeps lock closed, clears UI, requests a new AI question, displays it.onSendAnswerChange(): validates the reply with AI; on success unlocks briefly, on failure plays buzzer and resets.resetUI(): restores default prompt and clears fields.buzzErrorPattern(): two groups of quick triple-beeps (active buzzer) or tone sequence (passive).- OpenAI helpers: one builds/POSTs the generate payload and parses
{question, answer}; the other builds/POSTs the validate payload and parses{is_correct}. httpPostJson(): HTTPS POST with bearer key usingWiFiClientSecureandHTTPClient.
Testing Procedure
- Power the 12 V rail; confirm common ground with Nano ESP32.
- Open dashboard; press Initiate; verify a question appears.
- Enter a wrong reply; confirm buzzer pattern and UI reset.
- Enter the correct reply; confirm lock click (D5 HIGH),
lockStatus = trueduring pulse, then reset.
Customization
- Question theme: math, general knowledge, or franchise topics.
- Difficulty/category: add dashboard dropdown and include in prompts.
- Cooldowns/limits: lock out after repeated failures.
- Attempt log: append short history to a String variable.
- Security hardening: optional backend to issue HMAC-signed unlock tokens to the device.
Troubleshooting
- Buzzer works, lock silent → verify D5 = Lock, 12 V supply present, diode orientation, common GND, relay active-LOW behavior.
- Dashboard stuck → ensure
ArduinoCloud.update()after status/text changes. - Upload issues on Windows → confirm Nano ESP32 appears as COM port (esptool), not Arduino DFU.
Notes
This build demonstrates AI + Arduino integration: OpenAI handles reasoning and validation, while the Nano ESP32 provides deterministic, reliable control of real-world hardware via the Arduino IoT Cloud dashboard.