


Robotics for Beginners | How to Make a Robot for Kids?
This post is for people especially beginners and kids who are getting started with DIY robots and robotics; nice and easy robotics for beginners post. In this robotics tutorial, we will guide you through the basics of ‘Robotics for Beginners’ and you will learn how to how to Make a Robot for Kids easily. So let’s get started!
Getting Started with Robotics for Beginners and Kids
In this post, we will explain – What is a Robot, How to Build a Robot for Beginners, different parts of a Robot, how to make a robot for kids, what are the things to be taken care to get the best robot kit for kids, choosing the best battery for the robot, choosing the best microcontroller for the robot and in the end, you will build your own robot. Let’s get started.
How to Make a Robot for Kids?
Before answering ‘How to Build a Robot for Beginners?’, There is another thing you should know; another question you should answer first – ‘What is a robot?’ A robot is simply an electromechanical device that will sense its environment, process it, takes a decision by itself and reacts to its environment without manual intervention.
Robotics for Beginners Video Guide – How to Make a Robot for Kids?

The path to DIY Robots
Robotics is nothing new to RootSaid, considering how well we are accustomed to using modern tech right from our childhood. Internet technology is nothing new to us, and the pandemic has even forced us to take our education fully online. DIY Robots should’ve come naturally to our current generation, but it seems our education system is a bit slow on catching up with the latest trends in tech. So we usually find kids in their late teens getting their first real taste of robotics. Considering how widespread the usage of robots is in industries both big and small, their contribution to mass production and precise machining is unparalleled.
This enormous speed and efficiency that machines – especially robotic machines – bring in enhancing our lives have not been limited to industry floors or in high-tech military applications. For example, we now see drones people use for recreation, which were once considered very difficult to build. The same goes for many other systems that were previously considered difficult to make by enthusiasts with short budgets.
Just like any new technology, the DIY trend to tinker around and see what it offers has repeated for DIY Robot as well. This trend was accentuated by many factors: reduction in the prices for sensors, options for quick prototyping, availability of cheap microchips, and above all an ever-spreading supportive network of creators to help fellow tinkerers.
Another major contributor to the falling barrier of entry for DIY robotics enthusiasts is the entry of sensor-embedded garments, virtual reality modules, and similar high-tech devices that were previously unavailable for low prices. This trend is sure to continue in the coming years, with more and more advanced tech made available at approachable prices with the option for customization.
39 Interesting Facts About Robotics That Will Turn Your World Upside Down
In India, the boom of internet technology in addition to computers and mobile phones paved the way for a wave of white-collar jobs that are still in high demand. We are now witnessing a new wave of cloud, AI, and robotics tech that’s bringing in new opportunities in the hardware domain, also requiring appropriate programming skills to create turnkey solutions to novel challenges.
We must introduce these essential aptitudes to school-going children as well. Much of what the future of the 21st century offers could perhaps only be tackled by adequate DIY knowledge, along with basic coding acumen for software and hardware projects. This judgment is based on research done by PeopleStrong, where it was found that one in four employment cuts globally would be from India. Thus, it is more than just good practice to introduce kids to robotics, it’s high time.
Robotics for Beginners – What are the Parts of a Robot?
As this is a Robotics for Beginners Guide, I will try to make it as simple as possible. To make it more understandable, imagine a robot is like any other organism; like a human being.


We have sense organs. We see things with our eyes. We hear things with our ears, feel things with our skin, taste with our tongue, and smell with our nose. Our neurons transmit the signals from our sensors to our brain where we process them. Our brain process the signal takes a decision and sends the signal to our muscles to move our hands, legs or do whatever we want. Then we have a heart that circulates blood, supplies oxygen, provides energy for the working of your entire system. Then we have a body, where the sensors, muscles, heart, veins, and all other parts are neatly ‘assembled’.
This is the same as in the case of a robot.
1. The Robot Chassis – The Body of the Robot
A robot has a chassis/ robot frame; which is similar to our body. A-frame that will support the whole robot. A system which is having enough space and is capable of handling the weight of all the sensors, power sources, and all the cables used in the robot.
Qualities of a Good Robot Chassis for Kids
- Have enough space for all the components
- Provide good mechanical support for all the components
- Have mounting/screw holes where you can fix all the components in place
- Have enough strength to hold the entire weight of the components
Here are some of the best robot chassis that are available online to make your robot.
2. Sensors – The Sense Organs
Sensors are specially designed devices or objects that will detect the properties, events, or changes in the environment, and then provide a corresponding signal. They are one of the crucial instruments that will bridge the physical and electronic world. There are different types of Sensors.
A robot has sensors; sensors such as IR sensors, which will sense infrared rays, ultrasonic sensors to sense ultrasonic waves, heat sensors to sense temperature, a pressure sensor to sense touch/pressure and so much more.
3. The Brain
So we now have all the data from the sensor. What to do with this sensor data? We need to process it. For that, we will have a processing unit. Normally, we will use a logic circuit.
This can be a simple circuit consisting of resistors, capacitors, transistors to perform simple logical decisions or a microcontroller such as an Arduino or PIC that can perform complex calculations. That depends upon the complexity of your robot.
Arduino and Raspberry Pi are the most commonly used controllers in the field of Robotics.
Arduino is simply an open-source base employing easy to use microcontroller boards with simple programming technique. Combining the power of strong microcontrollers and user-friendly IDEs which can be used to write and upload programs, which runs on your computers, less price, and less power consumption, it is effectively used in various industries, robotics, and home automation projects.
Raspberry Pi is a small credit card-sized, lightweight and compact computer which is used by both professions and hobbyist alike. This mini-computer can do (almost) anything a normal Linux machine can do. It is widely used in various industries, robotics, home automation projects.
There is a new version of Raspberry Pi – Raspberry Pi Pico which is similar to Arduino, available in market for Hobbyists. This board is very simple to begin with and start building your projects! If you are confused about whether you need to buy Raspberry Pi or Arduino for your next project, fear not. In this post – Raspberry Pi Pico or Arduino we have explained everything in detail so that you can choose which suits best for your project.
4. Muscles – The Actuators (Motors and other moving parts)
Once the signals are being processed, the result/reaction will be sent to the actuators. Actuators can be any electromechanical device such as motors that will move the motor, or servo motors that will lift the hand; or anything.
Motors are one of the most commonly used actuators used in robots. This is also the best actuator from where kids can start learning about the programming and moving their first robot.
Before going further with Robotics for Beginners, let us take a look at one of the most commonly used actuator – The Motor.
There are mainly 3 types of Motors
- DC Motor
- Servo Motor
- Stepper Motor
DC Motors are simple motors that have 2 terminals – one negative and one positive terminal. The speed of DC motors varies from the motor to motor and depends on the operating voltage and number of turns. One thing to notice here is, it is possible to change the direction of rotation of DC motor by reversing the polarity of the voltage provided at the terminals of the DC motor. For that, we can use an H Bridge circuit such as an L293D motor driver or other similar H Bridge circuit. They are widely used for driving wheels in a robot.
Servo Motors are compact and electronically controlled motors with +/-90 degree rotation. However, modifications can be made to get a complete 360-degree rotation. They are used in places where we need precise control over the movement such as robot hands, turrets, etc. There are 3 terminals to the servo motor.
- +ve – 5V
- -ve – Gnd
- Signal – PWM Signal
It is this PWM signal that determines the angle at which the servo motors should rotate.
Stepper Motors are DC motors that rotate in a step-by-step manner. Inside the stepper motor, the coils are wound in a specific pattern called phase. By energizing each coil separately, we can precisely control the position and movement of the motor shaft. They are widely used in 3D printers.
5. Heart – The Battery
Now we almost have everything we need now. All we need is a power source. A power source that can provide enough energy to power up all the sensors, motors and the microcontroller. For that, we will use a current source such as a battery or a power adapter.
Simple DIY Robots for Beginners
Now you know what a robot is and what are the parts of a DIY Robot. Now let’s get practical, shall we? As you are all beginners in this field, in this session, I will show you and explain some of the basic, DIY Beginners robots which you can build and learn basic robotics. All of the equipment, tools and components used in these robots are cheap, simple and easily available at online markets. Give it a shot.
1. Line Follower Robot for Beginners
What is Line Follower Robot?
This is the easiest robot you can build for getting started with robotics. This robot uses IR or Infrared Sensor to ‘See’ a line in front of it and follow it automatically without human intervention. These line follower robots can be made with or without using microcontrollers.
How Line Follower Robot Works?
Simple Line follower Robot using IR sensors (mounted on either side of the robot) to sense the line, and uses these signals to drive DC motors using a DC Motor Driver. You can make a Beginners Line Follower with microcontroller or line follower without microcontroller.
What Will I Learn?
Here you will learn how IR sensor works, basic microcontroller coding and how to control DC motors using a motor driver IC.
2. Obstacle Avoidance Robot for Beginners
What is an Obstacle Avoiding Robot?
Obstacle avoidance robot is a simple robot equipped with UltraSonic Sensor which will automatically detect obstacles in front of it and change its direction by itself.
How an Obstacle Avoiding Robot Works?
An obstacle avoiding robot is able to sense whether some object is present in front of it using an ultrasonic transmitter/receiver pair. If there is any obstacle, the ultrasonic waves will hit the obstacle, bounce back and hit the receiver. This signal can be used to change the direction of the robot using DC motors.
What will I Learn?
You will learn to use the Basics of Robotics sensors like UltraSonic Sensors and Several motors such as DC motors and/or Servo Motors.
Remote Controlled Robot for Beginners
What is a Remote Controlled Robot?
Remote controlled robots are those which can be controlled wirelessly using a remote controller. Here we will have a robot part and a remote controller part and the robot can be controlled using the remote controller.
How a Remote Controlled Robot Works?
Working of a Remote Controlled Robot is really simple. Here you will be having two parts – The Robot and the Remote controller. Here we will use a Wireless signal transmitter module in the Remote controller and a Receiver in the Robot. The signal from the remote controller is transmitted directly to the Robot using a Wireless module.
What will I learn?
You will learn the working of Wireless Communication modules such as Bluetooth, HC12, Zigbee etc and apply them to your Robot.
Robotics for Beginners – DIY Robot Example 1
As this is a Robotics for Beginners Guide, I will try to explain everything with an example. Consider this line follower robot using Arduino. This robot uses IR sensors to detect the track and uses motors to move around depending upon the color of the track. Here,
- IR sensor is the Sensor
- Arduino is the Brain
- Motors are the Muscles
- LiPo Battery is the Heart
- Robot Chassis the Body
Using all these parts, the robot senses the path, takes a decision on its own, and reacts to its environment by moving only through the black path.

Robotics for Beginners – How to Build a Line Follower Robot?
So once again we are back with the same question. Now you know what all things we need to make make a robot for kids. But there are different types of sensors, motors, batteries, and microcontrollers available in the market. But all of them cannot be used to build a robot you want. For that, you will need a plan for a Robot.
Now, as promised at the beginning of this Robotics for Beginners post, Let us learn how to build a robot.
Step 1 – Plan Your Robot
First, decide what you want to build; a line follower, a pick and place robot or whatever you want. Decide what you want your robot to do.
For example – A Line follower that will follow a path without human intervention.
Step 2 – Know the Inputs
Understand what all are the inputs and outputs. For the robot to do whatever you want it to do, it should get maximum data from the environment, in order to process it. So find out what all things it need to know to perform that particular action.

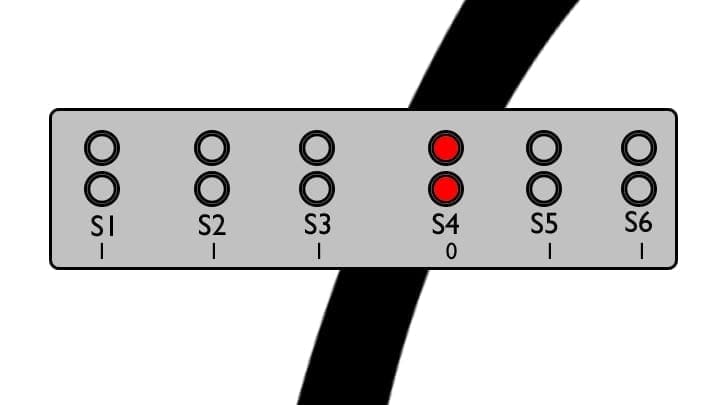
In the case of our line follower, we need something that can sense the color of the path in front of it. For that, you can use an IR sensor or a color sensor.
Step 3 – Processing the Inputs and Decision Making
Once we have collected all the input parameters, we will have to feed it to the Brain for processing. We have to process the inputs and make the robot to make the right decision in various conditions.
In our line follower, we have an Arduino microcontroller board which will act as its brain. The Arduino will read all the inputs from the IR sensors, process it and send the decisions/outputs to the motor driver board which will drive the motor.
Step 4 – The Output
Now the robot knows what to do. Now, all we need is to execute that action. For that, we will use an actuator. An actuator can be an electromechanical device.
In the case of our line follower, when the black line is curved towards left, it should go left.
When the black line turns right, the robot should go right. We have 2 DC motor which will drive the bot.
Step 5 – Power On the Robot
Our robot is almost ready. All you need is a power source to power everything up. Remember, you have to power all the devices including the sensors, microcontroller board, the motor drivers. the motors and all other actuators.
You have to choose the right power source for your robot. Different components have different voltage range for its working; below which it won’t work or above which, it will burn off the component. So choosing the right power source can be a crucial task.
Step 6 – The Robot Chassis
Chassis is a frame where you mount all the parts of a robot together. You can either build one yourself or get one online.
Robotics for Beginners – DIY Robot Example 2 Video Tutorial
Now you know the basics of a beginner-level robot, it’s time to build your own. In the below tutorial, we will provide complete details of a basic robot-like DC Motors, L293D motor driver and everything you need to build your own robot. Check out the below video.

Simple Robot Arduino Code
As promised, here is the code for the robot we build in the above video.
void setup() {
pinMode(4, OUTPUT);// S2 of Motor 1
pinMode(5, OUTPUT);// S1 of Motor 1
pinMode(6, OUTPUT);//S1 of Motor 2
pinMode(7, OUTPUT);//S2 of Motor 2
pinMode(9, OUTPUT);//Enable of Motor 1
pinMode(10, OUTPUT);//Enable of Motor 2
Serial.begin(9600);
}

void loop() {
forward();
delay(1000);

stopp();
delay(1000);

backward();
delay(1000);

stopp();
delay(1000);

left();
delay(500);

stopp();
delay(1000);

right();
delay(500);

stopp();
delay(5000);

}

void forward()
{
  digitalWrite(9,HIGH); //Set Enable of Motor 1 to 5V (Close Switch E1)
  digitalWrite(10,HIGH); //Set Enable of of Motor 2 to 5V (Close Switch E2)

  digitalWrite(5,LOW); //Set S1 of Motor 1 to 0V (Open Switch S1)
  digitalWrite(4,HIGH); //Set S2 of Motor 1 to 5V (Close Switch S2)
  digitalWrite(6,LOW); //Set S1 of Motor 2 to 0V (Open Switch S1)
  digitalWrite(7,HIGH); //Set S2 of Motor 2 to 5V (Close Switch S2)
}

void backward()
{
  digitalWrite(9,HIGH); //Set Enable of Motor 1 to 5V (Close Switch E1)
  digitalWrite(10,HIGH); //Set Enable of of Motor 2 to 5V (Close Switch E2)

  digitalWrite(5,HIGH); //Set S1 of Motor 1 to 5V (Close Switch S1)
  digitalWrite(4,LOW); //Set S2 of Motor 1 to 0V (Open Switch S2)
  digitalWrite(6,HIGH); //Set S1 of Motor 2 to 5V (Close Switch S1)
  digitalWrite(7,LOW);  //Set S2 of Motor 2 to 0V (Open Switch S2)
}

void left()
{
  digitalWrite(9,LOW); //Set Enable of Motor 1 to 0V (Open Switch E1)
  digitalWrite(10,HIGH); //Set Enable of of Motor 2 to 5V (Close Switch E2)

  digitalWrite(5,LOW); //Set S1 of Motor 1 to 0V (Open Switch S1)
  digitalWrite(4,HIGH); //Set S2 of Motor 1 to 5V (Close Switch S2)
  digitalWrite(6,LOW); //Set S1 of Motor 2 to 0V (Open Switch S1)
  digitalWrite(7,HIGH); //Set S2 of Motor 2 to 5V (Close Switch S2)
}
void right()
{
  digitalWrite(9,HIGH); //Set Enable of Motor 1 to 5V (Close Switch E1)
  digitalWrite(10,LOW); //Set Enable of of Motor 2 to 0V (Open Switch E2)

  digitalWrite(5,LOW); //Set S1 of Motor 1 to 0V (Open Switch S1)
  digitalWrite(4,HIGH); //Set S2 of Motor 1 to 5V (Close Switch S2)
  digitalWrite(6,LOW); //Set S1 of Motor 2 to 0V (Open Switch S1)
  digitalWrite(7,HIGH); //Set S2 of Motor 2 to 5V (Close Switch S2)
}

void stopp()
{
  digitalWrite(9,LOW); //Set Enable of Motor 1 to 0V (Open Switch E1)
  digitalWrite(10,LOW); //Set Enable of of Motor 2 to 0V (Open Switch E2)

  digitalWrite(5,LOW); //Set S1 of Motor 1 to 0V (Open Switch S1)
  digitalWrite(4,LOW); //Set S2 of Motor 1 to 0V (Open Switch S2)
  digitalWrite(6,LOW); //Set S1 of Motor 2 to 0V (Open Switch S1)
  digitalWrite(7,LOW);  //Set S2 of Motor 2 to 0V (Open Switch S2)
}
Robot Kits for Kids – Robotics for Beginners
Robot kits are packages that contain all the components (and sometimes tools) that you need to build your own robot from scratch. Robot kits can be really useful for kids and beginners who are getting started with robotics because they don’t have to worry about what all things to buy and how to assemble.
Qualities of Good Robotics Kits for Beginners
- It should have all the components you need to build your robots
- It should have all the tools you need to assemble them together.
- The robot Kit should include a Chassis to mount all the components.
Now you know the qualities of Best Robot Kits for Beginners.
Best Robotics Kits for Beginners | Robot Kits for Kids
Advanced Robot Kits for Beginners Online
Here we are presenting you with some cool robot kits which are available online and can be used by beginners, kids as well as experts to build their own robots easily. Links are also provided with the product description which will be redirected to trusted product pages from where you can buy your own robots.
Want to Build a Robot on Your Own?
Why not build a robot yourself? We will help in whichever way possible. We have a collection of Arduino and Raspberry Pi Robotics Projects in our Project vault. We have a lot of tutorials and an active community to help you build your own robot. We have now started a Whatsapp Group which we will use for discussing and sharing ideas and of course, for helping fellow members with their projects. We will be having hobbyists, enthusiasts, and professionals around the globe who are willing to teach others and share their ideas and experience.
Robot Building for Beginners
Now you know the basics, lets get started with building one! Check out below tutorials. There you will find complete tutorial on building amazing Robot!


Amazing Robotics Tutorial for Beginners
I have been a beginner in the field of electronics and Robotics and this article surely gives you a kick start.
This is Simply Awesome.
Nice Tutorial. Great Job.
I think the admin of this web site is genuinely working hard in favor of his web site, for the reason that here every information is quality based information.
I want to make a brain controlled drone. Sir can you help me in this project