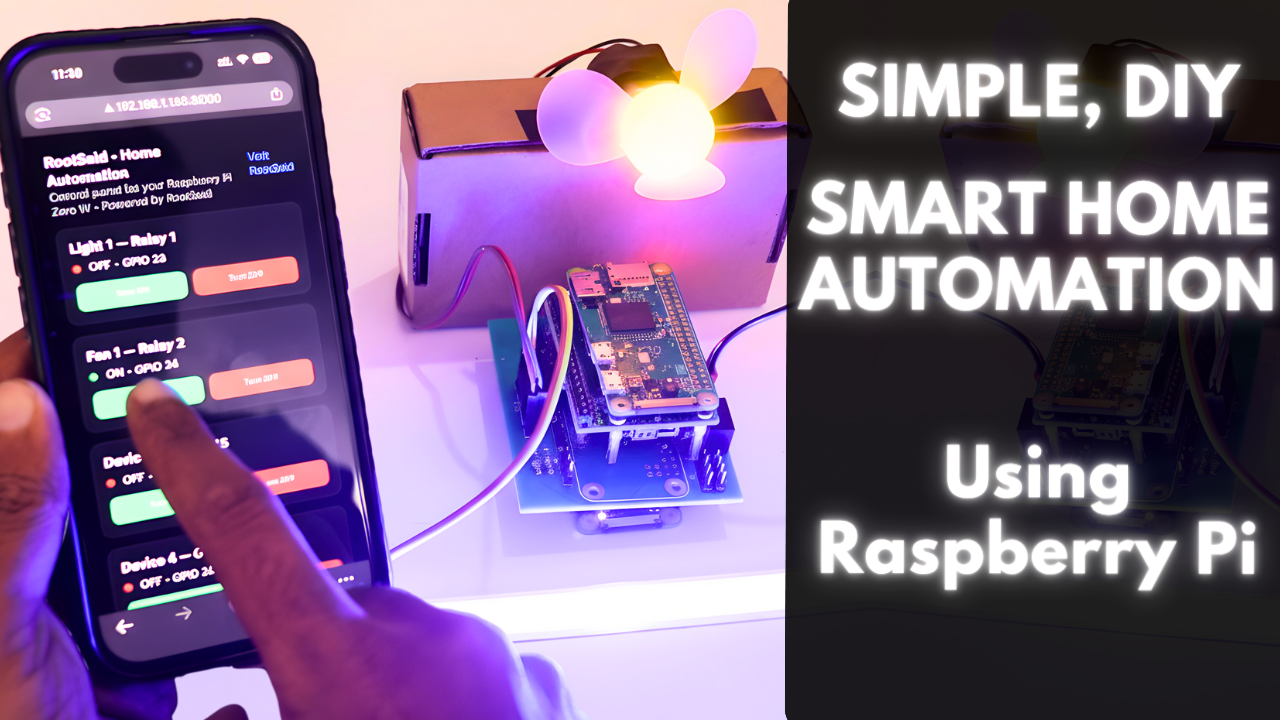
Home Automation with Raspberry Pi Zero – Complete Step-by-Step Guide
Introduction
In this tutorial, we’ll build a home-automation controller using a Raspberry Pi Zero W, two MOSFET switches, and a minimal Flask web console.
By the end, you’ll be able to toggle devices ON/OFF from your phone or laptop over Wi-Fi. We’ll keep the circuit clean, the power safe, and the code simple so you can customize it later.
Components You’ll Need
- Raspberry Pi Zero W (40-pin header soldered)
- 12 V DC adapter for your loads
- 2 × logic-level N-MOSFETs (e.g., AO3400A, IRLZ44N, FQP30N06L)
- 2 × flyback diodes (1N4007/SS14) for inductive loads (relays, solenoids, motors)
- Gate resistors: 100–330 Ω (one per MOSFET)
- Gate pulldowns: 100 kΩ (one per MOSFET)
- 5 V supply for the Pi: USB 5 V or TSR 1-2450 switching regulator (drop-in 7805 replacement)
- Wires, screw terminals, your 12 V devices (lamp, pump, lock, fan, etc.)
Why Raspberry Pi Zero W
- Tiny, affordable, and has built-in Wi-Fi
- Runs Python + Flask easily for a web UI
- Perfect for small automations without cloud complexity
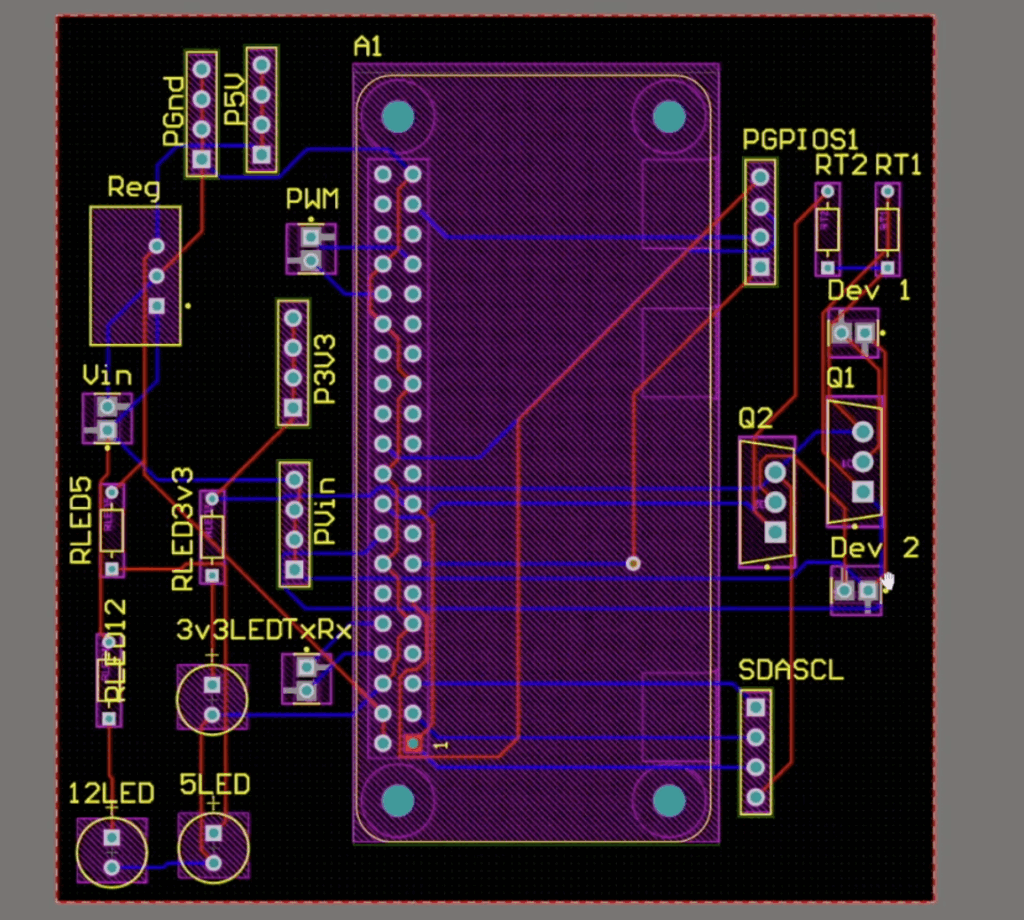
Circuit

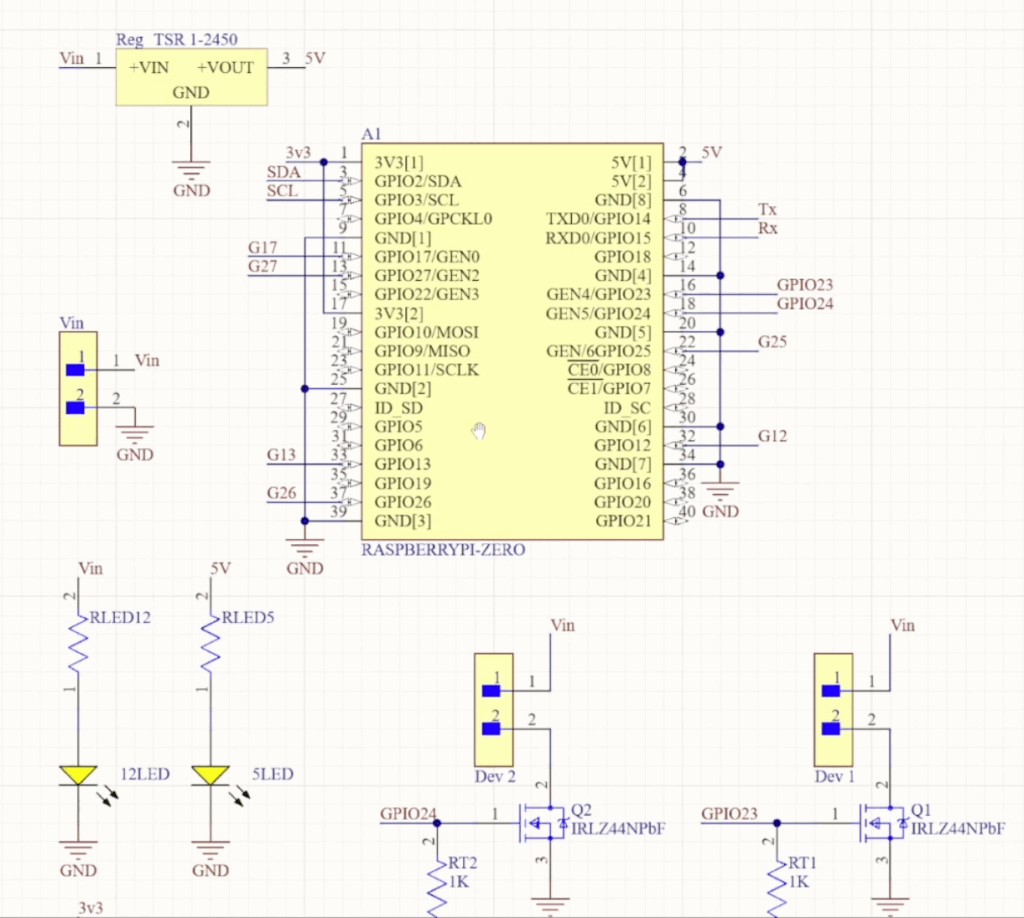
Circuit – Full Explanation
The circuit is simple and reliable. We use two low-side N-MOSFET switches controlled by the Pi’s GPIO pins.
- Each device connects from +12 V → Device → MOSFET Drain.
- The MOSFET Source goes to Ground.
- The MOSFET Gate is driven by a Pi GPIO pin through a 100–330 Ω resistor.
- A 100 kΩ pulldown from Gate to Ground keeps the MOSFET OFF at boot.
- For inductive loads (relay/solenoid/motor), add a flyback diode across the device: cathode to +12 V, anode to the device/MOSFET side.
- Common ground is mandatory: connect Pi GND to the 12 V supply negative so the gate signal has the right reference.
Behavior: When the Pi drives the gate HIGH, the MOSFET turns ON and completes the path to ground → the device receives power from 12 V and turns ON.
When the gate goes LOW, the device turns OFF.
Pin Map (BCM → Physical Header Pin)
| Function | BCM | Physical Pin |
|---|---|---|
| MOSFET A Gate | 23 | 16 |
| MOSFET B Gate | 24 | 18 |
| Ground (any one) | – | 6 / 9 / 14 / 20 / 25 / 30 / 34 / 39 |
| 5 V (Pi rail) | – | 2 / 4 |
We use BCM numbering in the code. The physical positions help if you wire from a loose Pi.
Power
We have two rails:
- 12 V for the devices
- 5 V for the Raspberry Pi
Power the Pi in one of two ways:
- A good 5 V USB supply into the Pi, or
- A switching regulator like TSR 1-2450 stepping 12 V down to 5 V.
Avoid a linear 7805 from 12 V; it overheats at Pi currents.
If you might use USB and the 5 V regulator at the same time, isolate them—add a series Schottky diode from the regulator to the Pi 5 V rail (or use an ideal-diode/power-mux IC) to prevent back-feeding.
Voltage Regulator
The TSR 1-2450 is a drop-in switching replacement for 7805. It delivers a cool, efficient 5 V up to 1 A from 9–12 V input.
Place a 10–22 µF capacitor near VIN and a 22–47 µF capacitor near the 5 V output for stability during Wi-Fi spikes.
If you plan heavy 5 V USB devices, consider a 1.5–2 A regulator.
GPIO Voltage
Pi GPIO is 3.3 V logic. Pick MOSFETs that turn fully ON at Vgs ≈ 3.3 V with low Rds(on) (e.g., AO3400A, IRLZ44N, FQP30N06L).
Always include the gate series resistor and the 100 kΩ pulldown for clean, predictable switching.
Advantage of Using a PCB

A PCB gives you:
- Neat screw terminals and proper footprints
- Clean labeling and consistent wiring
- Space for fuses/TVS/protection
- A robust build that fits in an enclosure
Prototype on a breadboard first, then move the same netlist to PCB for reliability.
Setting up the Pi
- Flash Raspberry Pi OS (Bookworm), boot, connect Wi-Fi
- Enable SSH if needed
- For a full imaging/first-boot guide, see my earlier video where everything is shown step-by-step
Initial Testing of GPIO Pins (Simple Code)
Before the web UI, test that GPIO 23 and 24 switch correctly.
File: simple_on_off_test.py
# simple_on_off_test.py
import time
import RPi.GPIO as GPIO

GPIO.setmode(GPIO.BCM)
GPIO.setup(23, GPIO.OUT, initial=GPIO.LOW)
GPIO.setup(24, GPIO.OUT, initial=GPIO.LOW)

# Turn ON GPIO 23 for 2s
GPIO.output(23, GPIO.HIGH)
time.sleep(2)
GPIO.output(23, GPIO.LOW)

# Turn ON GPIO 24 for 2s
GPIO.output(24, GPIO.HIGH)
time.sleep(2)
GPIO.output(24, GPIO.LOW)

GPIO.cleanup()
Run with:
sudo python3 simple_on_off_test.py
Install Libraries (Option A — apt for Pi Zero W)
On Bookworm, use apt for a smooth experience on the Zero W:
sudo apt update
sudo apt install -y python3-rpi.gpio python3-flask
Home Automation Web Console (Flask)
Now we’ll create a tiny web console to toggle the two channels from any browser on your LAN.
File: home_automation.py
#!/usr/bin/env python3
# home_automation_v2.py — 6 devices (3 rows × 2 cols)

import atexit
from datetime import datetime
from flask import Flask, render_template_string, jsonify, request, abort
import RPi.GPIO as GPIO

TITLE = "RootSaid • Home Automation"
BRAND = "RootSaid"
SITE_URL = "https://rootsaid.com"

# Edit names/pins to match your PCB (BCM numbering)
DEVICES = [
    {"pin": 23, "name": "Light 1 — GPIO 23"},
    {"pin": 24, "name": "Fan 1 — GPIO 24"},
    {"pin": 25, "name": "Device 3 — GPIO 25"},
    {"pin": 26, "name": "Device 4 — GPIO 26"},
    {"pin": 17, "name": "Device 5 — GPIO 17"},
    {"pin": 27, "name": "Device 6 — GPIO 27"},
]

# --- GPIO setup ---
GPIO.setwarnings(False)
GPIO.setmode(GPIO.BCM)
for d in DEVICES:
    GPIO.setup(d["pin"], GPIO.OUT, initial=GPIO.LOW)

state = {d["pin"]: False for d in DEVICES}

def set_pin(pin: int, on: bool):
    GPIO.output(pin, GPIO.HIGH if on else GPIO.LOW)
    state[pin] = on

@atexit.register
def _cleanup():
    for d in DEVICES:
        GPIO.output(d["pin"], GPIO.LOW)
    GPIO.cleanup()

app = Flask(__name__)

INDEX_HTML = '''
<!doctype html>
<html lang="en">
<head>
  <meta charset="utf-8">
  <meta name="viewport" content="width=device-width,initial-scale=1">
  <title>{{ title }}</title>
  <style>
    :root{--bg:#0e0f12;--card:#181b22;--muted:#9aa1ac;--text:#e6e9ef;
          --ok:#00d18f;--bad:#e74c3c;--accent:#007aff;}
    *{box-sizing:border-box} html,body{margin:0;height:100%}
    body{font-family:system-ui,-apple-system,Segoe UI,Roboto,Helvetica,Arial;color:var(--text);background:var(--bg)}
    .wrap{max-width:980px;margin:0 auto;padding:24px}
    .top{display:flex;justify-content:space-between;align-items:center;gap:12px}
    h1{margin:0;font-size:clamp(20px,3vw,28px)}
    .muted{color:var(--muted)} a{color:var(--accent);text-decoration:none}
    /* Fixed 2 columns -> 3 rows (with 6 items) */
    .grid{display:grid;grid-template-columns:repeat(2,minmax(280px,1fr));gap:16px;margin-top:16px}
    @media (max-width:640px){ .grid{grid-template-columns:1fr} }
    .card{background:var(--card);border:1px solid #2a2d36;border-radius:14px;padding:16px}
    .card h3{margin:0 0 6px}
    .status{margin-top:2px}.dot{display:inline-block;width:10px;height:10px;border-radius:50%;margin-right:8px}
    .on{background:var(--ok)} .off{background:var(--bad)}
    .row{display:flex;gap:10px;margin-top:12px}
    .btn{flex:1;border:0;border-radius:10px;padding:12px 14px;color:#fff;font-weight:600;cursor:pointer}
    .onb{background:#0ab685} .offb{background:#c8453b}
    footer{margin-top:18px;font-size:13px;color:var(--muted);display:flex;justify-content:space-between;gap:8px;flex-wrap:wrap}
  </style>
</head>
<body>
  <div class="wrap">
    <div class="top">
      <div>
        <h1>{{ title }}</h1>
        <div class="muted">Control panel for your Raspberry Pi Zero W • Powered by {{ brand }}</div>
      </div>
      <div><a href="{{ site_url }}" target="_blank" rel="noopener">Visit {{ brand }}</a></div>
    </div>

    <div id="cards" class="grid">
      {% for d in devices %}
      <div class="card" data-pin="{{ d.pin }}">
        <h3>{{ d.name }}</h3>
        <div class="status">
          <span class="dot {{ 'on' if state[d.pin] else 'off' }}"></span>
          <span class="label">{{ 'ON' if state[d.pin] else 'OFF' }}</span> • GPIO {{ d.pin }}
        </div>
        <div class="row">
          <button class="btn onb"  onclick="send({{ d.pin }}, 'on')">Turn ON</button>
          <button class="btn offb" onclick="send({{ d.pin }}, 'off')">Turn OFF</button>
        </div>
      </div>
      {% endfor %}
    </div>

    <footer>
      <div>© {{ year }} {{ brand }} • <a href="{{ site_url }}" target="_blank">rootsaid.com</a></div>
      <div>Device: {{ request.host }}</div>
    </footer>
  </div>

<script>
async function send(pin, mode){
  try{
    const r = await fetch('/api/toggle', {
      method:'POST', headers:{'Content-Type':'application/json'},
      body: JSON.stringify({pin:pin, mode:mode})
    });
    if(!r.ok) throw new Error('HTTP '+r.status);
    await refresh();
  }catch(e){ alert('Failed: '+e.message); }
}
async function refresh(){
  const r = await fetch('/api/state'); if(!r.ok) return;
  const data = await r.json();
  document.querySelectorAll('.card').forEach(card=>{
    const pin = Number(card.dataset.pin);
    const on = !!data.state[pin];
    const dot = card.querySelector('.dot');
    const label = card.querySelector('.label');
    dot.classList.toggle('on', on);
    dot.classList.toggle('off', !on);
    label.textContent = on ? 'ON' : 'OFF';
  });
}
setInterval(refresh, 2000);
</script>
</body>
</html>
'''

@app.get("/")
def index():
    return render_template_string(
        INDEX_HTML, title=TITLE, brand=BRAND, site_url=SITE_URL,
        devices=DEVICES, state=state, year=datetime.now().year, request=request
    )

@app.get("/api/state")
def api_state():
    return jsonify({"ok": True, "state": state})

@app.post("/api/toggle")
def api_toggle():
    data = request.get_json(silent=True) or {}
    pin = data.get("pin"); mode = data.get("mode")
    pins = [d["pin"] for d in DEVICES]
    if pin not in pins or mode not in ("on","off"):
        return abort(400)
    set_pin(pin, on=(mode=="on"))
    return jsonify({"ok": True, "pin": pin, "on": state[pin]})

if __name__ == "__main__":
    app.run(host="0.0.0.0", port=8000, debug=False)
Run it:
sudo python3 home_automation.pyThen open:
http://<your-pi-ip>:8000How It Works?
- We’ll create a small Flask web server that shows two buttons for GPIO 23 and GPIO 24. When you click ON, the app sets that pin HIGH; when you click OFF, it sets the pin LOW. The page refreshes to show the current state.
- First, we import Flask and RPi.GPIO.
- We define our pin list as
[23, 24]. - We set the GPIO mode to BCM, and configure those pins as outputs, initially LOW.
- We keep a simple state dictionary to display ON or OFF in the web page.
- The HTML is embedded right in the script, so there’s no extra template files.
- The route
/renders the page. The route/toggle/<pin>/<mode>receives a form post, flips the pin, updates the state, and redirects back to the main page. - On exit, we force pins LOW and cleanup so nothing stays stuck ON.
Troubleshooting
- Browser can’t reach the Pi? Make sure you use
http://(not https), disable VPN/Proxy/Private Relay, or test via SSH tunnel:ssh -L 8000:localhost:8000 pi@<pi-ip>→ openhttp://localhost:8000. - Devices not switching? Check common ground, gate resistors, pulldowns, and diode orientation.
- Power issues? Use a switching regulator, not a 7805 from 12 V. Add bulk caps near the regulator.
Safety Notes
- For mains AC, only use proper relay modules with isolation and follow local electrical codes.
- Add a fuse on your 12 V line if your load can draw high current.
- Keep wires short and connections tight.