High Current Motor Driver | Arduino VNH2SP30 Driver Tutorial
High Current DC Motor Driver Introduction
Recently, I published an article on L293D piggy backing for driving high current motors. That came up when I was building a remote controlled robot with 6 high current, high speed DC Motors.
Even though it could drive motors effortlessly, it generated too much heat if used for more than 10 minutes straight.
So, I checked for other DC motor drivers that could drive these DC motors without much heat dissipation. Then I came up with VNH2SP30 DC Motor Driver. This one was relatively cheap and easily available. So I decided to give it a shot.
VNH2SP30 Motor Driver

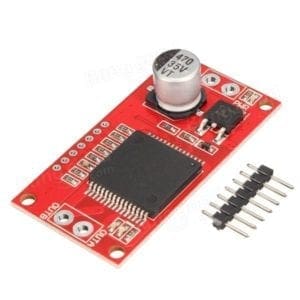
VNH2SP30 High Current DC Motor Driver for Arduino
Get Your VNHSP30 Motor Driver From Here
VNH2SP30 is an awesome high current full bridge motor driver made for high current applications such as driving heavy Stepper/DC Motors and a wide range of automotive purposes. This board adds a dual monolithic high side driver and two low side switches.
VNH2SP30 Specification
- Maximum Voltage: 16V
- Peak Current: 30 A
- Practical Continuous Current: 14 A
- Dedicated Pin for Current Sensing
- MOSFET on-resistance: 19 mΩ (per leg)
- Maximum PWM frequency: 20 kHz
- Thermal Shutdown
- Undervoltage & Overvoltage Shutdown.
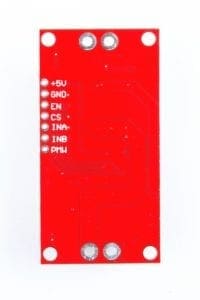
VNH2SP30 Pin Functions

VNH2SP30 Motor Driver
INA and INB used to control the direction of Motor; whether clockwise or anti clockwise.
PWM pin can be used to control the speed of the rotation of motor and top turn it on or off.
Basically these are the 3 pins you need to drive the motor.
Then we have another pin that can be used to measure the output current. Current Sense (CS) pins will output a voltage proportional to the current drawn (0.13 volts per amp) of output current.
Motor Power Supply – There are two ports where you can provide a voltage to drive the motor.
IC Pwer Supply – There are VCC and Gnd pins where you provide a voltage of 5V for the working of the internal circuitry.
Controlling DC Motor using Arduino and VNH2SP30 Motor Driver
We will now connect Arduino to VNH2SP30 and write a single code to rotate DC motor clock wise and counter clock wise and control their speed using Arduino and VNH2SP30 motor driver.
VNH2SP30 —– Arduino Connections
- Vcc ——- 5 V
- Gnd ——- 0 V
- A1 ——- Pin 13
- A2 ——- Pin 2
- PWM ——- Pin 3
- Motor + ——- 12 V
- Motor – ——- 0 V
- Motor 1 Terminal 1 ——- To Motor
- Motor 1 Terminal 2 ——- To Motor
VNH2SP30 Arduino Code
define MOTOR_A1_PIN 13
define MOTOR_B1_PIN 12
define PWM_MOTOR_1 3
void setup()
{
Serial.begin(9600);
pinMode(MOTOR_A1_PIN, OUTPUT);
pinMode(MOTOR_B1_PIN, OUTPUT);
pinMode(PWM_MOTOR_1, OUTPUT);
}
void loop()
{
clock();
delay(3000);
counter_clock();
delay(3000);
}
void clock()
{
motor1_speed=100;
analogWrite(PWM_MOTOR_1, motor1_speed);
digitalWrite(MOTOR_A1_PIN, HIGH);
digitalWrite(MOTOR_B1_PIN, LOW);
Serial.println(“Moving Clockwise”);
}
void counter_clock()
{
motor1_speed=50;
analogWrite(PWM_MOTOR_1, motor1_speed);
digitalWrite(MOTOR_A1_PIN, LOW);
digitalWrite(MOTOR_B1_PIN, HIGH);
Serial.println(“Moving Counter Clock Wise”);
}
As simple as that. You can simply modify this code to rotate the motor whichever way you want.
Top Arduino Projects You can Try this Summer Vacation

Here is a list of the latest Arduino Projects 2019 implementing newer sensors and boards, which can be followed easily and are really interesting to implement you can try this summer vacation.
Top Robotics Projects You can Try this Summer Vacation

Here is a list of the latest Robotics Projects for 2019 based on Raspberry Pi Arduino Projects 2019 implementing newer sensors and boards, which can be followed easily and are really interesting to implement you can try this summer vacation.
Did you find this page useful? Help us to improve by rating this page.
[RICH_REVIEWS_FORM]
[RICH_REVIEWS_SNIPPET stars_only=”true”]