
PH Sensor Arduino | PH Meter for Arduino
Arduino pH Meter Introduction
AAs you all know, pH is a very important unit for measurement of acidity/basic nature of solutions. pH measurement is widely employed in almost every aspects of our life of applications such as agriculture, industries, environmental pollution monitoring, wastewater treatment and in research and development. pH is a measure of the acidity or alkalinity of a solution.

In this post I will be explaining about What pH is, How pH electrode Works, What a pH Sensor is and how to connect Arduino to a pH Sensor to make your own Arduino pH Meter.


Sponsor Link
This Project is Sponsored by UTSource. UTSource is a professional electronic components supplier.
1. What is pH?
In Chemistry, pH is a scale used to determine acidic, basic or neutral nature of various solutions. Definition of pH is – Negative Logarithm of Hydrogen ion concentration.
pH = -log10[H+]
pH scale is from 0 to 14. Acidic solutions such as Hydrochloric Acid, Acetic Acid etc have pH below 7 where as Bases such as Sodium Hydroxide have pH above 7. Usually, neutral solutions such as distilled water have pH of 7.
pH is a numerical scale to represent acid, base or neutral solution on scale of 0 to 14.
Measurement of pH is very important in so many fields like chemistry, biology, medicine, agriculture, food and many more which can be done with your very own DIY Arduino pH Meter.
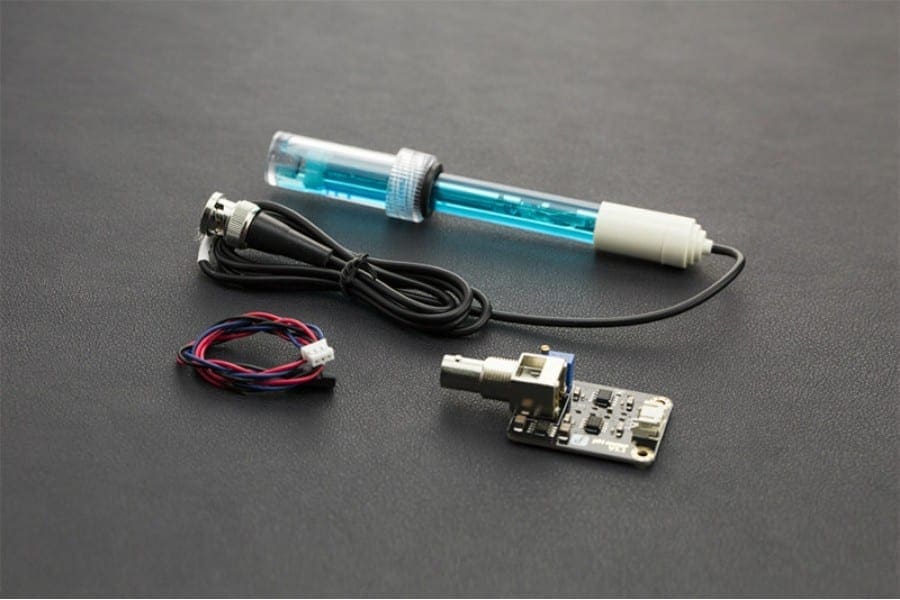
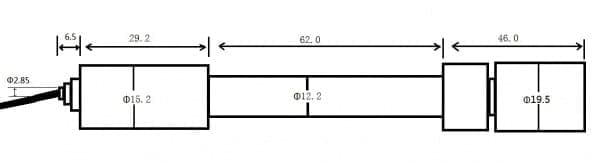
2. pH Sensor for Arduino
Start building your own Arduino pH sensor for water pH level monitoring station, aquarium or for your water tanks. Use this sensor for your aquaponics or fish tanks.
Get Your pH Sensor from Here.
This pH Sensor has 2 Parts
- The Probe
- The Circuit
This pH sensor gives out analog voltage depending up on the pH value of the solution where the probe is kept. This analog value can be read very easily using any analog pin of the Arduino.
3. How Arduino pH Probe Works?
Let us look at pH probe for our pH meter and how it works. Well the ph Probe measures the potential difference between two electrodes, both in the same solution, however one of the electrodes has an enclosure. This enclosure is usually filled with glass tube with a metal such as lithium, sodium, potassium, boron, calcium and so on.

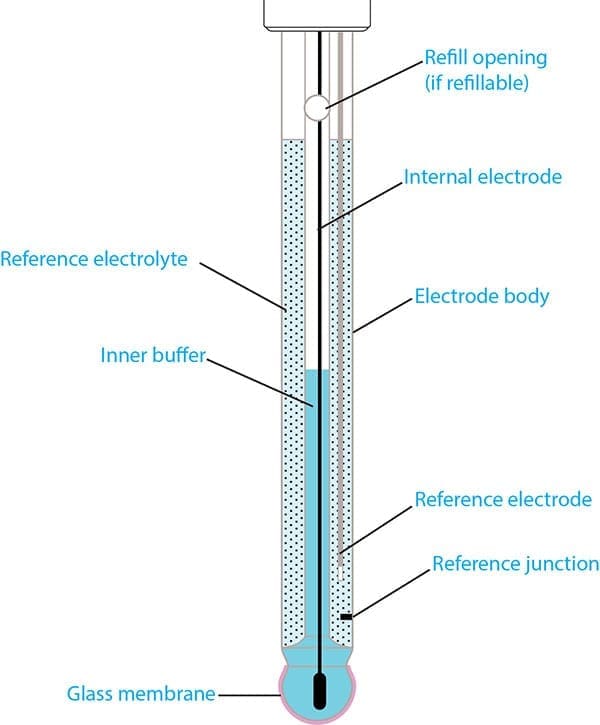
The inside and outside of the ph Probe is coated with a hydrated gel and the inside is a neutral solution of potassium chloride. The reference electrode is usually placed in a separate enclosure in contact with a solution through a porous membrane suspended in than 0.1 moles per liter potassium chloride solution. If we zoom in on the class member junction, we see the hydrogen ions has diffused into the gel on internal side.
When we place a probe into an acidic solution, hydrogen ions will diffuse into the gel on the external side. Now remember that inside of the silicon dioxide glass, we have metal cations, let’s say sodium that had some mobility inside the glass. So when we put the probe into a solution, the excess of hydrogen ions on the outside, force the sodium ions to diffuse from one region of activity to another.
So if we, with sufficient accuracy and measure the voltage crossed in and out the solution, we’ll get an increased positive voltage as the effective concentration of hydrogen ions increase.
For neutral solution the hydrogen ions balances. So we have no net diffusion of sodium and also no charge.
For basic solution we get an opposite diffusion and so we get a negative voltage.

Notice that if we were to change the thermodynamics situation by temperature or pressure, the rate at which hydrogen ions diffuse in or out of the gel changes and so will the measured voltage. This is the reason why pH is truly a mission of activity and not direct on the concentration of hydrogen ions in solution.
4. Connections – IR Sensor to Arduino


- pH Sensor ——- Arduino
- Vin —–5V of Arduino
- Gnd —– Gnd of Arduino
- Vout (Analog) —– A0 of Arduino
5. Arduino pH sensor Code
int ph_analog = A0;
int ph_analog_val;

void setup()
{
pinMode(ph_analog, INPUT);
}
void loop()
{
ph_analog_val= analogRead(ph_analog);

Serial.print("Analog Value - ");
Serial.println(ph_analog_val);
}
Just select the board and upload the sketch. Thats it Guys. Your ph meter is now ready to use. Just dip the ph meter probe to some solution and it will start showing you the values corresponding g to the ph of the solution.
Top Arduino Projects You can Try this Summer Vacation

Here is a list of the latest Arduino Projects 2019 implementing newer sensors and boards, which can be followed easily and are really interesting to implement you can try this summer vacation.
Top Robotics Projects You can Try this Summer Vacation

Here is a list of the latest Robotics Projects for 2019 based on Raspberry Pi Arduino Projects 2019 implementing newer sensors and boards, which can be followed easily and are really interesting to implement you can try this summer vacation.
Did you find this page useful? Help us to improve by rating this page.
[RICH_REVIEWS_FORM]
[RICH_REVIEWS_SNIPPET stars_only=”true”]


No doubt this is one of the best tutorials. I am also planning to use this in one of my projects.