Few weeks back, I published an tutorial on building a robot that can be controlled using WiFi and an App RootSaid – WiFi Command Center using Raspberry Pi. I got so many questions about making the same thing using Arduino. So in this tutorial, I will be showing you how to make a WiFi Robot…
Few weeks back, I published an tutorial on building a robot that can be controlled using WiFi and an App RootSaid – WiFi Command Center using Raspberry Pi. I got so many questions about making the same thing using Arduino. So in this tutorial, I will be showing you how to make a WiFi Robot that can be controlled via Mobile phone using Arduino. Yes; an Arduino WiFi Robot.
Here, I will be using an App RootSaid – WiFi Command Center to send UDP strings over the local network or the Internet to the Arduino which will be listening for UDP packets in a particular port. The listener accepts the UDP packets, process it, extract the string and then use it to run a commands to drive the motor. Now lets get started.
Sponsor Link
This Project is Sponsored by UTSource. UTSource is a professional electronic components supplier.
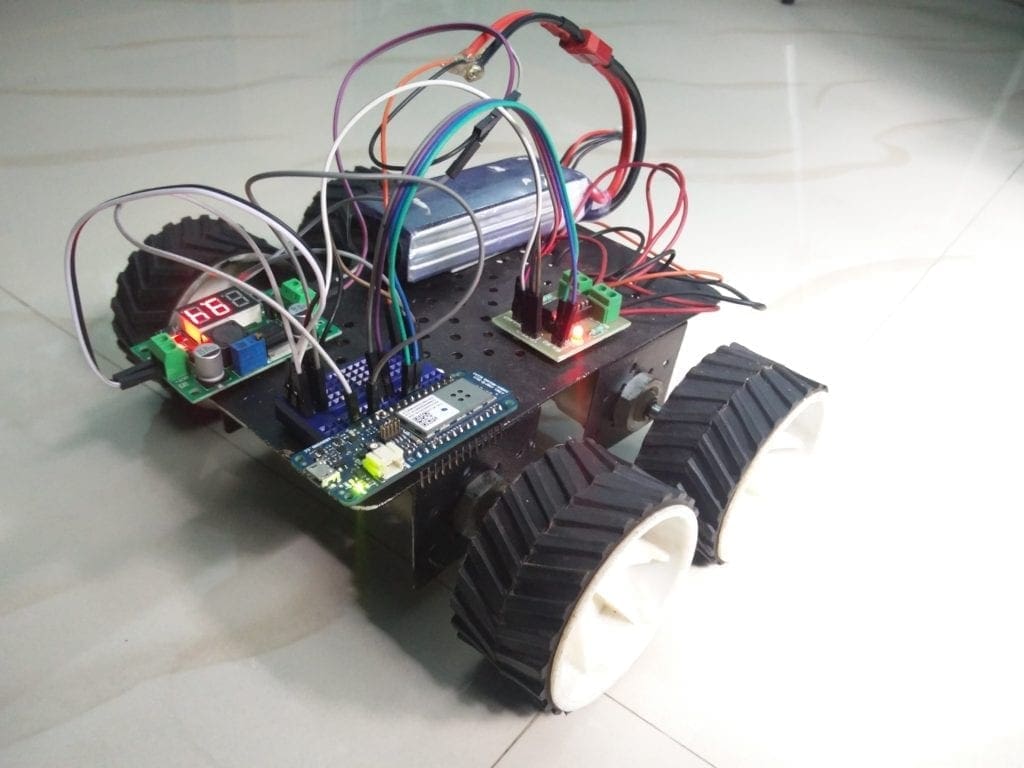
First thing to do is build a the chassis for WiFi Robot using Arduino. You can build it the way you like. Only think you should keep in mind mind is, it should have enough space for Arduino, L293D Motor Driver and a LIPO battery. For our project, I will be using a 12V LiPo Battery. You can use foam board or aluminium sheet or wood piece for building the base.
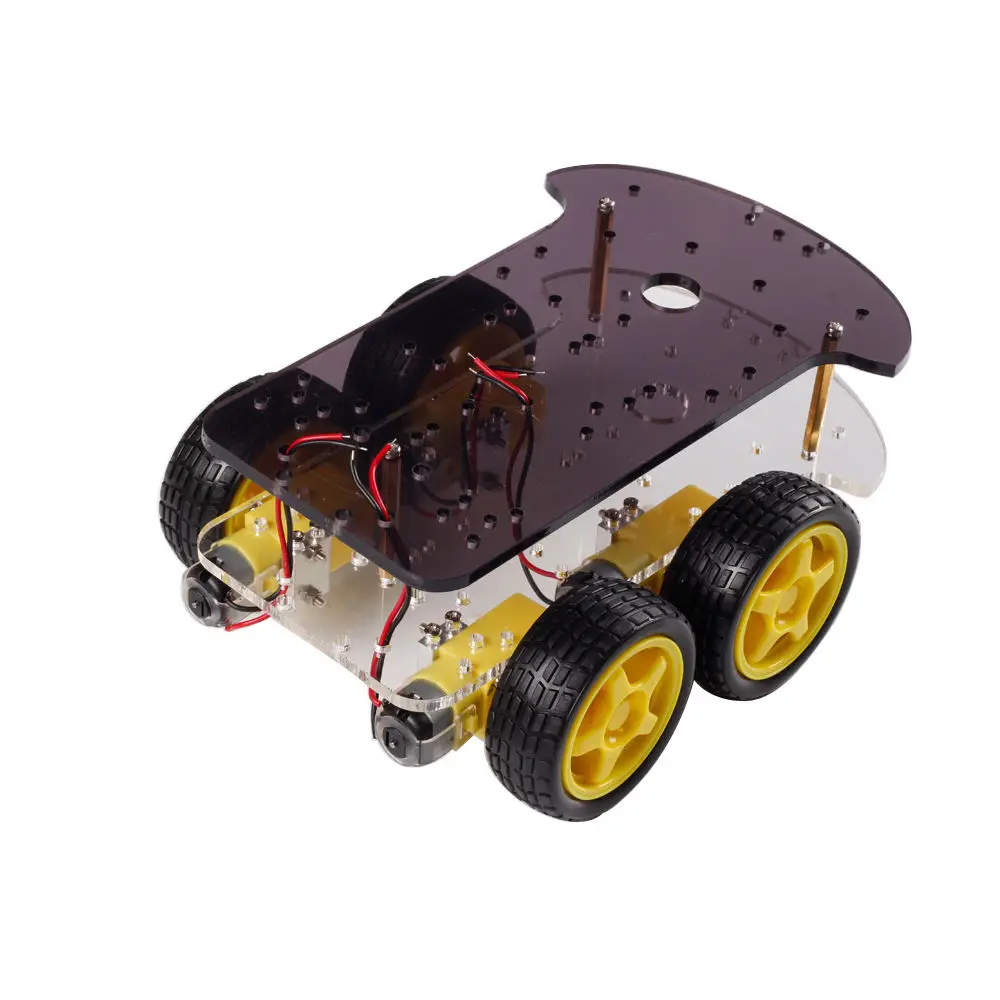
These are some of the best robot chassis available for you to build this project. Check out the link below.
Get the Best Robot Chassi Online
As mentioned earlier, I will be using a 12 V LiPo battery for powering our entire robot; that is the Arduino MKR1000 and the L293D Motor Driver IC to drive the circuit. We can provide 12 V directly to the motor driver Board I am using as it have an inbuilt regulator to power the motor and Circuit separately. But powering Arduino MKR1000 with this 12 V LiPo battery will fry the chip. So the best way is to use a voltage regulator that will step down 12 V to 5 V. You can Purchase your Lithium Polymer Battery From Here.
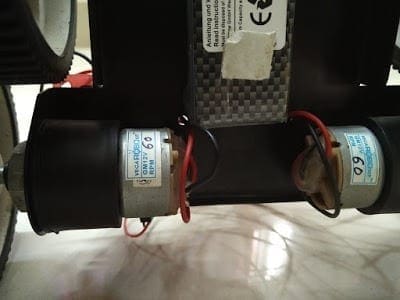
Step 3 – Arduino and DC Motor
Fix a DC motor on either side of the chassis. You can drive the DC motors using using a good motor driver IC. In this project, I will be using Dual H Bridge Motor Driver IC – L293D which can control two servo motors at a time.[AdSense-C]
For more details on driving DC motors using L293D IC click here. If you are new to this, it is better to go through this before proceeding to the next step to get a better understanding of the project.
Get your Product – L293D Driver Board
I have attached the pinout of MKR 1000 board to connect L293D of your WiFi Robot. You can use any 4 GPIO pins and connect it to L293D. In the code, I am using Pin 33 and 11 for enable pins, 13 and 15 for Motor 1 and 29 and 31 for motor 2.
Motor 1
In 1 – GPIO 10
In 2 – GPIO 11
Motor 2
In 3 – GPIO 12
In 4 – GPIO 13
Arduino should be provided with 5V and L293D Motor Driver with 12 V.
Step 5 – The Network
For our robot to work, you should have an active WiFi network. Either you can use your home WiFi network or you can create a hotspot on your mobile phone and control it from that network itself.
If you are planning to control it from outside the LAN, you should forward that particular port to that IP Address.
Download the below code to your Arduino WiFi Robot.
Download
Once you finish downloading the code, open it using Arduino IDE. There you have to make a small change in the below code
Here, you have to provide your WiFi Network name and password. Once that is done, select the correct port and board and click on upload button to upload the code to our Arduino WiFi Robot.
Once the upload is finished, open up the serial monitor and it will show you the IP Address of your WiFi robot.
Step 8 – Install RootSaid WiFi Command Center from Google PlayStore
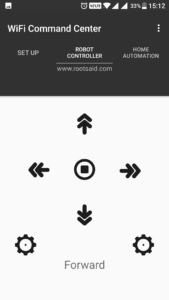
RootSaid WiFi Command Center is an android mobile phone app that can be used to control robots as well as home appliances over WiFi. All you have to do is connect your mobile phone to the WiFi network, enter the IP address and Port of the listener (the Arduino WiFi Robot) and control it using the arrow button in your android mobile phone. Click here to know more about this App.Click Here to Download this app to your phone from Playstore.
Step 9 – Start
Arduino WiFi Robot is all set and ready to go.
Now all you have to do is start the App in your android mobile phone, enter the IP address of the bot and port it is listening to.
Load the IP and Port using the link button and navigate to the Robot Controller Tab.
Now you can control the robot by simply pressing the forward, backward, left and right buttons in your android mobile phone.
[AdSense-B]
Rate the ProjectDid you find this page useful? Help us to improve by rating this page.
Cybersecurity Engineer | Cloud Infrastructure & DIY Robotics Enthusiast Bridging the gap between secure cloud systems and physical hardware. Lead contributor at the RootSaid Community, documenting real-world troubleshooting at the intersection of Cybersecurity, Cloud, and Robotics.
Transform a tiny DigiSpark ATtiny85 into a programmable HID keyboard with DigiKeyboard. Learn setup steps, key codes, macros, tips and inspiring project ideas.
Overview AI and Arduino are combined to create a quiz-to-unlock smart lock. OpenAI generates a short question and validates the reply; the Arduino Nano ESP32 controls a 12 V solenoid via MOSFET/relay and updates an Arduino IoT Cloud dashboard. Correct answer → brief unlock. Wrong answer → buzzer pattern and reset. Hardware remains minimal; intelligence…
Hey
After uploading the code, start the serial monitor. Then start the app, set the IP Address and press Action1 and Action2 buttons. You will see the string that is sent. Using that string, you can add another condition inside the if statement.
Like
    if(strcmp(packetBuffer, "action1") == 0){

      FunctionforAction1();

    }
Please tell me if can I use Arduino uno to controller by wifi and if you have any source to learn more about microcontroller and robot send to me..
Thanks for any information applied for us..


Hello, I wanted to ask how to code the Action1 and Action2 buttons to a particular function I wish to carry out.
This project is amazing and very clear cut, thank you for sharing.
Hey
After uploading the code, start the serial monitor. Then start the app, set the IP Address and press Action1 and Action2 buttons. You will see the string that is sent. Using that string, you can add another condition inside the if statement.
Like
if(strcmp(packetBuffer, "action1") == 0){
FunctionforAction1();
}
Hello
Your advice works perfectly. Thank you for your quick and efficient response !
Please tell me if can I use Arduino uno to controller by wifi and if you have any source to learn more about microcontroller and robot send to me..
Thanks for any information applied for us..