
Myoware EMG Sensor – Arduino Tutorial | Cost Effective EMG Sensor


Sponsor Link
This Project is Sponsored by UTSource. UTSource is a professional electronic components supplier.
Few months back I did a project on EEG sensor and Arduino – Raw EEG signal extraction using Mindflex and Building a Mind Controlled Robot. This time, I decided to do something related to muscles. A simple Arduino Project encorprating an Easy to Use EMG sensor which will allow you to read electrical activity of our muscles.
This is one of the basic electronic project and beginners can easily set this up effortlessly.
Muscles are used in all types of movements, sports and exercise – It is necessary to walk run throw eat jump etc. All these are generated by the contraction and relaxation of muscle fibres in our body. But how does our human body bring about this contraction and relaxation?


In this post, you will learn about EMG (Electromyography) and use your Arduino and how to read an emg signal using Arduino and Myoware – cost effective EMG sensor and use EMG Signals for your own projects.

How Does Our Muscles Contract?
Basically the contraction and relaxation of our muscle in our body chart as an electrical activity in our nervous system. Tiny electrical impulses that carry the message to contract and relax. 20 electrical impulses are carried down to each and every muscles in our body through nerves.
When a nerve impulse reaches the nerve ending it is then passed on and this electrical activity is spread across the muscle fibre. It is this excitation which causes the muscle cells to contract.
What is EMG or Electromyography?
As a hobbyists and electronic enthusiast, we might be interested in measuring this activity.This can be done using a technique called EMG or Electromyography.


Electromyogram (EMG) is a technique used to Study the electrical activity of muscles. As mentioned earlier, if a muscle is active that means there is an electrical impulse which is being passed to it from the nerves. The intensity of electrical activity will be directly proportional to the activity level of the muscle. So by studying the electrical activity we can understand the status and the activity of the muscle and vice versa. Some times, EMG is also known as myogram.
Reading EMG Signal?
EMC can be recorded by inserting electrodes into the muscles or by placing electrodes on the surface of the skin which is about the muscle which we want to study.
EMG Electrodes

There are mainly three electrodes which will be using for recording EMG signal. The first one will be
the reference electrode. It is known as reference electrode because the muscle activity is measured with respect to the electrical activity of the muscle where we keep this reference electrode.
The other two electrodes are placed on the belly of the muscle In line with muscle fibre. These electrodes measures the electrical activity of muscles with reference to the reference electrode. Send the signal to a device which will process these signals and display it in human readable form.
However there are other sources of electrical noises all around us. power lines in walls and ceilings fluorescent lights other electrical equipments they all generate electrical waves that we interfere with the electrical signals from our body. these signals are also captured by these electrodes and are sent along with our EMG signals.
The signals are then filtered and unwanted noises are removed by taking the differential of the electrical signals from the two electrodes. The signals are then passed onto an amplifier with will amplify the signal and is then displayed. Thanks to technological advancements we now have cost effective kits that will help us to read this EMG data easily.
OpenBCI
OpenBCI pr open source Brain Computer Interface is an opensource community researching in the field of electrical signals of the human brain and body that includes EEG ( electroencephalogram ), ECG ( electrocardiogram ), EMG ( Electro Myogram ) etc.
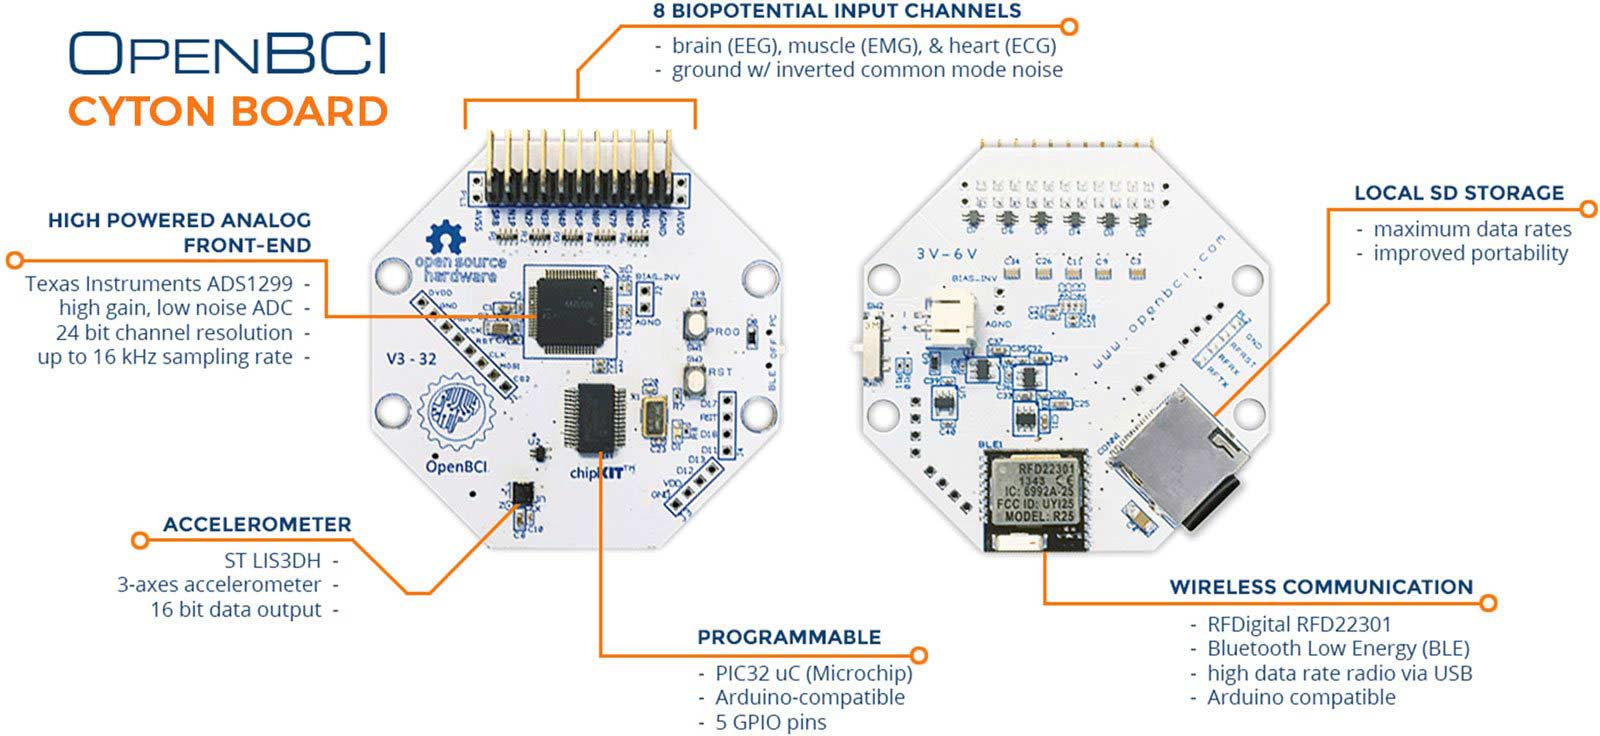

OpenBCI has developed so many software and hardware which includes electronic boards that are designed to work with micro controllers such as Arduino, Raspberry Pi etc. OpenBCI boards can be used to acquire and measure electrical activities within our brain (EEG), electrical activity during muscle contraction and relaxation (EMG) as well as heart (ECG).
And the best thing about these OpenBCI boards is that they can be used with normal non invasive electrodes.
Getting Started with Robotics?
Want to learn Robotics from Scratch? Here is an awesome guide for you to get started with robotics (Free Video Tutorials Included).
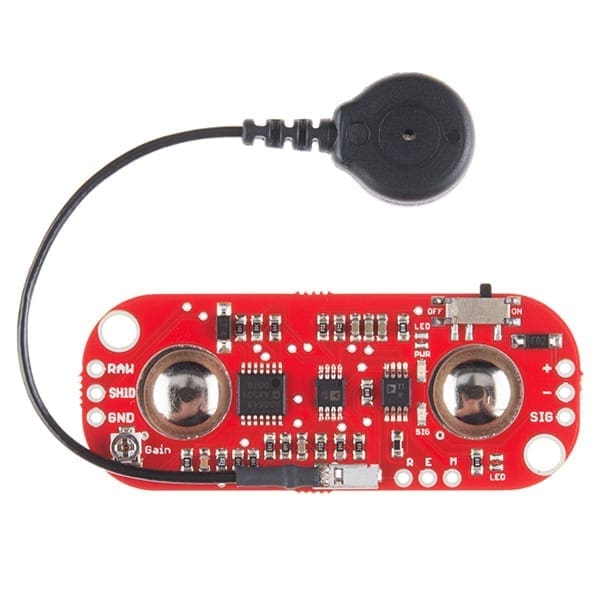
Myoware Sensor to get EMG Signal
Myoware sensor is an awesome piece of Technology which was developed by advanced Technologies which can be used to get EMG signals from our body. this is one of the best and cost effective way to get EMG signals from our body.[AdSense-C]
This sensor gives out analogue values which is proportional to the electrical activity of the muscle where it is kept. the output can be read using arduino Raspberry Pi or any other microcontroller which can read analogue signals. you can easily get the energy signal using this myoware sensor and effortlessly use these signals on your electronics projects such as controlling robotic arm, driving robots, prosthetic arms etc.

As the muscle contracts or flexes the electrical activity increases and the analogue output of the myoware sensor increases. as the muscle relaxers the electrical activity of the muscle decreases and the analogue output of the myoware sensor decreases.
How to read EMG Sensor using Arduino and Myoware Sensor?
Without wasting time we will get started on the project.
Components Needed
- Arduino
- Myoware Sensor
- PC
Steps
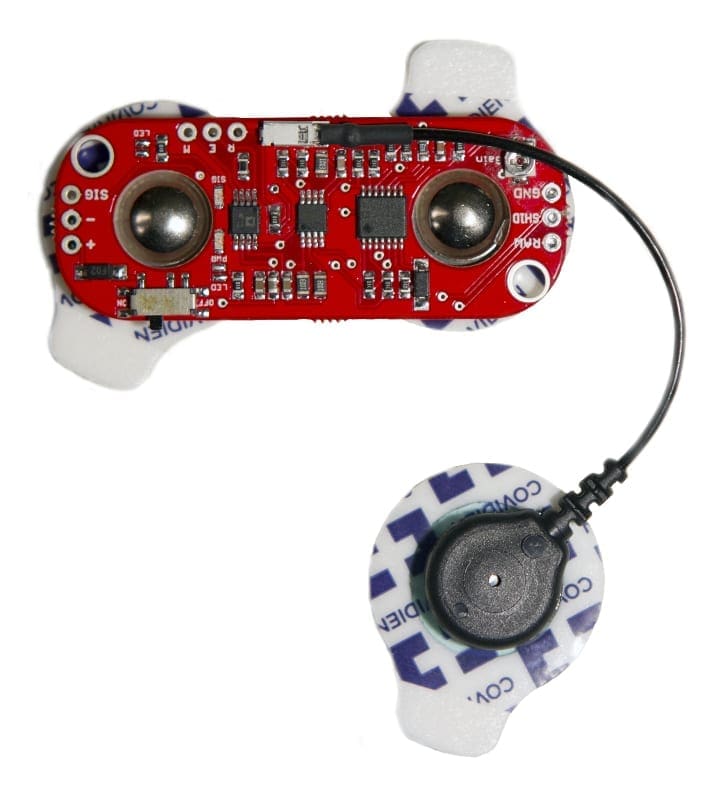

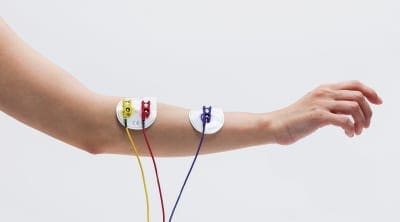
First thing to do is connect the electrode on the myoware sensor. You can easily snap the electrodes onto the sensor board.
Placing the Myoware sensor
- First choose a muscle group. In this example, I will be using biceps muscles.
- Clean up the skin above the muscle group which you want to take the EMG reading of. You can use rubbing alcohol and a cotton swab to do this.
- Now remove the back sticker of the electrodes and put the sensor in such a way that one of the connected electrodes touches the center of the muscle group and the other touches the end of that muscle group.
- Place the reference electrode on a bony surface or a non adjacent muscular part.
Connecting Myoware Sensor to Arduino
Now you can connect this to your Arduino.
MyoWare’s (+) to +5 Vout of the Arduino
MyoWare’s (–) to the GND of the Arduino
MyoWare’s Signal to A0 on Arduino
Code[AdSense-C]
void setup() {
Serial.begin(9600);
}
void loop() {
 Serial.print(“Muscle Activity : ”)
 Serial.println(analogRead(A0));
 delay(50);
}
Simply copy and paste this code in your Arduino IDE, select the right port and board and hit on upload.
Once the code is uploaded, fire up your Serial monitor. You will start to see analog data pooling up line by line every 50 milli second. These are analog EMG signals.
Now try flexining the muscles, you will see that value increases. Thats it. In the next post, we will build a robotic arm and control it using this Myoware EMG Sensor – An Arduino Myoelectric arm.
Subscribe RootSaid Website by simply entering your Email ID below. You will receive notification whenever the tutorial is available for you to tinker with.
[mc4wp_form id=”1842″]
Rate the Project
Did you find this useful? Help us to improve by rating this page.


Simply outstanding. finally, I got a website I have searching for you.