AI on Raspberry Pi — The Complete Guide (2026)
Running AI on a Raspberry Pi is no longer experimental – it is real, it works, and this guide shows you exactly how to do it. Whether you want to run a local large language model completely offline, offload heavy machine learning to AWS Lambda, build an AI-powered home automation controller, or connect AI to your Arduino projects, this guide maps every path – with real hands-on code tested on actual hardware by RootSaid.

Every section in this guide links to a full step-by-step tutorial. Use the table of contents to jump to what you need.
Prerequisites
Before diving into any section of this guide, make sure you have the following in place. Each project builds on these foundations, so getting them right from the start will save you a lot of troubleshooting time later.
Hardware
- Raspberry Pi 4 (4 GB minimum) or Raspberry Pi 5 (8 GB recommended) — for local AI projects (Sections 3, 6, 7). For Pi Zero 2 W projects, use the Cloud Offloading approach in Sections 4 and 5.
- MicroSD card (32 GB minimum, Class 10 A2-rated) — or better, an NVMe SSD via the PCIe M.2 HAT+ for Pi 5, or a USB 3.0 SSD for Pi 4. AI models are large and slow SD cards will cause crashes.
- Official power supply — 27W USB-C PSU for Pi 5, 15W USB-C PSU for Pi 4. Underpowering the Pi causes random crashes during AI inference.
- Active cooling (Optional) — a fan or heatsink case is mandatory for LLM inference. The official Active Cooler for Pi 5 or an Argon ONE case for Pi 4 are both suitable.
- Arduino Nano ESP32 (Optional) — only required for the AI Smart Lock project in Section 8.
Software
- Raspberry Pi OS Bookworm 64-bit — this is mandatory. The 32-bit version cannot load most AI libraries. Confirm you are running 64-bit by opening a terminal and running
uname -m— you should seeaarch64. If you seearmv7l, you are on 32-bit and need to reflash. - Python 3.11 — shipped by default with Bookworm. Confirm with
python3 --version. - Arduino IDE 2.x — only required for the Arduino Smart Lock project in Section 8. Download from arduino.cc/en/software.
Accounts and API Keys
- AWS account – only required for the Thin Client and EFS sections (Sections 4 and 5). The AWS Lambda free tier (1 million requests/month) covers all hobby usage.
- OpenAI API key – only required for the AI Smart Lock project in Section 8. You can create one at platform.openai.com. GPT-4o-mini costs a fraction of a cent per request.
- Raspberry Pi account – only required for the remote access section (Section 10). Free to create at id.raspberrypi.com.
- Arduino IoT Cloud account – only required for the AI Smart Lock project. The free tier is sufficient.
Knowledge
- Basic Linux terminal — you should be comfortable running commands, navigating directories, and editing files with nano. If not, spend 30 minutes with a basic Linux command line tutorial before starting.
- Basic Python — you should be able to read and run a Python script. You do not need to write Python from scratch — all code is provided — but understanding what a function and a loop do will help you customise the projects.
- SSH access to your Pi — all projects in this guide assume you can SSH into your Pi from your laptop. If you have not set this up yet, use Raspberry Pi Imager to preconfigure SSH and WiFi credentials before flashing your SD card.
New to Raspberry Pi GPIO and Python? Start with our beginner guide first: Raspberry Pi LED Control with Python — GPIO Beginner Guide (2026). It covers everything from OS setup to your first hardware control script.
Table of Contents
- Which Raspberry Pi Should You Use for AI?
- The Two Approaches: Local AI vs Cloud-Offloaded AI
- Running a Local LLM with Ollama and Open WebUI
- The Thin Client Model: Pi + AWS Lambda
- Bypassing the AWS Lambda 250 MB Limit with EFS
- GPIO Basics: Controlling Hardware with Python
- AI-Powered Home Automation with Raspberry Pi Zero
- AI + Arduino: The OpenAI Smart Lock Project
- Connecting Arduino and Raspberry Pi for AI Projects
- Accessing Your Pi AI Server Remotely
- Frequently Asked Questions
- What to Build Next
1. Which Raspberry Pi Should You Use for AI?
Before you write a single line of code, you need to match your AI project to the right hardware. Using the wrong Pi model is the most common reason projects fail — either the board runs out of memory, overheats, or is simply too slow to be practical.
- Pi 5 (8 GB) — Recommended: Best for local LLMs (Phi-3, TinyLlama, Qwen2), Open WebUI, and running a full AI server. Not suitable for very large models (7B+ without quantization).
- Pi 5 (4 GB): Good for TinyLlama, Phi-3 mini, and Open WebUI with light models. Struggles with 7B+ models without swap.
- Pi 4 (8 GB): Works well for TinyLlama and the Cloud-Offloaded Thin Client model. Slower than Pi 5 for real-time LLM responses.
- Pi 4 (4 GB): Suitable for light Ollama models. Cannot run Open WebUI and an LLM simultaneously.
- Pi Zero 2 W: Cannot run any local LLM. Use AWS Lambda offloading instead — this is covered in Sections 4 and 5.
Important: All Raspberry Pi models used for AI must run Raspberry Pi OS 64-bit (Bookworm). The 32-bit OS cannot load most AI libraries correctly and Ollama will not install on it. Confirm your architecture by running
uname -min the terminal – you should seeaarch64.
Recommended Storage for AI Projects
MicroSD cards are too slow for serious AI work. AI models range from 500 MB to several GB, and loading them from a slow card causes extreme delays and crashes. For the Pi 5, use an NVMe SSD via the PCIe M.2 HAT+ from Raspberry Pi. For the Pi 4, a USB 3.0 SSD is the next best option. If you must use a microSD, use a minimum Class 10 A2-rated card.
2. The Two Approaches: Local AI vs. Cloud-Offloaded AI
There are two distinct ways to run AI on a Raspberry Pi. Understanding the difference will save you hours of frustration, and many advanced projects use both together.


Approach A — Local AI: The AI model runs directly on the Pi with no internet required after setup. It works offline, has no cloud costs, and is perfect for demos and privacy-sensitive projects. The downside is slower responses since everything runs on the CPU. The best tools are Ollama for LLMs and gpiozero/RPi.GPIO for hardware control. This approach works best on a Pi 4 or Pi 5 with 4–8 GB RAM.
Approach B — Cloud-Offloaded AI (Thin Client): The Pi sends data to AWS Lambda for heavy processing and gets the result back. The Pi stays cool and fast, handling only sensors, GPIO, and communications. This supports very large models like OpenCV and TensorFlow with no size limits when combined with EFS. It requires an internet connection and a small AWS cost, though the Lambda free tier covers most hobby usage. This is the right approach for Pi Zero 2 W and other resource-constrained boards — and is covered in detail in Sections 4 and 5.
3. Running a Local LLM with Ollama and Open WebUI
Ollama lets you run large language models completely offline — no OpenAI account, no subscription, no cloud. Open WebUI gives you a browser-based chat interface that looks and works like ChatGPT, but runs entirely on your Pi. We ran this full setup on a Raspberry Pi and documented every problem that occurred — storage running out, models crashing, Docker issues, and overheating — and how to fix each one.

Full Tutorial: Run AI on Raspberry Pi Locally (2026) — Ollama + Open WebUI: Real Setup, Issues, and Fixes
Hardware Requirements
- Raspberry Pi 4 (4 GB minimum) or Raspberry Pi 5 (8 GB recommended)
- Raspberry Pi OS Bookworm 64-bit — 32-bit will not work
- 32 GB+ storage — NVMe SSD preferred, A2-rated microSD as minimum
- Active cooling — LLM inference generates significant and sustained heat
- Official power supply: 27W USB-C PSU for Pi 5, 15W for Pi 4
Step 1: Update Your System
sudo apt update && sudo apt upgrade -y
sudo reboot
Step 2: Install Ollama
curl -fsSL https://ollama.com/install.sh | shVerify the installation and confirm the service is running:
ollama --version
sudo systemctl status ollama
sudo systemctl enable ollama
Step 3: Choose and Pull a Model
Model choice is critical on the Pi. Too large a model will crash with an out-of-memory error. Recommended models for 2026 based on real hardware testing:
- tinyllama (637 MB, needs 1 GB RAM) — around 8–12 tokens/sec on Pi 5 8GB. Best for summaries, rewrites, and demos.
- phi3:mini (2.3 GB, needs 4 GB RAM) — around 5–8 tokens/sec. Better reasoning, coding help, and Q&A.
- qwen2:1.5b (934 MB, needs 2 GB RAM) — around 7–10 tokens/sec. Good balance of speed and quality.
- llama3.2:3b (2.0 GB, needs 6 GB RAM) — Pi 5 (8 GB) only. Best overall quality at around 4–6 tokens/sec.
ollama run tinyllamaThis downloads the model on first run and opens an interactive terminal prompt. Test it with structured prompts like summarisation or text rewriting — TinyLlama performs best on these. Exit with Ctrl + D. For Pi 5 (8 GB):
ollama run phi3:miniStep 4: Move Models Off the MicroSD Card
Ollama stores models in ~/.ollama/models/. On a small microSD this fills up fast. Move it to an external drive before downloading large models:
sudo systemctl stop ollama
sudo mkdir -p /mnt/ssd/ollama-models
sudo systemctl edit ollama
In the editor that opens, add these two lines between the existing comments:
[Service]
Environment="OLLAMA_MODELS=/mnt/ssd/ollama-models"
sudo systemctl daemon-reload
sudo systemctl start ollamaStep 5: Install Open WebUI with Docker
curl -fsSL https://get.docker.com | sh
sudo usermod -aG docker $USER
newgrp docker
docker run -d \
-p 3000:8080 \
--network=host \
-v open-webui:/app/backend/data \
--name open-webui \
--restart always \
ghcr.io/open-webui/open-webui:mainOpen http://localhost:3000 in a browser, or http://your-pi-ip:3000 from another device on your network. Create an account on first launch — the first account automatically becomes admin.
Step 6: Prevent Overheating
LLM inference is one of the most CPU-intensive tasks a Pi will ever run. Without cooling it will thermal-throttle within minutes. For Pi 5, use the official Active Cooler. For Pi 4, a heatsink case like the Argon ONE is sufficient. Monitor temperature in real time:
watch -n 2 vcgencmd measure_tempKeep temperature below 80°C under load.
4. The Thin Client Model: Pi + AWS Lambda
When the Pi Zero kept overheating and crashing under sustained CPU load from a TensorFlow model, the solution was not to buy a bigger Pi — it was to rethink the architecture entirely. The result is what RootSaid calls the Thin Client model: keep the Pi lightweight, doing only what it is good at (sensing, GPIO control, network communication), and offload all heavy computation to AWS Lambda in the cloud.

The Pi Zero captures sensor data or a camera frame and sends it via HTTP POST to an AWS API Gateway endpoint. Lambda processes it using large libraries like OpenCV or TensorFlow, then returns a JSON result. The Pi acts on that result — moving a robot, toggling a GPIO pin, updating a display. The Pi stays cool and responsive throughout.
Pi-Side Code: Sending Data to Lambda
import requests
import base64
import json

LAMBDA_ENDPOINT = "https://your-api-id.execute-api.us-east-1.amazonaws.com/prod/inference"

def send_image_to_lambda(image_path: str) -> dict:
    with open(image_path, "rb") as f:
        image_b64 = base64.b64encode(f.read()).decode("utf-8")

    payload = {"image": image_b64}

    try:
        response = requests.post(
            LAMBDA_ENDPOINT,
            json=payload,
            timeout=15
        )
        response.raise_for_status()
        return response.json()
    except requests.exceptions.RequestException as e:
        print(f"Lambda call failed: {e}")
        return {}

result = send_image_to_lambda("captured_frame.jpg")
print(f"Lambda result: {result}")
Full Tutorial: Pi as Thin Client — Offloading Heavy AI to AWS Lambda (and Why EFS Beats Layers) — includes the exact prime-number CPU overload test we ran on the Pi Zero to prove the performance difference, and the complete Lambda function code.
5. Bypassing the AWS Lambda 250 MB Limit with EFS
If you have tried the Thin Client approach, you have almost certainly seen this error: Unzipped size must be smaller than 250,735,466 bytes. This is AWS Lambda’s 250 MB deployment limit. For small libraries like requests or boto3 it is fine, but for AI and robotics — OpenCV alone is around 200 MB and TensorFlow is over 1 GB — this limit makes Lambda useless. Lambda Layers do not solve the problem because they count toward the same 250 MB total.

The solution is AWS EFS (Elastic File System). Instead of packaging libraries inside your Lambda deployment, you store them on a network drive that Lambda mounts at runtime. No size limits. No re-uploading 200 MB every time you change one line of code.
How EFS Changes the Lambda Code
import sys
import json
import base64
import numpy as np

# Libraries installed on EFS once from an EC2 instance:
# pip install opencv-python-headless tensorflow -t /mnt/efs/python-libs
sys.path.append('/mnt/efs/python-libs')

import cv2
import tensorflow as tf

def handler(event, context):
    image_data = base64.b64decode(event["image"])
    np_array = np.frombuffer(image_data, dtype=np.uint8)
    frame = cv2.imdecode(np_array, cv2.IMREAD_COLOR)

    # Run your AI model here
    # result = your_model.predict(frame)

    return {
        "statusCode": 200,
        "body": json.dumps({
            "message": "Inference complete",
            "shape": list(frame.shape)
        })
    }
EFS Setup Steps (AWS Console)
- AWS Console → EFS → Create file system. Use default settings and note the File System ID.
- Lambda function → Configuration → VPC. Add Lambda to a VPC with private subnets. EFS must be in the same VPC.
- Lambda function → Configuration → File systems → Add file system. Set mount path to
/mnt/efs. - Launch a temporary EC2 instance in the same VPC, mount the EFS drive, and run:
pip install opencv-python-headless tensorflow -t /mnt/efs/python-libs - Deploy your Lambda code — now just a few KB. The
sys.path.appendline connects it to EFS at runtime.
Full Tutorial: Bypassing the AWS Lambda 250 MB Limit — Why EFS is Better Than Layers for AI and Robotics
6. GPIO Basics: Controlling Hardware with Python
Before you can build AI-powered hardware projects, you need to understand how the Raspberry Pi communicates with the physical world through its GPIO pins. GPIO stands for General Purpose Input Output — these pins let the Pi send electrical signals to LEDs, motors, relays, and MOSFETs, or read signals from sensors.

We wrote a beginner guide that starts with a single LED and progressively introduces the concepts you will use in every AI and automation project: pin numbering (BCM vs BOARD), output control, PWM for brightness control, infinite loops for always-on systems, and the connection between Python’s while True loop and Arduino’s loop() function.
Here is the minimal working example from the guide — control an LED on GPIO pin 18:
from gpiozero import LED
from time import sleep

led = LED(18)

while True:
    led.on()
    sleep(1)
    led.off()
    sleep(1)
This is the foundation. Every home automation controller and every AI-triggered GPIO action in this guide builds on exactly this pattern.
Full Tutorial: Raspberry Pi LED Control with Python — GPIO Beginner Guide (2026)
7. AI-Powered Home Automation with Raspberry Pi Zero
This project combines everything: a Raspberry Pi Zero W, two MOSFET switches for controlling 12V devices, a Flask web console accessible from your phone, and GPIO control through Python. It is the foundation on which you can add any AI layer — whether that is a local Ollama model parsing natural language commands, or an OpenAI API call triggered by a voice command.

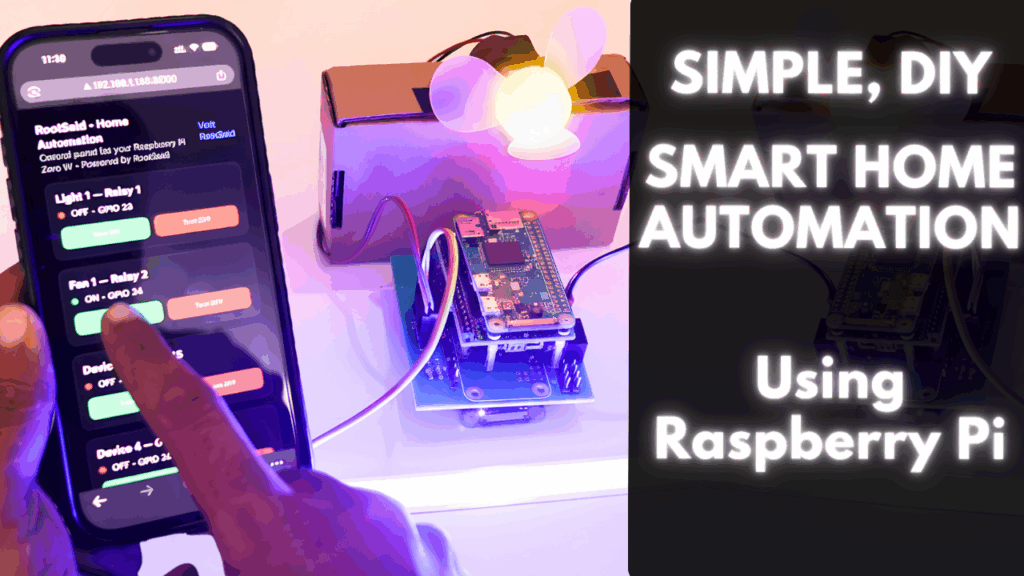
The circuit uses low-side N-MOSFET switches controlled by the Pi’s GPIO pins. Each device connects from +12V through the MOSFET drain to ground. The MOSFET gate is driven by a GPIO pin through a 100–330 Ω resistor. A 100 kΩ pulldown from gate to ground keeps the MOSFET safely off at boot. For inductive loads like relays or solenoids, add a flyback diode across the device.
Test GPIO Switching Before Adding Any AI
import time
import RPi.GPIO as GPIO

GPIO.setmode(GPIO.BCM)
GPIO.setup(23, GPIO.OUT, initial=GPIO.LOW)
GPIO.setup(24, GPIO.OUT, initial=GPIO.LOW)

# Turn ON GPIO 23 for 2 seconds
GPIO.output(23, GPIO.HIGH)
time.sleep(2)
GPIO.output(23, GPIO.LOW)

# Turn ON GPIO 24 for 2 seconds
GPIO.output(24, GPIO.HIGH)
time.sleep(2)
GPIO.output(24, GPIO.LOW)

GPIO.cleanup()
Once switching works reliably, you add the Flask web console that lets you toggle devices from any browser on your network — and from there, adding AI to parse natural language commands is a straightforward extension.
Full Tutorial: Home Automation with Raspberry Pi Zero — MOSFET Switches + Flask Web Console
8. AI + Arduino: The OpenAI Smart Lock Project
AI does not have to live only on the Pi side. We built a project that connects OpenAI directly to an Arduino Nano ESP32: an AI-powered smart lock where you must answer a quiz question generated by GPT to unlock the door. A wrong answer triggers a buzzer pattern. A correct answer drives a 12V solenoid via MOSFET for three seconds and updates the Arduino IoT Cloud dashboard with the lock status.
Required Hardware
- Arduino Nano ESP32 (built-in WiFi, 3.3V logic)
- 12V solenoid lock
- N-channel MOSFET — IRLZ44N or similar, must be logic-level 3.3V compatible
- Flyback diode (1N4007) across the solenoid
- Passive or active buzzer, 3.3V compatible
- 100–330 Ω gate resistor
- Arduino IoT Cloud account (free tier is sufficient)
- OpenAI API key
Arduino Library Dependencies
Install via Arduino IDE 2.x → Sketch → Include Library → Manage Libraries:
- ArduinoIoTCloud by Arduino — latest version
- Arduino_ConnectionHandler by Arduino — latest version
- ArduinoJson by Benoit Blanchon — version 7.x
- WiFi and HTTPClient — included with the Arduino Nano ESP32 board package
Board package: in Boards Manager, install Arduino ESP32 Boards by Arduino (version 2.0.0 or later). Select board: Arduino Nano ESP32.
Core Sketch — OpenAI Question Fetch and Answer Validation
/*
  RootSaid AI Smart Lock
  Hardware: Arduino Nano ESP32
  Dependencies: ArduinoIoTCloud, Arduino_ConnectionHandler, ArduinoJson 7.x
  Store API keys in arduino_secrets.h — never hardcode in sketch
*/

#include "arduino_secrets.h"
#include <WiFi.h>
#include <HTTPClient.h>
#include <ArduinoJson.h>
#include "thingProperties.h"

#define SOLENOID_PIN  D2
#define BUZZER_PIN    D3

String currentQuestion = "";
String correctAnswer   = "";

void setup() {
  Serial.begin(9600);
  delay(1500);
  pinMode(SOLENOID_PIN, OUTPUT);
  pinMode(BUZZER_PIN, OUTPUT);
  digitalWrite(SOLENOID_PIN, LOW);
  digitalWrite(BUZZER_PIN, LOW);
  initProperties();
  ArduinoCloud.begin(ArduinoIoTPreferredConnection);
  fetchNewQuestion();
}

void loop() {
  ArduinoCloud.update();
}

void onUserAnswerChange() {
  if (userAnswer.length() == 0) return;
  bool correct = validateAnswerWithAI(userAnswer, correctAnswer);
  if (correct) {
    lockStatus = "UNLOCKED";
    digitalWrite(SOLENOID_PIN, HIGH);
    delay(3000);
    digitalWrite(SOLENOID_PIN, LOW);
    lockStatus = "LOCKED";
    fetchNewQuestion();
  } else {
    lockStatus = "WRONG ANSWER";
    for (int i = 0; i < 3; i++) {
      digitalWrite(BUZZER_PIN, HIGH); delay(200);
      digitalWrite(BUZZER_PIN, LOW);  delay(200);
    }
    lockStatus = "LOCKED";
  }
  userAnswer = "";
  ArduinoCloud.update();
}

void fetchNewQuestion() {
  if (WiFi.status() != WL_CONNECTED) return;
  HTTPClient http;
  http.begin("https://api.openai.com/v1/chat/completions");
  http.addHeader("Content-Type", "application/json");
  http.addHeader("Authorization", String("Bearer ") + SECRET_OPENAI_KEY);
  String body = "{\"model\":\"gpt-4o-mini\",\"messages\":[{\"role\":\"user\","
                "\"content\":\"Generate a simple quiz question. Reply ONLY with JSON: "
                "{\\\"question\\\": \\\"...\\\", \\\"answer\\\": \\\"...\\\"}\"}],"
                "\"max_tokens\":80,\"temperature\":0.8}";
  int code = http.POST(body);
  if (code == 200) {
    JsonDocument doc;
    deserializeJson(doc, http.getString());
    String raw = doc["choices"][0]["message"]["content"].as<String>();
    JsonDocument qDoc;
    if (deserializeJson(qDoc, raw) == DeserializationError::Ok) {
      currentQuestion = qDoc["question"].as<String>();
      correctAnswer   = qDoc["answer"].as<String>();
      questionDisplay = currentQuestion;
    }
  }
  http.end();
}

bool validateAnswerWithAI(const String& given, const String& correct) {
  if (WiFi.status() != WL_CONNECTED) return false;
  HTTPClient http;
  http.begin("https://api.openai.com/v1/chat/completions");
  http.addHeader("Content-Type", "application/json");
  http.addHeader("Authorization", String("Bearer ") + SECRET_OPENAI_KEY);
  String prompt = "Question: " + currentQuestion +
                  "\\nCorrect answer: " + correct +
                  "\\nUser answer: " + given +
                  "\\nReply with only: CORRECT or WRONG";
  String body = "{\"model\":\"gpt-4o-mini\",\"messages\":[{\"role\":\"user\",\"content\":\""
                + prompt + "\"}],\"max_tokens\":5,\"temperature\":0}";
  int code = http.POST(body);
  String result = "";
  if (code == 200) {
    JsonDocument doc;
    deserializeJson(doc, http.getString());
    result = doc["choices"][0]["message"]["content"].as<String>();
    result.trim();
  }
  http.end();
  return result == "CORRECT";
}
Security Note: Never write your OpenAI API key directly in the sketch. Store it in
arduino_secrets.hand add that file to.gitignore. In the Arduino IoT Cloud editor, secrets are managed under the Devices tab.
Full Tutorial: Arduino AI-Powered Mystery Lock — Arduino Nano ESP32 + OpenAI + Arduino IoT Cloud
9. Connecting Arduino and Raspberry Pi for AI Projects
Many AI projects need both boards working together: Arduino handles the low-level hardware (motors, sensors, actuators) while Raspberry Pi runs the AI processing (Ollama, Python inference, cloud calls) and sends commands back. The most reliable way to connect them is USB serial communication.

Our guide covers both USB serial (the easiest method, just plug in the cable) and direct UART TX/RX pin communication (for when you need the USB port free). It includes full Python code for the Raspberry Pi side and Arduino sketches for the microcontroller side, plus the one detail beginners most commonly miss: the TX/RX pins must be crossed (Arduino TX to Pi RX, Arduino RX to Pi TX), and the Raspberry Pi’s GPIO pins operate at 3.3V while most Arduino boards use 5V logic.
Full Tutorial: Arduino and Raspberry Pi Serial Communication — USB and UART TX/RX Guide
10. Accessing Your Pi AI Server Remotely
Once your Pi is running Ollama or an AI-powered Flask app, you will want to access it from outside your home network. Raspberry Pi Connect is the official tool for this — it creates a secure tunnel to the Pi Foundation’s relay servers with no port forwarding, no static IP, and no VPN configuration needed.
sudo apt update
sudo apt install -y rpi-connect
sudo systemctl enable rpi-connect
sudo systemctl start rpi-connect
rpi-connect signin
After signing in, your Pi appears at connect.raspberrypi.com. Access a browser-based terminal or full desktop session from any device, anywhere.
Full Tutorial: Raspberry Pi Connect — Remote Access Without Port Forwarding
11. Frequently Asked Questions
Can I run AI on a Raspberry Pi without internet?
Yes. With Ollama and a downloaded model, everything runs fully offline. You need internet once to install Ollama and download the model, after which it works with no connection at all. This makes it ideal for demos, offline learning, and privacy-sensitive applications. The Cloud Offloading approach using AWS Lambda does require internet.
What is the best Raspberry Pi for AI in 2026?
The Raspberry Pi 5 with 8 GB RAM is the best all-round choice for local AI. It is roughly 3x faster than the Pi 4 for LLM inference and runs models like Phi-3 mini and Llama 3.2:3b at usable speeds of around 5–8 tokens per second. If budget is tight, a Pi 4 with 4–8 GB RAM works well for TinyLlama. For Pi Zero projects, use the Cloud Offloading (Thin Client + Lambda) approach.
Does Ollama work on Raspberry Pi OS Bullseye?
Ollama requires a 64-bit OS. It works on Raspberry Pi OS Bullseye 64-bit but Bookworm (Debian 12) is strongly recommended because it ships with Python 3.11, newer libraries, and better Docker compatibility. If you are on Bullseye, flashing a fresh Bookworm card is worth the time.
My Raspberry Pi keeps crashing when running Ollama. What is wrong?
Three common causes: (1) Not enough RAM — try a smaller model: TinyLlama on a 4 GB Pi, Phi-3 mini on an 8 GB Pi. (2) Overheating — add active cooling and monitor with watch -n 2 vcgencmd measure_temp. (3) Storage full — models fill up microSD cards fast. Move OLLAMA_MODELS to an external SSD using the systemd override method in Section 3.
How do I connect an Arduino to a Raspberry Pi for AI projects?
The most reliable method is USB serial communication. The Arduino handles hardware — motors, sensors, actuators — and sends data via serial. The Raspberry Pi reads that data, processes it with Python or an AI model, and sends back commands. Full wiring and code is covered in the Arduino and Raspberry Pi Serial Communication Guide.
How much does running AI on a Raspberry Pi cost to run 24/7?
Very little. A Raspberry Pi 5 under full LLM load draws approximately 5–8 watts. At average EU electricity prices of around €0.30/kWh, running it 24/7 for a full year costs around €13–21. Idle it uses around 3–4 watts. Compare this to a desktop GPU running Ollama, which can draw 100–300 watts.
12. What to Build Next
Once you have your AI foundation in place, here is the natural progression of projects from RootSaid:
- Pi Zero Home Automation — MOSFET switches and Flask web console. Real circuit, real code.
- AI Smart Lock — Arduino Nano ESP32 + OpenAI + IoT Cloud. The complete AI hardware project.
- Remote Pi Access — Access your Pi AI server from anywhere without port forwarding.
- Arduino + Pi Serial Communication — The bridge between your hardware and your AI code.
- GPIO Beginner Guide — The foundation for all hardware control in Python.
Written by Jithin, Cybersecurity Engineer and Cloud Infrastructure specialist at RootSaid. Every project in this guide was built and tested on real Raspberry Pi hardware. All code is tested on Raspberry Pi OS Bookworm (Debian 12) and Ollama latest as of April 2026. Found an error or have a question? Drop it in the comments below – every question gets answered.