Real-Time Object Detection – Run YOLO on Raspberry Pi: (2026)
Run YOLOv8 object detection on a Raspberry Pi 4 with the V1 camera – no GPU needed. Real errors, real fixes, tested by Indian makers at RootSaid.
If you have been scrolling through YouTube wondering whether your Raspberry Pi can actually “see” and recognise objects like a person, car or bottle without sending data to the cloud or buying an expensive AI HAT, the answer is yes. We tested this ourselves on a Raspberry Pi 4 with the basic Camera Module V1, hit almost every error a beginner could hit, and documented the fixes so you do not have to repeat our mistakes.

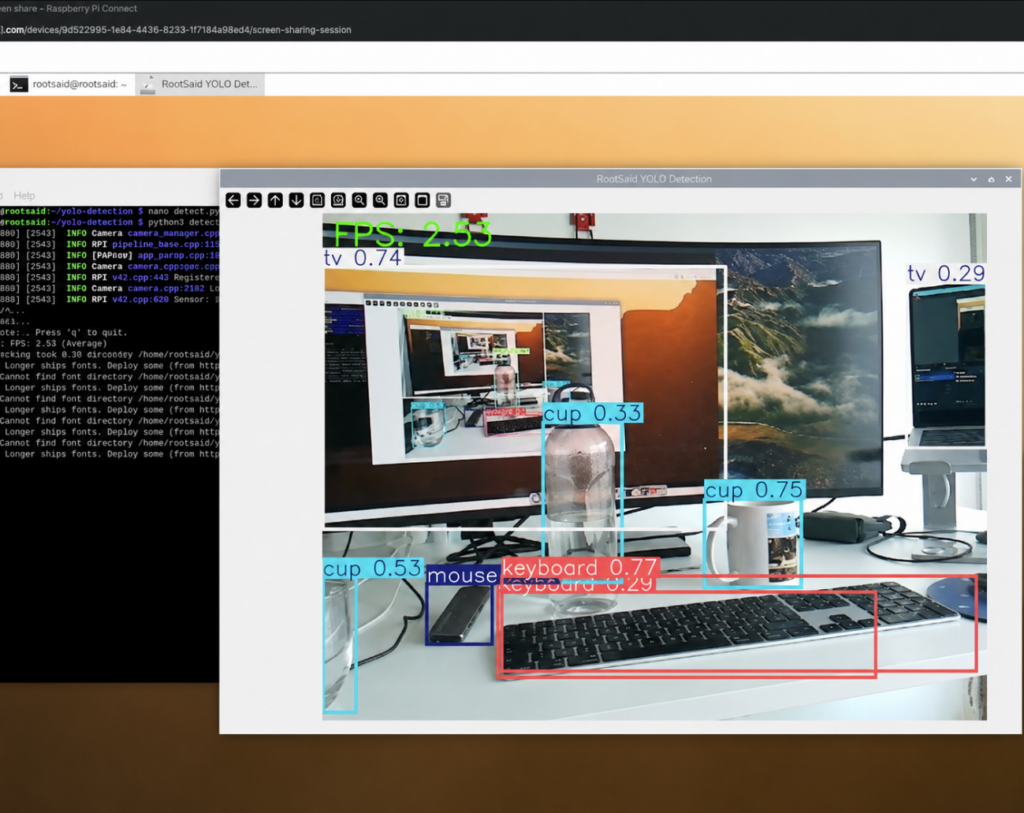
This guide walks through the complete process of running YOLOv8 (You Only Look Once) for real time object detection on a Raspberry Pi, using only the CPU. No external GPU, no Coral accelerator, just the Pi itself and a basic camera module that many Indian makers already have lying around from older projects.
What You Need: Components and Setup Costs
One of the best things about this project is that it does not require any new hardware if you already own a Raspberry Pi 4. The Camera Module V1 (the OV5647 sensor) is an older module, often the first camera Indian students buy along with their first Pi, and it works perfectly fine for this project. We specifically used this older camera to prove that you do not need the latest Camera Module 3 to get started with AI vision projects.
Here is what we used on our bench, with approximate prices for the Indian market. Prices can vary slightly between sellers like Robu, Robocraze and ElectronicsComp, so treat these as a rough budget guide.
| Component | Purpose | Approx Price (India) |
|---|---|---|
| Raspberry Pi 4 (4GB) | Main computer running YOLO inference | ₹6,000 – ₹7,000 |
| Camera Module V1 (OV5647, 5MP) | Captures live video for detection | ₹700 – ₹1,000 |
| MicroSD Card (32GB, Class 10) | Stores OS, Python environment and models | ₹400 – ₹600 |
| 5V/3A USB-C Power Supply | Stable power, important during sustained inference | ₹500 – ₹700 |
| HDMI Cable or VNC Setup | Required to view the live detection window | ₹150 (or free with Raspberry Pi Connect link) |
If you do not have a monitor handy, we recommend setting up remote access first. We have a separate guide on using Raspberry Pi Connect for remote access without port forwarding, which is genuinely the easiest way we found to get a desktop view on the Pi from a laptop without messing with VNC server settings.
Why Run YOLO on a Pi Without a GPU?
A fair question we got after posting our local AI videos was, “why bother with YOLO on a Pi when you could just run everything on a laptop?” The honest answer is that robotics projects need the brain to be on the robot. If you are building a line-following bot, a security camera, or an automated sorting arm, the Pi needs to make decisions locally, in real time, without depending on a laptop sitting nearby.
YOLOv8 Nano is specifically designed for this kind of constrained hardware. It is the smallest variant in the Ultralytics YOLO family, and while it will never match a desktop GPU for speed, it is more than capable of detecting everyday objects – people, vehicles, animals, electronics – at a few frames per second, which is plenty for many robotics and automation tasks.
If your project later needs a language model alongside vision (for example, a robot that can both “see” and “talk”), it is worth knowing that the Pi 4 can also run small local language models. We covered that separately in our guide on running AI locally on Raspberry Pi with Ollama and Open WebUI, including the real issues we hit there too.
Setting Up the Raspberry Pi OS and Camera
Start with a fresh installation of Raspberry Pi OS Bookworm (64-bit) using the official Raspberry Pi Imager. The 64-bit version matters here because several Python AI libraries, including PyTorch, perform noticeably better on 64-bit builds, and some newer packages do not even ship 32-bit wheels anymore.
Once your Pi boots up, update the system and install the base packages. We are installing these specific packages for the following reasons:
- python3-pip and python3-venv – for installing and isolating Python packages
- libopenblas-dev – the math library that PyTorch leans on heavily during inference
- python3-picamera2 – the official library for the V1 camera on Bookworm, which must come from apt and not pip
- libgtk-3-0 – needed so OpenCV can actually open a live preview window
sudo apt update && sudo apt upgrade -y
sudo apt install -y python3-pip python3-venv libopenblas-dev git python3-picamera2 libgtk-3-0
Connect the Camera Module V1 to the CSI port with the blue side of the ribbon facing the USB ports (on a Pi 4), then test it immediately before writing a single line of Python:
rpicam-hello --timeout 5000If a 5 second live preview opens, your camera is working at the hardware level. This single command saves you hours later, because it isolates camera problems from software problems right at the start.
💬 “The first time we did this, we skipped the rpicam-hello test entirely and jumped straight into Python. When the camera feed showed up black later, we spent almost an hour debugging the YOLO script before realising the ribbon cable was inserted slightly loose. One command at the start would have saved us all that time.”
How to Install YOLO on Raspberry Pi (Step by Step)
This is the part where most beginners hit walls, mainly because Raspberry Pi OS Bookworm changed how Python packages are installed compared to older versions. Here is the exact sequence that worked for us, with the reasoning behind every step.
First, create a dedicated project folder and a virtual environment. On Bookworm, running pip install directly will throw an “externally-managed-environment” error – this is intentional, Debian now protects the system Python from being broken by random pip installs. A virtual environment sidesteps this completely.
mkdir ~/yolo-detection && cd ~/yolo-detection
python3 -m venv venv --system-site-packages
source venv/bin/activate
The –system-site-packages flag is the detail that trips people up. Without it, your virtual environment cannot see the picamera2 library you installed earlier with apt, and your camera import will fail with a confusing error.
Next, create a temporary folder for pip downloads. This sounds unnecessary but it solves a very real “No space left on device” error that has nothing to do with your SD card actually being full:
mkdir -p ~/pip-tmpOn many Pi setups, /tmp is a small RAM-based filesystem. PyTorch’s installer wheel is over 400MB, and downloading it directly into /tmp can fail even when your SD card has 10GB free. Pointing pip’s temporary directory to your home folder fixes this instantly.
Now install the core packages:
TMPDIR=~/pip-tmp pip install --upgrade pip
TMPDIR=~/pip-tmp pip install ultralytics
TMPDIR=~/pip-tmp pip install opencv-python-headless
Ultralytics is the package that gives you the YOLO model classes and pulls in numpy, pandas and PyTorch as dependencies automatically. opencv-python-headless handles drawing the bounding boxes and the live preview window – in our testing, this headless build worked correctly for the live window once installed cleanly into a fresh environment.
📌 Official Resource: Full Ultralytics YOLOv8 documentation and model details Visit Official Website
Fixing the “Illegal Instruction” Error on Raspberry Pi
If you run a YOLO script at this point, theres a good chance it will crash with just two words: Illegal instruction. No traceback, no helpful message, the script simply dies. This happens because the latest PyTorch builds use CPU instructions that the Pi 4’s Cortex-A72 chip does not fully support.
We genuinely lost almost half a day to this error during testing, trying everything from reinstalling Python to flashing a new SD card, before finding the actual cause buried in a GitHub issue thread. The fix involves two parts working together.
First, downgrade PyTorch and torchvision to a version combination confirmed to run on Pi hardware:
pip uninstall -y torch torchvision
TMPDIR=~/pip-tmp pip install torch==2.6.0 torchvision==0.21.0
Second, set an environment variable that forces the OpenBLAS math library to use ARMV8 instructions instead of trying to auto-detect the CPU (auto-detection is what triggers the crash on many Pi boards):
echo 'export OPENBLAS_CORETYPE=ARMV8' >> ~/.bashrc
source ~/.bashrc
Adding this to .bashrc means it applies automatically in every future terminal session. After this, open a new terminal, reactivate your virtual environment, and run a quick sanity check on a sample image before touching the camera:
python3 -c "
from ultralytics import YOLO
model = YOLO('yolov8n.pt')
results = model('https://ultralytics.com/images/bus.jpg')
results[0].save('test_output.jpg')
print('Done! Check test_output.jpg')
"
Open the resulting test_output.jpg.


If you see bounding boxes around people, buses and other objects with confidence scores, your PyTorch installation is working correctly and you are ready for the live camera.
📌 Official Resource: PyTorch installation matrix and version compatibility notes Visit Official Website
Running Live Detection and Boosting Your FPS
With the model confirmed working, its time to connect it to the live camera feed. Create a file called detect.py using nano, and paste in the following script. This version includes a camera warm up delay, because the V1 camera needs a moment for auto exposure to settle – skip this and your first frame often comes out completely black.
#!/usr/bin/env python3
import time
import cv2
from picamera2 import Picamera2
from ultralytics import YOLO

picam2 = Picamera2()
config = picam2.create_preview_configuration(
    main={"size": (640, 480), "format": "RGB888"}
)
picam2.configure(config)
picam2.start()

print("Warming up camera...")
time.sleep(2)

print("Loading YOLO model...")
model = YOLO("yolov8n.pt")

print("Starting detection... Press 'q' to quit.")

while True:
    frame = picam2.capture_array()
    results = model(frame, imgsz=320, verbose=False)
    annotated = results[0].plot()

    inference_ms = results[0].speed['inference']
    fps = 1000 / inference_ms if inference_ms > 0 else 0
    cv2.putText(annotated, f"FPS: {fps:.1f}", (10, 30),
                cv2.FONT_HERSHEY_SIMPLEX, 1, (0, 255, 0), 2)

    cv2.imshow("RootSaid YOLO Detection", annotated)

    if cv2.waitKey(1) & 0xFF == ord('q'):
        break

picam2.stop()
cv2.destroyAllWindows()
print("Detection stopped.")
Run it with:
python detect.pyNotice the imgsz=320 parameter inside the detection loop. This is the single most important tweak for FPS on a Pi. The camera still captures at 640×480, but YOLO processes each frame at 320×320, roughly a quarter of the pixels. In our testing, running without this parameter gave us less then 1 FPS, which felt more like a slideshow then real time detection. Adding imgsz=320 brought it up to a smooth, usable frame rate that made the demo actually feel “real time” on camera.

💬 “When we first saw the FPS counter sitting at 0.9, our reaction on camera was basically ‘well, this is technically working but not exactly real time.’ Adding that one imgsz=320 argument and watching the number jump up immediately was honestly one of those small wins that makes this hobby addictive.”
What Can You Build Next With This Setup?
Once object detection is running reliably, the natural next step for most robotics students is to act on what the camera sees – for example, sending a signal to an Arduino to move a servo or motor when a specific object is detected. If you want to connect your Pi’s detection results to an Arduino-controlled robot, our guide on Arduino and Raspberry Pi serial communication over USB and UART covers exactly how to pass simple commands between the two boards.
If your goal is a small mobile robot that reacts to what it sees, you could combine this detection script with the chassis and motor driver setup from our Raspberry Pi Zero robot build using the L293D motor driver, though note that a Pi Zero will be significantly slower for YOLO then a Pi 4, so a hybrid setup (Pi 4 for vision, Pi Zero or Arduino for motors) tends to work better.
For makers interested in combining vision with conversational AI – for example, a robot that announces what it detects – it is worth looking at how local language models run on the same hardware. We documented our full experience in building a fully offline AI voice assistant on Raspberry Pi with Ollama and Gemma, which pairs well conceptually with this detection pipeline.
Frequently Asked Questions
Can the Raspberry Pi Camera Module V1 really work with YOLO?
Yes, the V1 camera (OV5647, 5MP) works fine with YOLOv8 through the picamera2 library on Raspberry Pi OS Bookworm. Detection accuracy depends mainly on lighting and the YOLO model size, not the camera generation.
Do I need a Raspberry Pi 5 for this, or will a Pi 4 work?
A Raspberry Pi 4 (2GB or more) is sufficient for YOLOv8 Nano at 320×320 resolution. A Pi 5 will run noticeably faster, but the Pi 4 is more then capable for learning and small robotics projects.
Why does YOLO crash with “Illegal instruction” on Raspberry Pi?
This happens because newer PyTorch builds use CPU instructions not fully supported by the Pi’s Cortex-A72/A76 processor. Downgrading to torch 2.6.0 with torchvision 0.21.0 and setting OPENBLAS_CORETYPE=ARMV8 resolves it.
How can I increase the FPS of YOLO on Raspberry Pi?
The easiest fix is reducing the inference image size using imgsz=320 instead of the default 640. This alone can take you from under 1 FPS to a usable real time frame rate on a Pi 4.
Do I need internet access to run YOLO after setup?
Only the first run needs internet, to download the yolov8n.pt model file (about 6MB). After that, detection runs completely offline on the Pi itself.
What objects can YOLOv8 detect out of the box?
The default yolov8n.pt model is trained on the COCO dataset and can recognise 80 everyday object classes, including people, cars, bicycles, animals, phones, laptops and bottles, without any custom training.
Found this helpful? Share it with a fellow maker or student. Subscribe to our RootSaid YouTube channel for hands-on hardware and AI project videos – and check out our RootSaid Robotics Malayalam channel for Malayalam tutorials.
Final Thoughts
Running YOLO on a Raspberry Pi is one of those projects that sounds intimidating from the outside, “AI on a tiny ₹6000 computer”, but once you get past the initial environment setup quirks, it genuinely is approachable for anyone willing to follow the steps and read the error messages carefully. Every error we hit while building this, from the externally managed environment message to the illegal instruction crash, has a simple, repeatable fix once you know what to look for.
If you are a student or hobbyist in India working with a Pi 4 and an old V1 camera you bought years ago for a different project, this is a great way to put that hardware to genuine use. Start with the basic detection script, get comfortable with the imgsz parameter for performance tuning, and then start thinking about how detection results could trigger actions on motors, servos or even a voice assistant.
We will keep updating this guide as newer Ultralytics and PyTorch versions are released, since this is exactly the kind of project where version numbers matter more then usual on the Pi. If you build this and run into an error we have not covered, drop a comment, theres a decent chance we have hit it too on our bench.