
Arduino Volume Controller with Gestures | Media Player Controller
Introduction to Arduino Volume Controller
In this post, I will explain one of the coolest Arduino Projects of 2019. This gesture based media controller or Arduino Volume Controller that can be connected to any computer running any OS. You can connect it to PCs USB port and it will act as a HID or a Human Interface Device. In this video, I will explain this sensor, HID using Arduino and the Code. Using this You can start, play or pause the song, go to the next song, play previous song, increase, reduce and mute volume. Take a look at the demo video below.
Arduino Volume Controller Video Demo and Tutorial

Looks cool right? Guys. Before going further, if you find this video useful, consider supporting my channel by giving this video a like and subscribe to my channel by clicking the subscribe button below. I would really appreciate it.
This is a Hand Gesture Media Controller. Using this Gesture Controller, you can control the media player using simple hand gestures. You can start, play or pause the song, go to the next song, play previous song, increase, reduce and mute volume. Let’s Get Started!!!


Sponsor Link
This Project is Sponsored by UTSource. UTSource is a professional electronic components supplier.
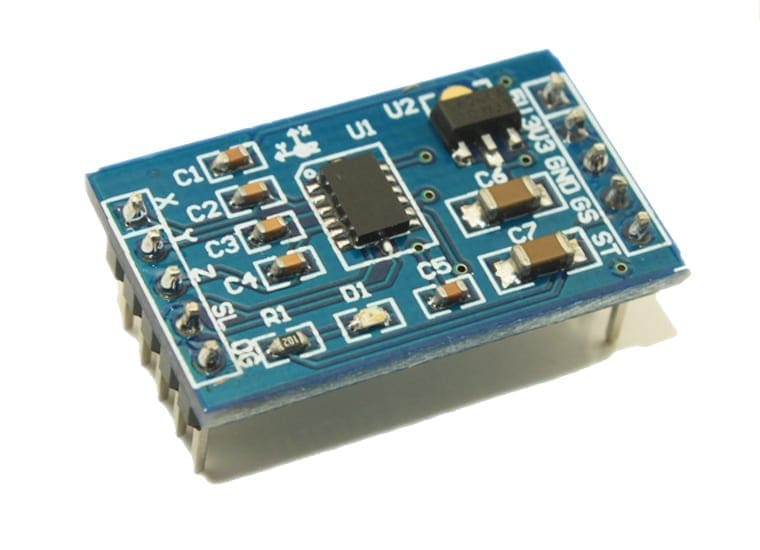
PAJ7620 Gesture Sensor
PAJ7620 Gesture Sensor is a quick and easy way to add gesture control to your Arduino or Raspberry Pi Project. This tiny little sensor can recognize various hand gestures such as moving your hands up, down, left, right, forward, backward, clockwise, anti-clockwise and waving . It employs an in built proximity sensor which can sense approaching and departing objects.
amzn_assoc_tracking_id = “jithinsanal16-20”; amzn_assoc_ad_mode = “manual”; amzn_assoc_ad_type = “smart”; amzn_assoc_marketplace = “amazon”; amzn_assoc_region = “US”; amzn_assoc_design = “enhanced_links”; amzn_assoc_asins = “B07QGZV4ZG”; amzn_assoc_placement = “adunit”; amzn_assoc_linkid = “3f4d2bfb547f94cf6c638463ac23d9f4”;In the previous Post, I explained everything about PAJ7620 gesture sensor, how to connect this sensor to Arduino and read hand gestures.

I have also added a post on making an awesome gesture controlled robot using this sensor. If you are interested, take a look at the video below.

If you are not familiar with that, click the link below and watch that first.
Arduino as HID
Some Arduino Board can act as HID (Human Interface Device), as a keyboard or mouse and send keystroke through the USB like a real keyboard. When you connect the Arduino to the USB port of the PC, it will act as a keyboard and send keystrokes to it.
In this project, we will be sending media control keystrokes to the PC using Arduino MKR1000. For that we will be using this NicoHood Library.
amzn_assoc_tracking_id = “jithinsanal16-20”; amzn_assoc_ad_mode = “manual”; amzn_assoc_ad_type = “smart”; amzn_assoc_marketplace = “amazon”; amzn_assoc_region = “US”; amzn_assoc_design = “enhanced_links”; amzn_assoc_asins = “B071LRYYHH”; amzn_assoc_placement = “adunit”; amzn_assoc_linkid = “9c632f2bb1cc797c83204cdbcec085d1”;Components Needed
- PAJ7620 Gesture Sensor
- Arduino Board that can act as a HID
As I mentioned earlier. this is a simple project, connections are pretty easy and you wont need more than 1 minute to set this up. You can use any arduino board that can act as HID like MKR1000, pro micro, Leonardo to name a few. I will provide complete list in the description. Let us start connecting them together.
Steps
Step 1 – Testing Components
For this project, you will need 2 libraries for your Arduino IDE.
- PAJ7620 Library — For Reading Hand Gestures
- Nicohood – HID Library — For Sending Media Key Strokes
The first thing to do is install these libraries and check the working individually.
PAJ7620 Library
To install this library, you can go to “library manager” and search for “PAJ7620” and install the library effortlessly. Or you can download it from here. Extract the file and paste it inside library folder.
Now restart Arduino IDE, navigate to File>Example>PAJ7620
There you will find 2 examples. You can try uploading the basic demo and once uploaded, start the serial monitor.
Then try moving your hand in front of it. The gesture sensor will detect and print the gesture in the serial monitor.
Learn more about PAJ7620 Gesture Sensor
Nicohood – HID Library
You can download it from here. Extract the file and paste it inside library folder.
Now restart Arduino IDE, navigate to File>Example>HID-Project
Then try moving your hand in front of it. The gesture sensor will detect and print the gesture in the serial monitor. Check whether it is working.
If both these libraries are working, then you wont have any problem with the rest of the code. You can now start to make our Gesture based Arduino Volume Controller.
amzn_assoc_tracking_id = “jithinsanal16-20”; amzn_assoc_ad_mode = “manual”; amzn_assoc_ad_type = “smart”; amzn_assoc_marketplace = “amazon”; amzn_assoc_region = “US”; amzn_assoc_design = “enhanced_links”; amzn_assoc_asins = “B07FVP1ZW9”; amzn_assoc_placement = “adunit”; amzn_assoc_linkid = “5df2a4f0ea4d0e0166224722d5aef851”;Step 2 – Connections
Connections are simple – Simply Connect
- Vin to 5 V
- Gnd to Gnd
- SCL to SCL
- SDA to SDA.
Step 3 – Coding
The code is exactly the same code we used in the PAJ7620 Tutorial. We are just adding HID library. When a particular gesture is detected, instead of just printing what it is, we will send keystroke using the HID Project library.
Complete Media Control Keystrokes
#define MEDIA_FAST_FORWARD 0xB3
#define MEDIA_REWIND 0xB4
#define MEDIA_NEXT 0xB5
#define MEDIA_PREVIOUS 0xB6
#define MEDIA_STOP 0xB7
#define MEDIA_PLAY_PAUSE 0xCD
#define MEDIA_VOLUME_MUTE 0xE2
#define MEDIA_VOLUME_UP 0xE9
#define MEDIA_VOLUME_DOWN 0xEA
#define CONSUMER_EMAIL_READER 0x18A
#define CONSUMER_CALCULATOR 0x192
#define CONSUMER_EXPLORER 0x194
#define CONSUMER_BROWSER_HOME 0x223
#define CONSUMER_BROWSER_BACK 0x224
#define CONSUMER_BROWSER_FORWARD 0x225
#define CONSUMER_BROWSER_REFRESH 0x227
#define CONSUMER_BROWSER_BOOKMARKS 0x22A
#include <Wire.h>
#include <HID-Project.h>
#include "paj7620.h"
#define GES_REACTION_TIME 300
#define GES_ENTRY_TIME 400
#define GES_QUIT_TIME 400
void setup()
{
uint8_t error = 0;
Serial.begin(9600);
error = paj7620Init();
if (error)
{
Serial.print("INIT ERROR,CODE:");
Serial.println(error);
}
else
{
Serial.println("INIT OK");
}
Serial.println("Start Controlling Media with Gestures\n");
}
void loop()
{
uint8_t data = 0, data1 = 0, error;
error = paj7620ReadReg(0x43, 1, &data);
if (!error)
{
switch (data)
{
case GES_RIGHT_FLAG:
delay(GES_ENTRY_TIME);
paj7620ReadReg(0x43, 1, &data);
if(data == GES_FORWARD_FLAG)
{
Serial.println("Mute/No Mute");
Consumer.write(MEDIA_VOLUME_MUTE);
delay(GES_QUIT_TIME);
}
else if(data == GES_BACKWARD_FLAG)
{
Serial.println("Mute/No Mute");
Consumer.write(MEDIA_VOLUME_MUTE);
delay(GES_QUIT_TIME);
}
else
{
Serial.println("Previous");
Consumer.write(MEDIA_PREVIOUS);
delay(500);
}
break;
case GES_LEFT_FLAG:
delay(GES_ENTRY_TIME);
paj7620ReadReg(0x43, 1, &data);
if(data == GES_FORWARD_FLAG)
{
Serial.println("Mute/No Mute");
Consumer.write(MEDIA_VOLUME_MUTE);
delay(GES_QUIT_TIME);
}
else if(data == GES_BACKWARD_FLAG)
{
Serial.println("Mute/No Mute");
Consumer.write(MEDIA_VOLUME_MUTE);
delay(GES_QUIT_TIME);
}
else
{
Serial.println("Next");
Consumer.write(MEDIA_NEXT);
delay(500);
}
break;
case GES_UP_FLAG:
delay(GES_ENTRY_TIME);
paj7620ReadReg(0x43, 1, &data);
if(data == GES_FORWARD_FLAG)
{
Serial.println("Mute/No Mute");
Consumer.write(MEDIA_VOLUME_MUTE);
delay(GES_QUIT_TIME);
}
else if(data == GES_BACKWARD_FLAG)
{
Serial.println("Mute/No Mute");
Consumer.write(MEDIA_VOLUME_MUTE);
delay(GES_QUIT_TIME);
}
else
{
Serial.println("Nothing Assigned");
}
break;
case GES_DOWN_FLAG:
delay(GES_ENTRY_TIME);
paj7620ReadReg(0x43, 1, &data);
if(data == GES_FORWARD_FLAG)
{
Serial.println("Mute/No Mute");
Consumer.write(MEDIA_VOLUME_MUTE);
delay(GES_QUIT_TIME);
}
else if(data == GES_BACKWARD_FLAG)
{
Serial.println("Mute/No Mute");
Consumer.write(MEDIA_VOLUME_MUTE);
delay(GES_QUIT_TIME);
}
else
{
Serial.println("Nothing Assigned");
}
break;
case GES_FORWARD_FLAG:
Serial.println("Mute/No Mute");
Consumer.write(MEDIA_VOLUME_MUTE);
delay(GES_QUIT_TIME);
break;
case GES_BACKWARD_FLAG:
Serial.println("Mute/No Mute");
Consumer.write(MEDIA_VOLUME_MUTE);
delay(GES_QUIT_TIME);
break;
case GES_CLOCKWISE_FLAG:
Serial.println("Volume Up");
Consumer.write(MEDIA_VOLUME_UP);
delay(100);
break;
case GES_COUNT_CLOCKWISE_FLAG:
Serial.println("Volume Down");
Consumer.write(MEDIA_VOLUME_DOWN);
delay(100);
break;
default:
paj7620ReadReg(0x44, 1, &data1);
if (data1 == GES_WAVE_FLAG)
{
Serial.println("Nothing Assigned");
}
break;
}
}
delay(100);
}Step 4 – Fixing the Controller
Once the connections are completed, you can use a double sided tape to fix your Arduino board and the gesture sensor somewhere. I fixed the Arduino board behind the speaker and the gesture sensor on top of it like this.
Step 5 – Start the Player
Now start your media player and try various hand gestures. Move your hand towards the sensor to Mute. Right to play next song, Left to play previous song, clockwise to increase volume, anti clockwise to reduce volume and top to down to play the song.
That was easy right? In our channel, you will find lots of Arduino and Raspberry Pi projects and tutorials, using the latest boards and sensors. Our main focus is on DIY Hobby projects, Robotics and Home automation using simple and cheap components in a fun and easy way. Make sure you subscribe and click on the bell icon so that you wont miss our fun videos.
New to Robotics?
We have a beginners guide on “Getting Started with Robotics” which will give you a kick start in this field. Check out our free video tutorial below for a brief introduction.

Top Arduino Projects You can Try this Summer Vacation

Top Robotics Projects You can Try this Summer Vacation

Did you find this page useful? Help us to improve by rating this page.
[RICH_REVIEWS_FORM]
[RICH_REVIEWS_SNIPPET stars_only=”true”]


Hi, I love this project! Looking to use it in my home office to show it off to my friends. I’m currently stuck on this part here where I’m getting an error. I feel like it’s an easy fix but I can’t see what it is. Appreciate any help I can get, thanks.
Error resolving FQBN: missing
Error compiling for board HoodLoader2 16u2.
The current selected board needs the core ‘HID:hid’ that is not installed.
dear sir, thank you so much for sharing this article, It’s really good.