
Arduino Nano 33 BLE Sense Getting Started | RGB LED and Chirp
Arduino Nano 33 BLE Sense Introduction
Today, I am here with a new version of Arduino Nano – ARDUINO NANO 33 BLE SENSE, Nano with BLE connectivity focusing on IoT, which is packed with a wide variety of sensors such as 9 axis Inertial Measurement Unit, pressure, light, and even gestures sensors and a microphone.
This board is a special one. Why? Arduino has added a new feature into this tiny board. For the first time in history, Arduino has integrated Chirp technology, which will enable machine to machine communication wirelessly over sound waves using this board. I will get back to that in a minute.
Specs
Now, let’s see the board in detail.

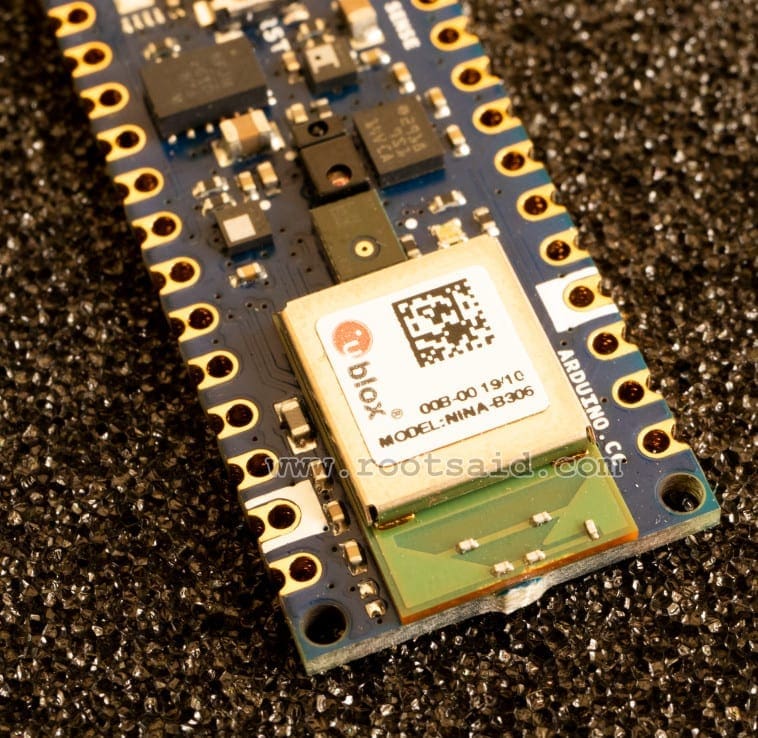
This board is based on the nRF 52840 microcontroller. With a clock frequency of 64 Mhz, 1 MB Flash memory and 256 KB RAM. It is powered by Nina B306 module that support BLE as well as Bluetooth 5 connection.
Bluetooth
The inbuilt Bluetooth module consumes very low power and can be easily accessed using Arduino libraries. This makes it easier to program and enable wireless connectivity to any of your projects in no time.You won’t have to use external bluetooth modules to add Bluetooth capability to your project. Save space and power.
Arduino Nano 33 BLE Sense Pinout
I said earlier this is an IOT board, light and compact and it’s the same size as that of nano. The board has a two 15 pins connectors – one on each side, pin to pin compatible with the original Arduino Nano.
Get more Details from here.
Arduino Nano 33 BLE Sense Pin Functions

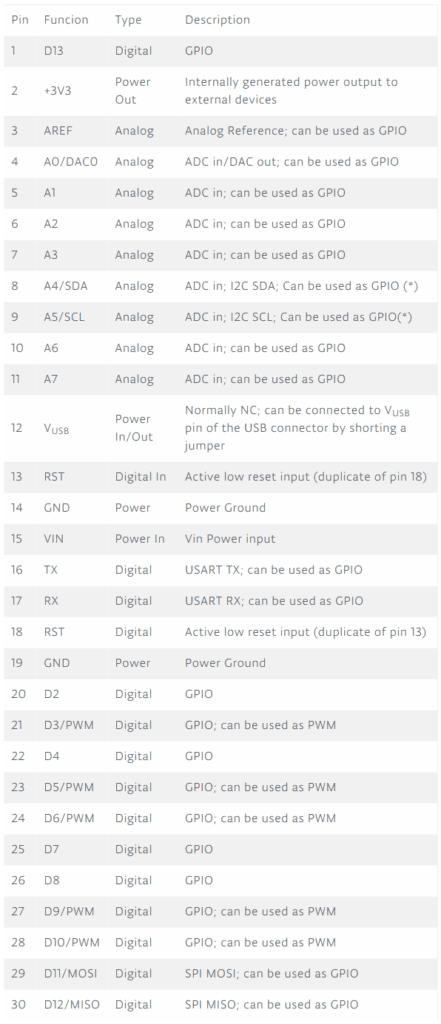
Note: There are somethings that are to be noted before working with this board. Arduino Nano 33 BLE only supports 3.3V I/Os and is NOT 5V tolerant so please make sure you are not directly connecting 5V signals to this board or it will be damaged. Also, as opposed to Arduino Nano boards that support 5V operation, the 5V pin does NOT supply voltage but is rather connected, through a jumper, to the USB power input.
Arduino Core – ArduinoCore-nRF 528x-mbedos
Another thing to mention is the Arduino core. As I mentioned earlier. Arduino Nano 33 BLE Sense board is based on nRF 52840 microcontroller. Arduino did not have an official core for this microcontroller. So they developed a core based on Mbed OS foundation sharing its libraries and drivers – ArduinoCore-nRF 528x-mbedos. which can be added to your Arduino IDE.
Mbed is a RTOS (real-time operating system), meaning you can run multiple “programs” or threads at the same time, like what is happening inside your PC or smartphone.
Mbed also supports tickless mode, means every time you write delay() in your code, the board will try to go in low power mode, knowing exactly when to wake up for the next scheduled event.
Arduino and Chirp
Now, about the chirp. Chirp integration will allow Arduino-powered projects to send and receive data wirelessly over sound waves, using just microphones and loudspeakers. The data is encoded into a series of audible or inaudible pitches and tones to form a sonic barcode.
This encoded data is sent over the air to a receiving device, or group of devices, where the data is then decoded.Using special libraries and detailed documentations, hobbyists can create amazing projects using this Data – Over -Sound Capabilities.
Compared to other technologies data-over-sound is able to be used in very wide application areas, using existing hardware and without setup or configuration. This will open new window of opportunities to hobbyists and Arduino enthusiasts.
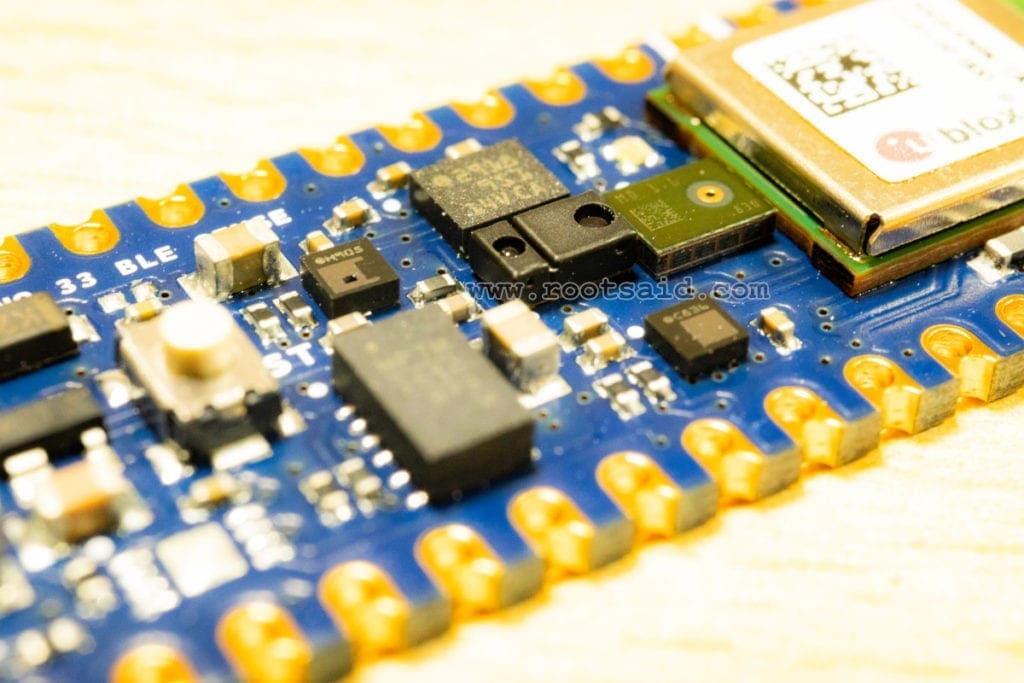
Arduino Nano 33 BLE Sense – Sensors
BLE Sense can sense its environment and read a lot of value through its impressive array of onboard sensors like a 9-axis inertial measurement unit (IMU), temperature, pressure, humidity, light, color, and even gesture sensors, as well as a microphone, that can be easily accessed and managed using specialized libraries.

Sensors and Libraries
- IMU – ArduinoLSM9DS1
- Microphone – PDM, ArduinoSound
- Gesture, Color, Proximity – ArduinoAPDS9960
- Humidity Temperature – ArduinoHTS221
More Detailed Instructions can be found here at Arduino’s Official Website.
Arduino Nano 33 BLE Sense RGB LED
This board has an inbuilt RGB LED which is connected to pin 22, 23, 24. The below code will help you get started with RGB LED.
const int ledPin = 22;
const int ledPin2 = 23;
const int ledPin3 = 24;

void setup() {

pinMode(22, OUTPUT);
pinMode(23, OUTPUT);
pinMode(24, OUTPUT);
}

void loop() {
     digitalWrite(ledPin, LOW);
     digitalWrite(ledPin2, LOW);
     digitalWrite(ledPin3, LOW);
  delay(1000);
     digitalWrite(ledPin, LOW);
     digitalWrite(ledPin2, LOW);
     digitalWrite(ledPin3, HIGH);
  delay(1000);
     digitalWrite(ledPin, LOW);
     digitalWrite(ledPin2, HIGH);
     digitalWrite(ledPin3, HIGH);
  delay(1000);
       digitalWrite(ledPin, HIGH);
       digitalWrite(ledPin2, LOW);
       digitalWrite(ledPin3, LOW);
  delay(1000);
       digitalWrite(ledPin, HIGH);
       digitalWrite(ledPin2, LOW);
       digitalWrite(ledPin3, HIGH);
  delay(1000);
       digitalWrite(ledPin, HIGH);
       digitalWrite(ledPin2, HIGH);
       digitalWrite(ledPin3, LOW);
  delay(1000);

         digitalWrite(ledPin, HIGH);
       digitalWrite(ledPin2, HIGH);
       digitalWrite(ledPin3, HIGH);
  delay(1000);
}
Whats Next?
In the next post, I will show you how you can use Chirp with Arduino and Send Data using Sound and use various sensors and make cool projects with this board.
New to Robotics?
We have a beginners guide on “Getting Started with Robotics” which will give you a kick start in this field. Check out our free video tutorial below for a brief introduction.

Did you find this page useful? Help us to improve by rating this page.
[RICH_REVIEWS_FORM]
[RICH_REVIEWS_SNIPPET stars_only=”true”]