ELECFREAKS TPBot Review 2026: Is This micro:bit Robot Car Worth It?
In-depth ELECFREAKS TPBot review with setup guide, MakeCode programming tips, and project ideas. Learn why this micro:bit robot car is perfect for STEM beginners. Includes pricing and specs.
Whenever I test a robotics kit designed for beginners, I always ask one simple question: Is it fun to start with, but powerful enough to keep learning? The ELECFREAKS TPBot micro:bit robot car is one of those kits that tries to strike that balance — and honestly, it does a pretty good job.


The TPBot (also known as TP Bot) is one of ELECFREAKS’ most popular smart car kits, and it’s easy to see why. It’s compact, simple to set up, and designed specifically for learning robotics using the BBC micro:bit. In this article I will walk you through what the TPBot is, what makes it interesting, and how it can be used as a beginner-friendly robotics platform.
Why the TPBot is an Interesting Beginner Robot
What I like about the TPBot is that it doesn’t overwhelm beginners. The robot comes almost ready to use, so instead of spending time assembling complicated hardware, you can quickly focus on the important part; programming and experimenting.
The TPBot uses the BBC micro:bit as its brain, which means you can program it using the Microsoft MakeCode visual programming environment. If you’ve used micro:bit before, you will feel right at home. For beginners who are just entering the world of robotics, this is a great way to learn how software controls hardware.
What’s Inside the Box?
The TPBot kit includes everything you need to build your first smart robot car (except the micro:bit board).


You get:
- The TPBot car body
- Dual DC motors (130 motors)
- Ultrasonic distance sensor (HC-SR04, up to about 400 cm detection)
- Line-following sensor
- RGB programmable headlights
- Battery holder (uses 4 × AAA batteries)
- Expansion ports (P1, P2, P8, P12 and I2C ports)
- LEGO-compatible mounting structure
The micro:bit board acts as the brain of the robot and is inserted on top of the TPBot.
A Quick Look at the TPBot Design
The first thing I noticed when I looked at the TPBot is how compact and friendly it looks. The design is simple but clever. It’s a two-wheel drive robot powered by small DC motors, with a supporting omni wheel that helps the robot stay balanced while turning. The wheels are large enough to give the robot good grip and stability on most surfaces.
Another nice feature is that the robot is compatible with LEGO-style building bricks. This means you can easily customize the robot, add creative structures, or even build small robotic projects on top of it.
- Body : The TPBot has a compact and stable design. Its dimensions without packaging are approximately 128 × 113 × 90 mm. It is lightweight and strong, making it perfect for classroom use. It is also compatible with LEGO bricks, so you can customize and build your own creative designs on top.
- Motors : The robot uses two 130 DC motors connected to rear wheels (62 mm diameter). These motors allow the robot to move forward, backward, turn left, and turn right smoothly. There is also a small omni wheel in the front (14 mm) that helps maintain balance and smooth turning.
- Sensors : The ultrasonic sensor allows the robot to detect obstacles in front of it. It can measure distances up to about 4 meters with good accuracy. The line-following sensor allows the TPBot to follow black lines on a white surface, which is perfect for learning autonomous driving logic.
- RGB Headlights : The TPBot includes three RGB LEDs. These programmable lights can be controlled using code to display different colors and patterns.
- Battery : It runs on 4 AAA batteries with a working voltage of 4.5V to 6V. The battery life is approximately 1.5 hours in continuous operation.
What Makes the TPBot Stand Out
I’ve tested a few beginner micro:bit robot cars, and the TPBot holds its own pretty well in this category. Instead of just repeating what I’ve already covered above, I want to focus on what actually sets the TPBot apart from similar robots.
The biggest advantage is how little setup friction there is. You’re not soldering anything, you’re not hunting for compatible parts, and you’re not wading through a 40-page assembly manual. The robot comes nearly ready to use, which means a classroom full of students can all be programming within the first 15 minutes. That’s genuinely rare at this price point.
The Bluetooth control option is something I particularly like. Using a second micro:bit as a wireless controller, students can build their own remote-control system. This isn’t just a gimmick — it introduces wireless communication, pairing logic, and interactive robotics in a way that feels immediately rewarding.


Compared to something like the Ring:bit Car V2, the TPBot has a clear edge in built-in sensor coverage out of the box. The Ring:bit is more modular and expandable, but you have to add sensors separately. With the TPBot, the ultrasonic sensor and line-following sensor are already there, which means less shopping and more learning from day one.
The LEGO compatibility is another thoughtful design choice. Being able to snap LEGO bricks onto the robot body turns a coding lesson into a creative engineering session, which is excellent for younger students or mixed-ability classrooms.
Programming the TPBot
Setting up the TPBot is surprisingly straightforward. All you need to do is insert your micro:bit board into the slot on the robot. Once connected, you can open Microsoft MakeCode on your computer and start programming the robot using drag-and-drop blocks. Within minutes you can create programs that make the robot move forward, turn, stop, or react to sensor inputs.

From there you can program behaviors such as:
- Move forward and backward
- Turn left or right
- Detect obstacles using the ultrasonic sensor
- Follow lines on the ground
- Control the RGB lights
Connection and Code Upload
Getting started with the TPBot is very simple, and it only takes a few steps.
- First, insert the BBC micro:bit board into the slot on the top of the TPBot. The micro:bit acts as the main controller, which means all the programs you write will run through this board.
- Next, connect the micro:bit to your computer using a USB cable. Once connected, the micro:bit will appear as a small storage device on your computer.
- Now open the Microsoft MakeCode website in your browser. This is the platform used to program the TPBot. Create a new project and start writing your program using the block-based coding interface.
- For beginners, you can start with a simple movement program. For example, you can write code that makes the robot move forward for two seconds, stop, then turn left or right. This helps you understand how the motors are controlled through code.
- Once your program is ready, click the download button in MakeCode. This will create a file that you can drag and drop onto the micro:bit drive. As soon as the file is copied, the program will automatically start running on the micro:bit.
- After uploading the program, disconnect the USB cable and power the TPBot using the battery pack. The robot will now execute the commands you programmed.
- From here, you can experiment with more advanced features. You can write programs that make the robot avoid obstacles using the ultrasonic sensor, follow a line on the floor using the line sensor, or change LED colors based on different actions.
The block programming interface makes it easy for beginners to understand how sensors and motors interact. More advanced users can also explore Python programming to build more complex robotics behaviors. For beginners this is a great introduction to robotics programming, because you can immediately see how your code affects the real world.
Experiments You Can Try with TPBot
After spending some time experimenting with the TPBot, I found that it supports several interesting robotics behaviors. You can program the robot to avoid obstacles, which teaches how sensors and decision making work together. You can also create a line-following robot, which introduces the concept of autonomous navigation.

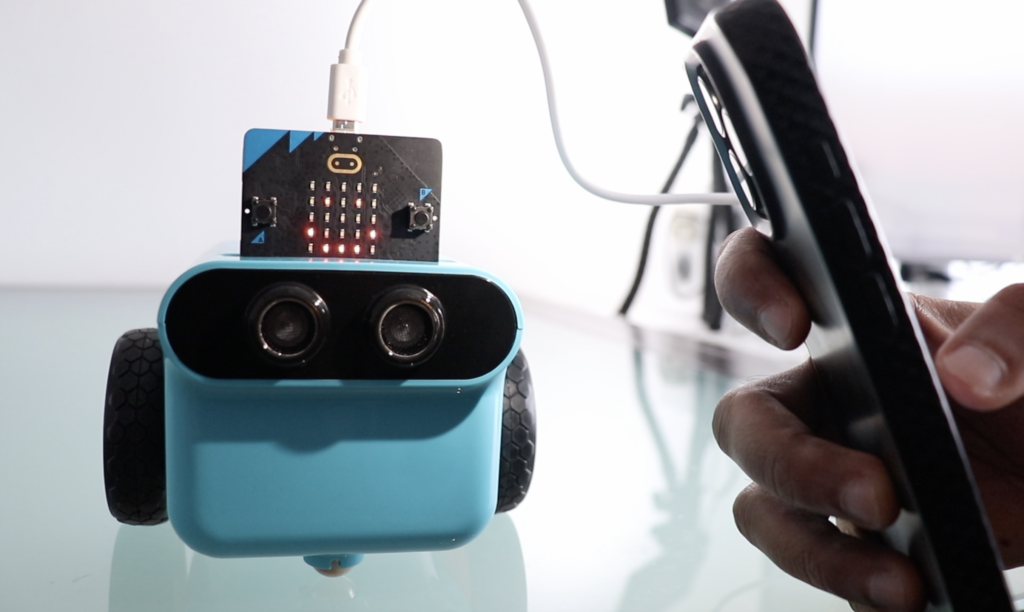
Another interesting experiment is making the robot maintain a fixed distance from objects, which demonstrates how feedback loops work in robotics. These kinds of experiments help beginners understand how real robots make decisions based on sensor data.
Why TPBot Works Well for Kids and Students
What makes the TPBot particularly useful in STEM education is its simplicity. Students don’t need advanced electronics knowledge to start using it. Instead, they can focus on understanding how sensors work, how motors move the robot, and how programming logic controls everything. This hands-on approach makes robotics feel less like theory and more like an interactive learning experience.
It Teaches Real Robotics Concepts in a Simple Way
The TPBot helps beginners understand the basic building blocks of robotics such as motors, sensors, and programming logic. Instead of learning these ideas only in theory, students can see them working in a real robot.
For example, when you write a simple MakeCode program to move the TPBot forward for two seconds and then stop, you are already learning how a controller sends commands to motors. This is the same concept used in larger industrial robots and autonomous vehicles.
It Encourages Logical Thinking and Problem Solving
When programming a robot, students must think step by step about what the robot should do. This process builds logical thinking and problem-solving skills.
For instance, if the TPBot keeps hitting an obstacle, students must figure out how to change the program. They might add a condition like: if the distance sensor detects an object closer than 20 cm, stop and turn right. Through this process they learn how to analyze problems and improve their solutions.


It Introduces Sensor-Based Decision Making
One of the most important parts of robotics is making decisions based on sensor data. The TPBot includes an ultrasonic distance sensor and a line-tracking sensor that allow the robot to react to its surroundings.
For example, the ultrasonic sensor can detect obstacles in front of the robot. A program can use this information to decide whether the robot should move forward, stop, or change direction. Instead of blindly moving, the robot begins to behave intelligently.
It Helps Students Understand How Hardware and Software Interact
The TPBot clearly demonstrates how software instructions control real hardware components. When you write code in MakeCode to turn the robot left, the micro:bit sends signals to the motor driver. The driver then powers the motors differently on each side, causing the robot to rotate.
This simple action helps students understand that software commands directly control physical devices like motors, LEDs, and sensors.
It Supports Hands-On STEM Education
TPBot is designed as a practical learning tool for STEM education. Instead of only reading about robotics, students can build programs, test them, and immediately see the results.
For example, a classroom activity might involve creating a line-following robot. Students draw a track on the floor and then write code that allows the TPBot to follow the line. Through this experiment they learn programming, electronics, and engineering concepts at the same time.
TPBot Price – What Does It Actually Cost?
Let’s talk about pricing. The ELECFREAKS TPBot Car Kit is priced pretty reasonably for what you get. Here’s what the current pricing looks like from the official ELECFREAKS store:
| Kit Version | Price (USD) | Notes |
|---|---|---|
| TPBot Standard Kit | $79.90 | micro:bit board NOT included |
| TPBot Edu Kit | $79.90 (on sale from $117.50) | micro:bit board NOT included |
| BBC micro:bit board (sold separately) | ~$20–25 USD | Required to run the robot |
| Estimated total (TPBot Edu + micro:bit) | ~$100–105 USD | Complete working setup |
One thing I want to flag clearly: the micro:bit board is not included in either kit. You need to buy it separately, and it runs about $20–25 USD extra. So your all-in cost for a fully working TPBot setup is closer to $100–105 USD. That’s still competitive compared to many robotics kits in this category.
Also worth knowing — prices can vary depending on where you buy. Retailers like Amazon or RobotShop sometimes carry the TPBot at slightly different prices, and ELECFREAKS does run sales on their official store. The $79.90 Edu kit price I’ve listed here reflects a sale price at the time of writing, so it’s worth checking the official store for the latest.
For STEM educators buying in bulk, ELECFREAKS does offer educational pricing — it’s worth reaching out to them directly if you’re planning a classroom purchase.
TPBot vs Other micro:bit Robot Cars
If you’re trying to decide whether the TPBot is the right robot for you, it helps to see how it compares to other popular micro:bit robot cars. Here’s a quick comparison of the TPBot against two close alternatives — the Ring:bit Car V2 and the Smart Cutebot.
| Robot | Price (approx.) | Sensors Included | LEGO Compatible | Best For |
|---|---|---|---|---|
| ELECFREAKS TPBot | $79.90 + ~$22 micro:bit | Ultrasonic + Line sensor | Yes | Beginners, classrooms |
| Ring:bit Car V2 | ~$19.90 + sensors extra | None (modular add-ons) | No | Makers who like customizing |
| Smart Cutebot | ~$27.90 + ~$22 micro:bit | Ultrasonic + Line + IR | No | Budget-conscious beginners |
The Ring:bit Car V2 is the most affordable entry point, but it’s intentionally stripped back. You buy the base car and add sensor modules separately. That flexibility is great if you want to experiment with different hardware setups, but it also means more components to buy and more complexity for younger students.
The Smart Cutebot is actually my recommendation for budget buyers — it comes with a solid sensor set and is noticeably cheaper than the TPBot. However, it doesn’t have LEGO compatibility, and the build quality feels a bit lighter.
The TPBot sits in the middle as the most classroom-ready option. It’s ready to use out of the box with no extra sensor purchases, the LEGO integration adds genuine educational value, and the overall build quality feels sturdy enough to survive a school year of regular use. If you’re an educator setting up a robotics lab or a parent buying for a serious young learner, the TPBot is worth the extra cost over the Cutebot.
Where to Buy the TPBot
The safest place to buy the TPBot is directly from the official ELECFREAKS store at shop.elecfreaks.com. You’ll get the latest pricing, any active discounts, and direct access to their support team if something goes wrong with your order.
If you prefer buying from a marketplace you already trust, the TPBot is also available on Amazon — just search for “ELECFREAKS TPBot” and make sure you’re buying from the official ELECFREAKS seller page to avoid third-party markups or counterfeit listings.
Other retailers that carry the TPBot include RobotShop and various regional STEM education suppliers. If you’re based in India or Southeast Asia, check whether ELECFREAKS has a local distributor in your region, as this can save on shipping costs and customs delays.
One practical tip: always double-check whether the listing includes the micro:bit board or not. Some bundles on Amazon include it, some don’t, and the listing titles aren’t always clear. Look for the phrase “with micro:bit” explicitly in the product title before assuming it’s included.
Final Thoughts
The ELECFREAKS TPBot micro:bit robot car is a great example of how robotics can be made accessible for beginners. It combines a simple design with useful sensors, programmable lights, and easy coding through MakeCode. For students, hobbyists, or educators looking for an entry-level robotics platform, it offers a solid introduction to how robots work.
If you’re just starting your journey into robotics, the TPBot is a fun and practical way to begin experimenting with code, sensors, and autonomous behavior.