


Arduino Coding Tips and Tricks – 5 Easy Tips to Improve the Usability of your Code
Coding could easily be one of the most sought after skills in the 21st century. A domain that never existed a century ago, there are not many fields of work that can quite come close to the versatility it offers.
One of the most common mistakes that young or even veteran coders make is to write passionately without structure. Although they’d still do the job on the fly, it makes future work on the code fairly difficult.
We all agree that codes must be easily readable and navigation friendly if it is to be used for future works as well. Here are five basic tips that could improve the usability of your code.
Arduino Coding Tips for Beginners
Tip 1. Make your variable names as descriptive as possible
This easier said than done. While coding, we usually do not think too deep into each variable as we long to finish the code with the least amount of lines written.
So let’s say you declared a variable for a digital pin that is supposed to turn an LED on or off. instead of just using ambiguous terms like ‘button_led’, try writing button_led_on_off_Pin instead. With this simple step, the code became legible and memorable for recollection.
// read the input on analog pin 0:
int sensorValue = analogRead(A0);

// Convert the analog reading (which goes from 0 - 1023) to a voltage (0 - 5V):
float voltage = sensorValue * (5.0 / 1023.0);
There are obvious exceptions to this rule as well. Things like for() loop, initialization variables and so on are all pretty self explanatory.
Tip 2. Improve the visual cue by Indentation
We all have fallen victims to this error at least a couple of times. Codes that comes with nested functions are a bit harder than usual to track. As programmers, we use indentation to clearly recognize each block of functionality from the rest.
Try spotting the difference from the below two snippets of code which basically renders the same output.
void loop() {if(hedgehog==cat){if(cat==likehedgehog){
 //hedgehog and cat are friends}else if(hedgehog!=cat){
 //hedgehog and cat are friends}else if(cat != hedgehog){
 //hedgehog and cat arn't friends}}else{
 //hedgehog and cat are not in the same room}}
Now try to compare it with this one:
void loop() {
if (hedgehog == cat) {
  if (cat == likehedgehog) {
     //hedgehog and cat are friends
  }
  else if (hedgehog != cat) {
     //hedgehog and cat are friends
  }
  else if (cat != hedgehog)
  {
     //hedgehog and cat arn't friends
  }
}
 else {
 //hedgehog and cat are not in the same room
 }
}
You’ll instantly recognize how readable the second piece of code is, even though the first example had all the comments in the world to know what each step did.
Another benefit of indenting is to spot errors quickly without gliding through illegible code all over again. You’ll easily find missing brackets in a properly indented piece of writing.
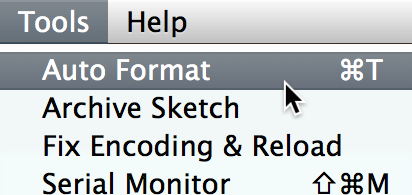
So how do we do it? Actually its been hidden in plain sight.
It’s there in the tools menu.
Fire up your ArduinoIDE and it is right there under the Tools Menu. There you go.
Tip 3. Simple comments can ease up future coding
Commenting is by far one of the most under appreciated tasks in coding. In the heat of work, we usually try to get to the output as fast as we can.
But as we’ve seen in the above sections, codes can become easily illegible for future use if we aren’t mindful about it. This is where simple commenting proves its worth.
Although they are part of the documentation, they are often not considered as valuable work in most cases. They come in handy when we, or any client that we wrote that for tries to figure out the code in a later instance.
Consider this piece of code for example:
// the setup function runs once when you press reset or power the board
void setup()
{
// initialize digital pin LED_BUILTIN as an output.
pinMode(LED_BUILTIN, OUTPUT);
}

// the loop function runs over and over again forever
void loop()
{
digitalWrite(LED_BUILTIN, HIGH); // turn the LED on (HIGH is the voltage level)
delay(1000); // wait for a second
digitalWrite(LED_BUILTIN, LOW); // turn the LED off by making the voltage LOW
delay(1000); // wait for a second
}
See how well described those comments are? You’ll come to thank them later. You could even add further information such as the name of the person who wrote that, the date of completion, what the code is intended for etc to get the reader up to speed on the code.
/*
Blink
Turns an LED on for one second, then off for one second, repeatedly.
https://www.arduino.cc/en/Main/Products
modified 8 May 2014
by Scott Fitzgerald
modified 2 Sep 2016
by Arturo Guadalupi
modified 8 Sep 2016
by Colby Newman
*/
This does one more thing quite well – help in creating a version history in writing. You can make as many edits as you want and mention them as comments to let the reader know how your code was developed.
Tip 4. Organize and reuse your code with functions()
Coding is meant to be universally readable: something that all coders try to do when they start their work. While writing big blocks of code that are meant to be used for specific purposes, it is always good to put them into separate functions.
By putting them into their own separate functions, these become both readable and reusable at the same time. Here’s a small example to demonstrate how this can be achieved:
void setup() {
pinMode(13, OUTPUT);
}

void loop() {
digitalWrite(13, HIGH);
delay(1000);
digitalWrite(13, LOW);
delay(1000);
}
You may have noticed that this is simple LED blinking code. Now let’s add in a function and see what happens:
void setup() {
pinMode(13, OUTPUT);

}

void loop() {
blinkLed();
}

void blinkLed() {
digitalWrite(13, HIGH);
delay(1000);
digitalWrite(13, LOW);
delay(1000);

}
Same code, same purpose. Now take a look at the below code
const int LED1 = 13;
const int LED2 = 5;

void setup()
{
pinMode(LED1, OUTPUT);
pinMode(LED2, OUTPUT);
}

void loop() {
blinkLed(100,LED1);
blinkLed(100,LED1);
blinkLed(100,LED1);
blinkLed(300,LED2);
blinkLed(300,LED2);

}

void blinkLed(int delayTime, int led) {
digitalWrite(led, HIGH);
delay(delayTime);
digitalWrite(led, LOW);
delay(delayTime);

}
This is code reusability. Not only is it reader friendly, it uses way less memory on your controller board as well.
Tip 5. Documentation is key
Documentation is often looked down by most programmers as they feel it has less connection or value than the code itself. But this is untrue in so many levels.
In-depth documentation always saves money and time for backend tasks as it will otherwise be daunting to get a grip of the work for someone who is reading your work for the first time.
One suggestion that I’d like to offer is to maintain a separate documentation for the software and hardware section of you work. Your projects are your brainchild and may not be perceived by others the same way you do.
You may start out with a clear description on the sketch, how to use it, and start explaining from there. The functions you chose, the libraries you used and even quirky methods you took to get the job done.
Make sure you use the same techniques we’ve learned here in your documentation as well – keep it simple and readable.
Arduino Coding Tips – Conclusion
I suggest you try these techniques on your older codes to see if you could shorten or explain any of them to your peers or colleagues to use.
We know instinctively how easily we get caught up in our work and forget how we got to a point in our coding routine. Being mindful of your code and a fair bit of forethought could actually save you a lot of time in future coding efforts too.
Reusable, Easily readable and understandable code is what the world needs today and honestly, it’s not that tough after all is it?

