Best Beginners Kit for Arduino
Today, I got something pretty cool. Here I want to show you a Complete, Easy to use, Plug and Play Arduino beginners kit from SEEED studio.

The best thing about this kit is, it contains almost all the sensors and modules pre-wired so that you don’t need to use any breadboard or connection wires or solder them to make it work. Simply connect the board to the computer and start coding!
Thanks to Seeed Studio
Seeed is the IoT hardware enabler providing services over 10 years that empower makers to realize their projects and products. Seeed offers a wide array of hardware platforms and sensor modules ready to be integrated with existing IoT platforms and one-stop PCB manufacturing and Prototype PCB Assembly.

Seeed Studio provides a wide selection of electronic parts including Arduino, Raspberry Pi and many different development board platforms. Especially the Grove Sytsem help engineers and makers to avoid jumper wires problems. Seeed Studio has developed more than 280 Grove modules covering a wide range of applications that can fulfill a variety of needs.
What is in the box?
This is what’s in this box. This is the most complete starter kit, Arduino.


There’s a ton of stuff in here, but don’t worry guys, we’re gonna get to each and every one of them.
- Grove Beginner Kit For Arduino Board x 1
- Micro USB Cable x 1
- Grove Cables x 6
- Included onboard:
- Grove – LED x 1
- Grove – Buzzer x 1
- Grove – OLED Display 0.96″ x 1
- Grove – Button x 1
- Grove – Rotary Potentiometer x 1
- Grove – Light x 1
- Grove – Sound x 1
- Grove – Temperature & Humidity Sensor x 1
- Grove – Air Pressure Sensor x 1
- Grove – 3-Axis Accelerator x 1
- Seeeduino Lotus x 1
Seeduino Lotus
First I just want show you the Arduino UNO Compatible seeeduino board. And yes guys, it is just like coding an Arduino UNO board which is the most beginner friendly board from Arduino.

This is the heart of of everything on this board. Infact, this is one which controls the whole board.
Sensor Cluster
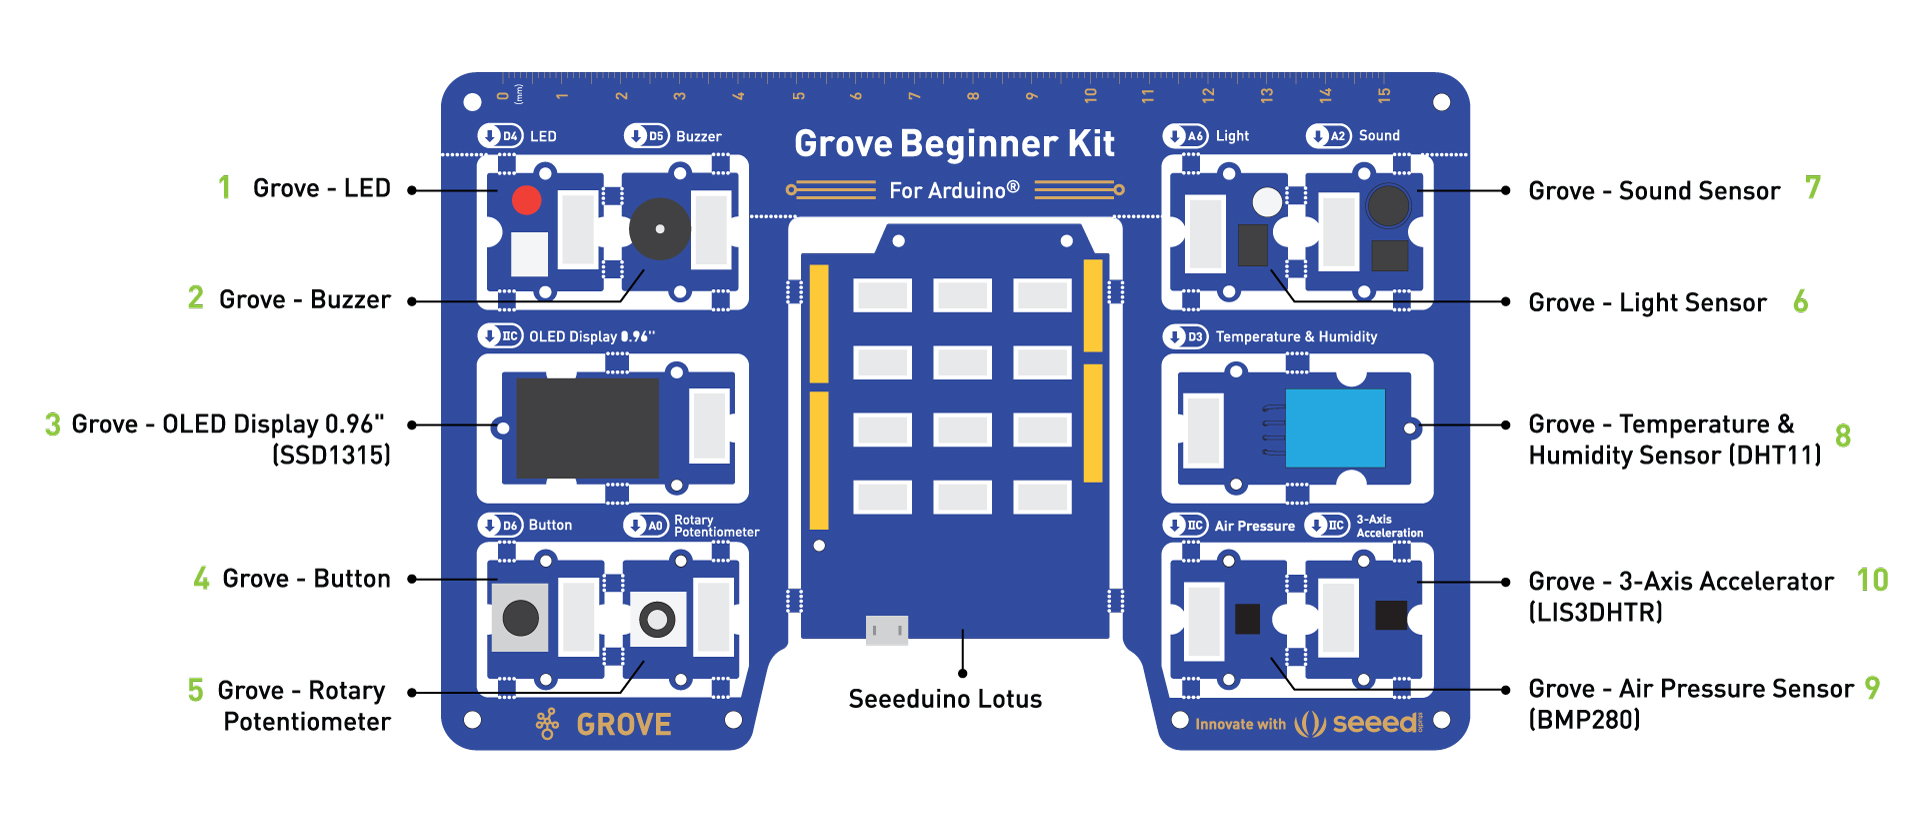
Then we have 10 most commonly used sensors and modules which will help you kickstart your Robotics instincts.

All these sensors are pre-wired and connected to GPIO pins of the Arduino so you don’t have to use breadboard and jumper wires.
Along with the package you will also get 6 connecting wires as well as a mini USB cable you will need to program.
If you look at the box, you will also see some useful information like Common References that you will come across when you start coding.
What Makes Grove Beginner Kit the best Arduino Kit?
The advantage is, you can do so many things with this board itself without any modifications. You can try out various modules together like beeping the buzzer when you press this button or turning on LED if the ambient light is low and things like that.


All these are very basic you will need to get started with an Arduino and can be done in an easy and fun way. No messy wires and soldering.
Grove Beginner Kit Pin Mapping
Like we mentioned above, all the modules are pre-wired and ready to be used. You can connect the Arduino to the PC and call the below pins to access corresponding sensors.


Getting Started with Grove Beginner Kit for Arduino
Step 1 – Arduino IDE
All you need to get started is Arduino IDE which is, as you know free of cost. You can download the latest version of Arduino IDE from here.
Step 2 – Connecting the board
Now you can connect the board to the PC using the micro USB cable. Most of the time, in win 10 PCs, you won’t have to do anything else. It will automatically detect the board as Arduino UNO.
If the driver is not installed, or if the driver is installed incorrectly (not matching the chip model), it will appear as an “unknown device” in the device manager. At this point, the driver should be reinstalled. If it didn’t, you can manually install the USB driver from here.
Step 3 – First Code Upload
Guys, now we will start coding. Let’s start with the classic “hello world”. Simply copy the below code and paste it in the Arduino IDE.
Code
void setup() {
  Serial.begin(9600); // initializes the serial port with a baud rate of 9600
}
void loop() {
  Serial.println("hello, world"); // prints a string to a serial port
  delay(1000); //delay of 1 second
}
Code Explained
Basically what this code does is, it will print hello world every 1 second. Here if we look closely, the code has 2 functions. Void Setup and Void Loop.
Setup – Use it to initialize variables, pin modes, start using libraries, etc. The setup() function will only run once, after each powerup or reset of the Arduino board.
In our case, it will initialize the serial port of Arduino and facilitates transfer of data between the USB port and the Arduino board.
Loop – The loop() function does exactly what its name suggests, and loops consecutively, allowing your program to do something, change, and respond. We can Use it to actively control the Arduino board.
Code Summary
So, in our code, when the board is powered up, first, the setup function is executed which will initialize the serial port and then the loop function which will print “Hello world” every 1 seconds.
Code Upload
Now let us upload
Click on Tools -> Board and Select Arduino/Genuino Uno as Board.

Click Tools -> Port -> Arduino Port
Now, press the Verify button(✓) to compile. After the compilation is successful, press the upload button.
Once the upload is complete, open serial monitor. You can see hello world being printed on a new line every 1 second.
Congrats Guys. You have run the first code in your Grove Beginner Kit for Arduino.
In the next lesson, we will start working with the sensors. So stay tuned Guys!