Arduino Time Sensor DS3231 – Real Time Clock Tutorial
Hello guys, today I would like to write about real time sensors – DS3231 sensor and DS1302 sensor. Both these time sensors will work well with Arduino but DS3231 sensor is the most widely used.
In this tutorial, I will show you how you can use the time sensor with Arduino. The thing is quite interesting and useful.
First we will take a look at the the DS1302 sensor. So, the real time clock. This useful thing solves most of the projects that are associated with real time application. For example, watering the dacha at 5 am or turning on and off lights and other electrical devices at a particular time or turning on the heater automatically.
Arduino and DS1302
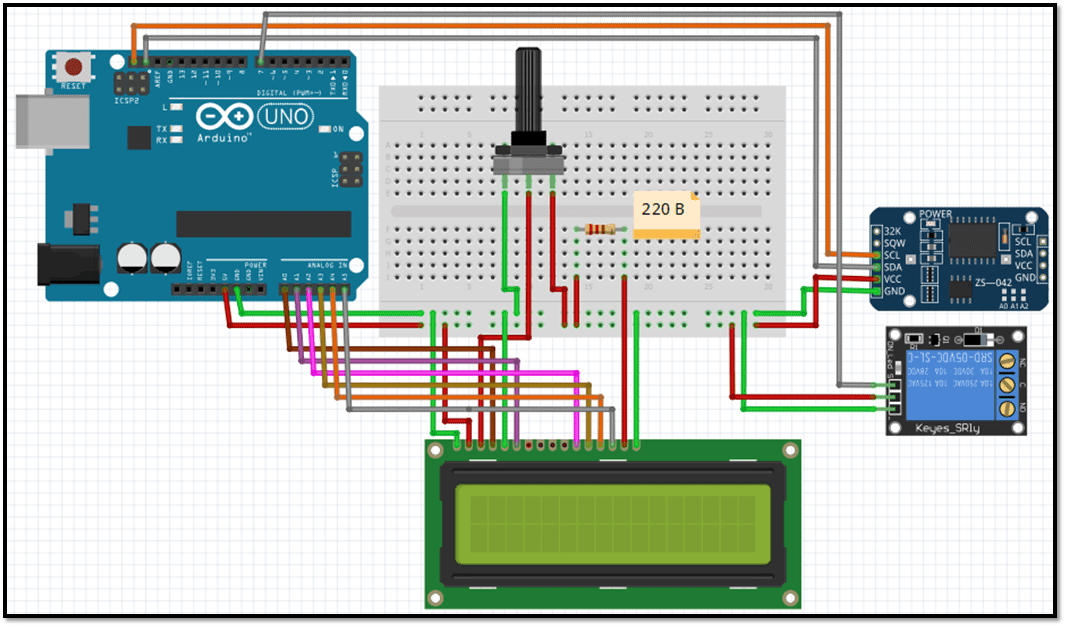
Connection: Connection is made in the application Fritzing
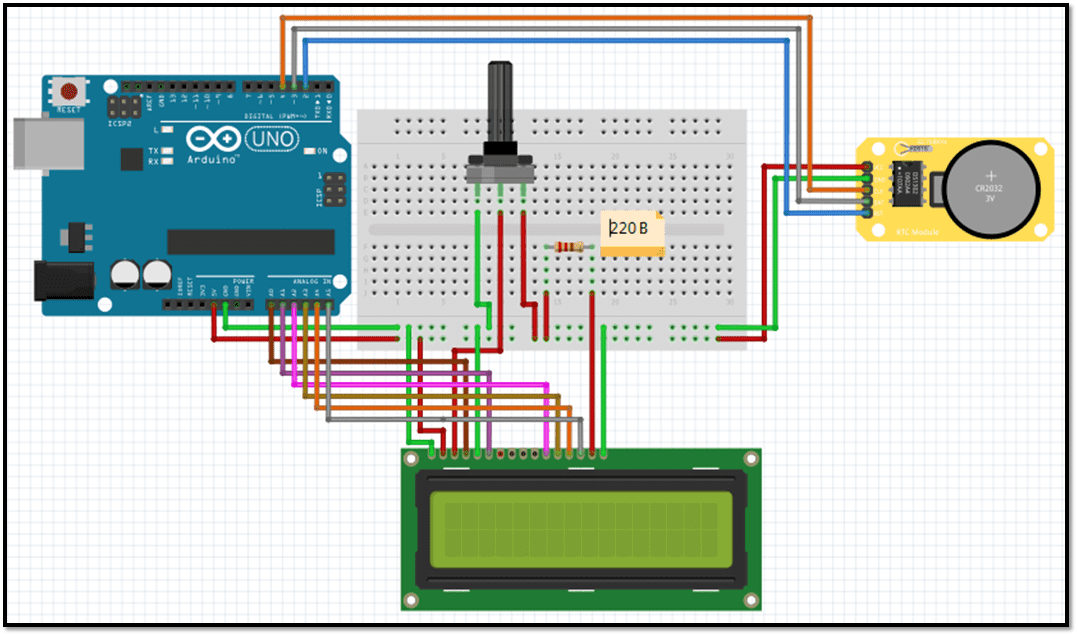
After connecting we need to download a library named DS1302. I’ll give you links to the library, or you can google.[AdSense-A]
After downloading the library, we need to understand that for the beginning time is set manually, then we must necessarily comment this line, so that on the second compilation the time does not change and are preserved. Sketch that sets the time:
#include <DS1302.h>
#include <LiquidCrystal.h>
LiquidCrystal lcd(A0,A1,A2,A3,A4,A5);
int rst1=2;
int dat1=3;
int clk1=4;
DS1302 rtc(rst1,dat1,clk1);
void setup()
{
lcd.begin(16, 2);
rtc.halt(false);
rtc.writeProtect(false);
// rtc.setTime(18, 17, 0);
// rtc.setDate(15, 8, 2018);
}

void loop()
{
lcd.setCursor(4,0);
lcd.print(rtc.getTimeStr());
lcd.setCursor(3,1);
lcd.print(rtc.getDateStr());
delay (1000);
}
Time appears on the screen. After one compilation, we will not forget to comment. But once open and set the time. After the date we can manage the times. for this we must connect the RELAY.
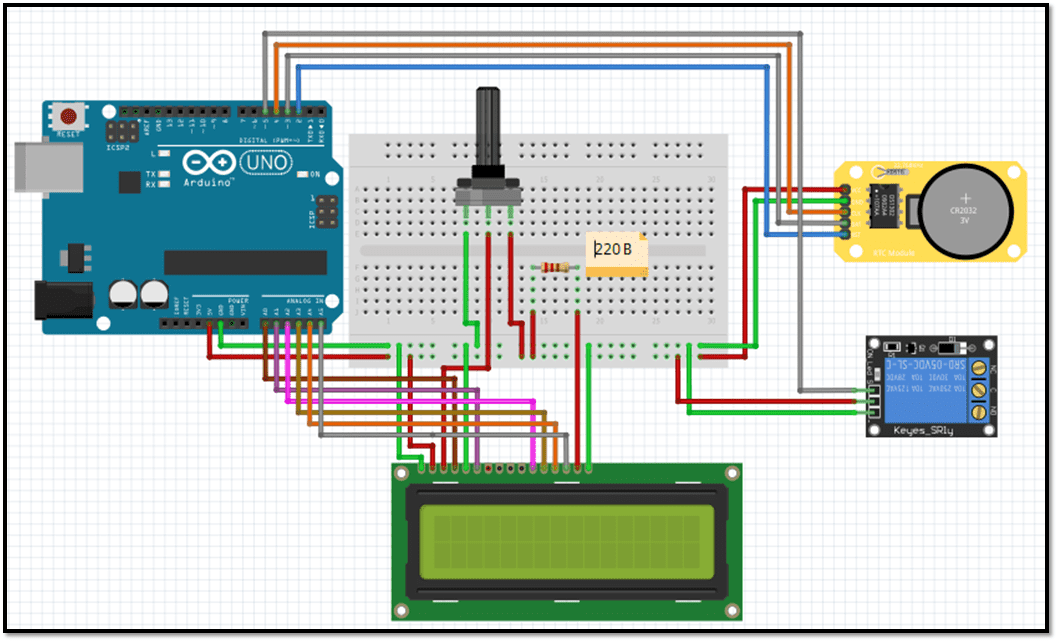
After that we will add hours, minutes, seconds on and off
#include <DS1302.h>
#include <LiquidCrystal.h>
LiquidCrystal lcd(A0,A1,A2,A3,A4,A5);
int svet = 13;
int rst1=2;
int dat1=3;
int clk1=4;
DS1302 rtc(rst1,dat1,clk1);
Time t;
const int OnHour = 18;
const int OnMin = 44;
const int OnSec= 50;
const int OffHour = 18;
const int OffMin = 44;
const int OffSec= 58;
void setup() {
lcd.begin(16, 2);
pinMode(svet, OUTPUT);
digitalWrite(svet, LOW);
}

void loop() {
t = rtc.getTime();
lcd.clear();
lcd.setCursor(4,0);
lcd.print(t.hour);
lcd.setCursor(6,0);
lcd.print(":");
lcd.setCursor(7,0);
lcd.print(t.min);
lcd.setCursor(9,0);
lcd.print(":");
lcd.setCursor(10,0);
lcd.print(t.sec);
// ..........................
lcd.setCursor(3,1);
lcd.print(rtc.getDateStr());
delay (1000);
if(t.hour == OnHour && t.min == OnMin&&t.sec == OnSec){
digitalWrite(svet,HIGH);
Serial.println("svet ON");
}
else if(t.hour == OffHour && t.min == OffMin && t.sec == OffSec){
digitalWrite(svet,LOW);
Serial.println("svet OFF");
}
}
Using DS3231 and Arduino
With sensor DS3231 we work the same way. But the connection and libraries are a little bit different.
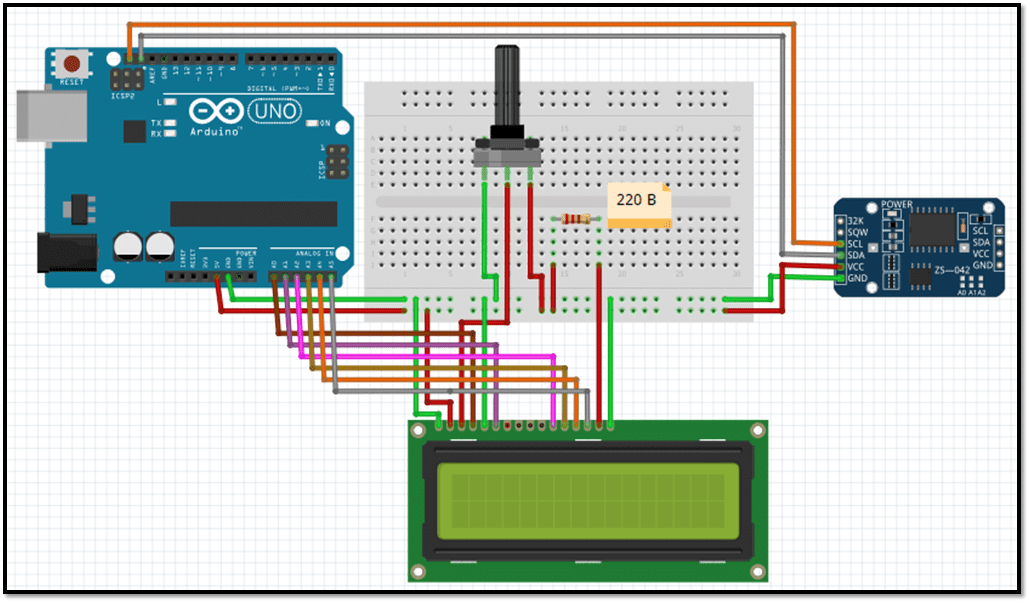
[AdSense-A]In the folder I gave you, there are libraries sketch to send time. There is a change in the connection. You can connect DS3231 to A4, A5 and LSD to a regular pin. Because the DS3231 can be connected so and so. I suggest you to connect to an analog A4, A5, and LSD to any other pin.
#include <DS3231.h>
#include <LiquidCrystal.h>
LiquidCrystal lcd(A0,A1,A2,A3,A4,A5);
DS3231 rtc(SDA, SCL);
void setup()
{
lcd.begin(16, 2);
rtc.begin();
//rtc.setTime(14,33,0);
//rtc.setDate(23,8,2018);
}

void loop(){
lcd.setCursor(3,0);
lcd.print(rtc.getTimeStr());
lcd.setCursor(3,1);
lcd.print(rtc.getDateStr());
delay (1000);
}
After connection it is possible to control the time
#include <DS3231.h>
#include <LiquidCrystal.h>
LiquidCrystal lcd(A0,A1,A2,A3,A4,A5);
DS3231 rtc(SDA, SCL);
Time t;
int OnHour = 18;
int OnMin = 44;
int OnSec= 50;
int OffHour = 18;
int OffMin = 44;
int OffSec= 58;
int Relay = 7;
void setup()
{
pinMode(Relay,OUTPUT);
lcd.begin(16, 2);
rtc.begin();
}

void loop()
{
t = rtc.getTime(); lcd.clear();
lcd.setCursor(4,0); lcd.print(t.hour);
lcd.setCursor(6,0); lcd.print(":");
lcd.setCursor(7,0); lcd.print(t.min);
lcd.setCursor(9,0); lcd.print(":");
lcd.setCursor(10,0); lcd.print(t.sec);
//......................
lcd.setCursor(3,1);
lcd.print(rtc.getDateStr());
delay (1000);
if(t.hour == OnHour && t.min == OnMin&&t.sec == OnSec){
digitalWrite(Relay,HIGH); }
else if(t.hour == OffHour && t.min == OffMin && t.sec == OffSec){
digitalWrite(Relay,LOW); }
}
Learn Arduino the Easy Way
Are you new to Arduino? Do you want to improve your skills in Arduino programming? You are in the right place. We have a complete beginner-level tutorial for Arduino which covers everything from scratch. In this free Arduino Tutorial for Beginners guide, we will be taking a look at Introduction to Arduino platform, getting started with Arduino IDE, different types of Arduino boards, and a lot of DIY projects using Arduino. Check it Out!
Awesome Arduino Projects you DONT WANNA MISS!
Here is a list of the creative Arduino Projects implementing newer sensors and boards, which can be followed easily and are really interesting to implement. Even if you are a beginner and just started learning Arduino-based projects, following these tutorials will be easy. All of the below Arduino-based projects are well-explained step by step, with detailed tutorials on how to get started from scratch.

DigiSpark as HID Keyboard – Complete DigiKeyboard Commands Explained
Building a Home Automation using Arduino and Arduino IOT Cloud | Arduino IOT Projects
We Have the New Arduino UNO R4 Minima | Everything You Need to Know

Let’s Use Arduino To Take Charge Of The Bittle| Petoi Bittle The Arduino Programmable Robot
Hey, guys welcome back. How about making a DIY Arduino robot dog? What if the…

DIY Motion Triggered Halloween Prop using Arduino/Digispark | Halloween Project 2022

Control your Home Devices using Arduino and your Favorite Personal Assistant!
Introduction In the previous video, we build an Alexa-controlled Door Locking System. So many people…
Give me more Awesome Projects!
This project can be really helpful in building time controlled loads. Great Tutorial.